RSS

Tag Archives: Miso

Chicken Miso Stew (Nabe)

(serves 3 to 4)
Miso Stew or Miso Nabe is a winter dish that is popular in Hokkaido. The concentration of protein and carbohydrates in miso and soya milk creates a stew that is hearty and robust, giving it the power to keep the cold at bay. Every region has its own unique way of cooking their miso stew and there is no definitive cooking method or set of ingredients, though the meat is usually fish, pork or chicken. If you’ve never tired a Miso Stew don’t worry, my particular way of cooking Miso Stew is suitable to Western tastes.

Ingredients

  1. Chicken Legs (2, with thigh)
  2. Red Miso (4T)
  3. Carrot (1)
  4. Onion (1)
  5. Mushroom (1.5 cups)
  6. Yam (1)
  7. Garlic (1T, minced)
  8. Mirin
  9. Sake
  10. Soy Sauce
  11. Soya Milk (unsweetened, 3/4 Cup)
  12. Maple Syrup

Preparation (the day before)

  1. Debone the chicken and cut the meat into bite sized chunks. Keep the bones in the freezer for use the next day.
  2. Mix in a large bowl 2T Red Miso, 2T Sake, 1T Mirin and 1T Maple Syrup until you get a paste. Stir in 1T of minced garlic.
  3. Place the chicken meat in the bowl and toss well until each piece is coated with the marinade. Cover the bowl with cling film and keep it in the fridge overnight.

Preparation

  1. Peel a yam and cut it into bit sized chunks. Place the yam pieces on a sheet of aluminium foil and drizzle them with 2T oil and 2T mirin. Wrap the yam up in the foil and place in a toaster oven set at 180oC (360oF) for twenty five minutes.
  2. Put 3T of oil in a large pan (or clay pot) and heat the pan until the oil is searing hot. Keeping the fire on high, pour in the chicken together with all the marinade. Stir fry.
  3. When the chicken begins to shrink, add 3/4 cup of soy milk and 3/4 of water. After a quick stir, pick out the chicken pieces and set them aside on a plate.
  4. When the contents of the pan come to a boil again, put the chicken bones in the pan, as well as 1T sugar, 1T Soy Sauce and 2T of Red Miso. Turn the fire down to bring the liquid in the pan to a low simmer.
  5. Peel a carrot and slice it into 1/8 inch thick oval pieces. Put the carrot slices in the pan.
  6. Peel an onion and cut it into 6 equal wedges. Place the onion in the pan. Cover the pan and simmer for about 15 minutes.
  7. Cut your mushrooms into appropriate size if you have chosen to use a big variety. I used Shimeji in the picture above and used them whole.
  8. When the carrot is no longer crunchy, add the mushrooms, chicken and yam to the pan. Cover and simmer for a further five minutes. Remove the chicken bones before serving.

Notes

  • You’ll notice I specified Red Miso above. You can also use Hatcho Miso, but preferable not any of the white, yellow or golden varieties of Miso, for the unique flavour of miso dissipates into plain saltiness with cooking. For more information on Miso, you can refer to this post about Miso.
  • Nabe (pronounced nar-bay) is not the Japanese word for stew. It refers to a shared hot pot, sort of like a fondue using soup.
  • If don’t have any unsweetened soya milk, you can use plain milk instead. 
  • The reason you put in the carrots before the onion is carrot takes longer to soften. Don’t reverse the order of steps 5 and 6.  
  • One key element of this recipe is cooking the yam and chicken separately from the stew. Both chicken and yam taste better when cooked at high temperatures. You can of course choose to just boil everything in the stew, but the result will not be as good. 
  • Miso stew is best eaten with steamed rice as a staple, although you can use another type of staple, like noodles or bread. This stew is not meant to be eaten on its own.
  • Instead of putting the bones in the freezer, you could also keep them in the bowl with the marinated chicken if it is big enough. A third option would be to boil the bones to create 3/4 cup of stock which you then put in the fridge. 


Tags: , , , , , ,

Miso-Cured Black Cod

(serves 2)
Miso-Cured Black Cod, also known as Gindara Saikyo Yaki, started out as a way to preserve fish in Japan, but has since become the default method of cooking Alaskan Black Cod. The curing process cuts through the fattiness of the black cod, and results in a decadent smokey and buttery flavour that makes Gindara appreciated by one and all, young and old. Of all the ways of preparing fish in Japan, this is perhaps the one that is most suited to Western palates.

Ingredients

  1. Alaskan Black Cod (500g)
  2. White Miso
  3. Mirin
  4. Sake
  5. Minced Garlic
  6. Cooked White Rice
  7. Mayonnaise
  8. Salt

Preparation

  1. Make a solution using 2 cups of water with 1T of salt and 1t of sugar. Brine 500g of black cod in the solution for 20 minutes.
  2. After rinsing the cod, wrap each piece in some paper kitchen towel and squeeze gently over the sink. Wrap the fish with fresh pieces of kitchen towel to soak up any remaining water. Leave the fish to fully dry on a metal rack for half an hour or so.
  3. Mix 2 heaped T of white miso (40g) with 3T Mirin and 2T sake in a bowl until you arrive at a paste. Stir in 1t of minced garlic.
  4. Slather the marinade onto the fish and then place the fish into a zip lock bag. Seal the bag with minimal air and then proceed to move the fish pieces around inside the bag. This will ensure the miso mixture comes into contact with every surface of the fish.
  5. Cure the fish in the fridge, for 2 days if you desire a milder flavour, and up to a week for a more intense miso infusion.  
  6. When you are ready to cook your black cod, allow the fish to warm to near ambient temperature.
  7. Use a few T of oil to wash the curing marinade off the fish. Miso chars easily, so you should be thorough.
  8. Arrange the fish on a baking tray with the skin side facing up and place the tray in a toaster oven preheated to 180oC (360oF) for twenty minutes.
  9. Traditionally miso-cured black cod is served fish white steamed rice, a generous dollop of mayonnaise and a few slices of pickled ginger.

Notes

  • Alaskan Black Cod is also called sablefish. It is technically not actually a member of the cod family, so do not substitute another type of cod. You can however cure other kinds of large oily fish with the same method. Swordfish for example would be a good alternative.    
  • Brining and removing the excess water are essential as they prevent a fishy odour from developing. You are after all leaving the fish raw for several days in the fridge. Other recipes typically get you to sprinkle salt over the fish, but I find brining to be more effective, and less salty.
  • Oily fish take to freezing much better than white fish, so there is no need to use fresh fish, especially if you follow steps 1 & 2.
  • If you are using steak cuts (as pictured) a good idea would be to roll the fish pieces onto their side for the final 5 minutes of baking, then plate with the bottom side up. This gives the fish a good finish.
  • If you are using a full oven, you can reduce the cooking time to fifteen minutes as a large oven does not lose much heat compared to a toaster oven when you put the fish in.
  • You must use only white miso. It is milder and sweeter. Outside of Japan it’s probably the last type of miso you would have around at home, so if you are tempted to try this with red or yellow miso, don’t. YIt won’t end well. Even if you do use white miso it will still tend to be a bit on the salty side, it is cured fish after all. You thus have to serve it with a very plain unsalted staple, like rice.
  • Miso-cured Black Cod is also great for BBQs. Just wrap individual pieces in foil and broil them over the barbie. 
 
Leave a comment

Posted by on August 10, 2020 in Japanese, Main Courses, Seafood


Tags: , , , ,

Miso-Cured Chicken Wings

(makes 2 dozen wings)
Chicken wings are a party staple and a favourite among children, and the unique blend of Miso and honey will make your wings all the more popular. I have yet to meet a person who didn’t like my Miso-cured wings. The vast majority of Miso-flavoured wing recipes make you cook the wings twice, the second time after painting on a miso glaze. My method does away with this troublesome glazing procedure and cooks the wings in one go. Furthermore, curing allows the flavour of miso to penetrates all the way into the meat. 

Ingredients

  1. Mid-joint Chicken Wings (1 kilo)
  2. Red Miso
  3. Mirin
  4. Honey
  5. Turmeric
  6. Tahini
  7. Sesame Oil
  8. Soya Sauce
  9. Liquid Smoke (optional)

If you are unfamiliar with Miso, refer to this page. Similarly for information on Mirin, refer to this page.

Preparation

  1. You need to begin the day before. Defrost and rinse your wings.
  2. Leave the wings to drain in a colander or strainer for at least 5 minutes.
  3. Arrange the wings on half of a large dish cloth. Fold the empty portion over and press down gently to dry the wings as best you can. Unfold and allow the chicken to dry further while you make the marinade. You can place a sheet of paper towel between the chicken and the cloth to make the cloth easier to wash, but don’t try using paper towels alone or you end up using half a roll.
             
  4. In a ceramic bowl mix the following: 2T red miso, 2T honey, 1T mirin, 1T tahini, 1T sesame oil, 1t soya sauce and 1t turmeric. You can also add 1t of liquid smoke if that is your preference. (nb. the T’s for the pastes are heaped ones)
  5. As many of these ingredients are from the fridge you will need to microwave the mixture for about 15 seconds before they will can mix well. Alternatively, put the bowl in a larger bowl of hot water for a while. Stir and mash down with the bottom of a table spoon until all the lumps are gone and you end up with a smooth paste.
  6. Place the wings in a gallon zip lock and add the marinade. Squeeze out most of the air and then massage the bag and roll it around to get the marinade evenly over all the wings.
  7. Place the bag flat in the fridge overnight. Some water will be drawn out from the wings making the marinade a bit more watery, that is normal. Flip the bag over once every 6 hours or so to ensure the curing is even.
  8. The next day the wings will be cured. Arrange them on a wire rack in a tray(s) and allow the wings to warm to room temperature. The wings should not be touching each other. Don’t leave any splotches of marinade on the wings as these will become black patches of burnt skin as the excess sugar carbonizes in the oven.
  9. Preheat your oven to 180oC (350oF). Place the tray(s) in the oven for 20 minutes. The time may vary a bit from oven to oven, so decide when the wings are ready by visual inspection.

Notes

  • The issue with most marinades is they are too watery and they drip off when they heat up in the oven, hence the need to paint on a layer of glaze at the end. That’s why this recipe emphasizes keeping the wings dry, so do not skip steps for 2 and 3. The tahini and turmeric play an important role in keeping the marinade thick so do not substitute them for something else. Also do not add any additional liquid to the marinade.
  • You can also use a toaster oven. Set it to 200oC (390oF) and bake each batch for 25 minutes – the toaster oven is weaker than a regular oven, but can do the job – 8 wings at a time as shown in the photo.
  • You can also skewer the wings and cook them over a BBQ.
  • You can also use white miso, but you will need 3T instead of 2T as it is less salty. The white miso version is milder and sweeter. I typically use 2T white and 1T red when I make my wings.


Tags: , , , , , ,

Oven-Steamed Salmon in Miso

(serves 2)
Here we have a simple no fuss way to cook salmon by wrapping it in foil and steaming it in its own juices in the oven. Miso with its strong distinct flavor is one of the best ways to marinate meats which don’t absorb flavor easily, such as fish. Steaming is one of the best ways to cook salmon fillets as you don’t need to overcook the outside to ensure the middle is done. Put the two together and you have the trappings of a great salmon recipe. This recipe is also great for BBQ and toaster oven friendly as well.  
 

Ingredients Miso Salmon

  1. Salmon (Belly Fillet, 400g)
  2. Coriander (chopped, 1 cup)
  3. Miso
  4. Minced Garlic
  5. Sesame Oil (1/4 cup)
  6. Honey
  7. Cointreau

Preparation 

  1. Rinse and pat your salmon fillet dry with a kitchen towel. We want the belly cut (the type without a bone in the middle).
  2. Prepare 1 cup of chopped coriander. I usually just hold a bunch in hand and snip away with scissors from the top. We only want the leafy portion.
  3. Mix 1T of miso, 1T minced garlic, 1T Honey, 1T Cointreau and 1/2 t pepper with 1/4 cup sesame oil. When the mixture is even, mix in the chopped coriander.
  4. Place a large piece of foil on a plate. You can see from the photo it is the same plate the salmon is served on later. Spoon one third of the miso coriander mixture onto the foil as a base for your salmon.Salmon B4 After
  5. Position the salmon on the base. If you look carefully at the right side of the upper picture (you can click on photo to zoom in), I cut off the thinner tip of the fillet and stacked it back on in a way to make the thickness of the salmon even, like a brick.
  6. Spoon on the rest of the marinade, making sure some of the coriander adheres to the side. Wrap up the foil by rolling the long edges of the foil together, then crumpling in the two ends.
  7. Place the foil parcel in the fridge. You can cure the salmon overnight if you wish. The minimum curing time is 2 hours in the fridge plus one hour to warm up to room temperature.
  8. Preheat your oven to 180oC (350oF). Put the foil parcel in and turn the temperature down to 150oC (300oF). Bake for 8 minutes, 9 if you insist on having your salmon 100% cooked.
  9. Allow the parcel to rest for a further 5 min once removed from the oven. Then cut open and serve.

Notes

  • One of the purposes of  the coriander is to allow the marinade to adhere to the salmon instead of pooling at the bottom of the foil parcel. If you don’t like coriander, you will need to replace it with Italian parsley or something similar instead of just skipping it altogether.
  • For more information on Miso, refer to this page
  • If you are into steamed fish, have a look at my Cantonese style Steamed Snapper which uses the pan method.
 

Tags: , , , , , ,

Japanese Wafu-Style Orzo

(serves 3)
How does one cook a light pasta that still tastes good? For the answer we have to look not to Italy, but to the Far East where the Japanese have developed Wafu Cuisine, a style incorporating the best of Japanese and Western cooking. Miraculously, my Wafu Pasta recipe is not based on cream, cheese or oil, yet it’s still delicious and satiating. You will find this Italy meets Japan recipe great for the formal dinner table but also perfect for those times when you just want to have dinner on the sofa.      
 

Ingredients Wafu Orzo

  1. Scallops (12=200g)
  2. Shaved Ham (100g)
  3. Mushrooms (100g)
  4. Corn (1 ear)
  5. Scallion (4 sprigs)
  6. Orzo a.k.a. Risoni (200g)
  7. Miso
  8. Butter
  9. Sesame Oil
  10. Sherry

Preparation 

  1. Slice each scallop into 3 discs. Marinate them in a mixture of 1T of sesame oil and a flat 0.5t of salt.
  2. Cut the mushrooms into thin slices. Any kind of brown or white mushrooms will do. If they are large, cut them in half before slicing.
  3. Julienne the bottom 1/4 (white) of the scallion into one bowl and the second 1/4 (green) into a separate bowl. Discard the remaining tips.
  4. Cut the ham into small pieces. Brine soaked pre-sliced ham, the type that is sold for sandwiches, has the texture best suited for the Wafu style.
  5. Shave the corn kernels into a bowl. Retail the cob.
  6. Fry the white scallion bits with1T of sesame oil in a pan. When the scallion begins to brown, add the shaved ham. Continue to stir fry for a minute. Mix 1 heaped t of miso with 1T sherry and add this to the pan followed by 1 cup of water. You now have a ham and scallion miso soup base.
  7. While the mixture is simmering, rinse 200g or orzo in boiling water and then add the orzo to the pan, followed by the corn kernels and mushroom. Scrape the cob with the back of a knife blade over the pan. Leave uncovered on a low simmer.
  8. In the meanwhile melt a large knob of butter in a second pan over high heat. When the butter browns add the scallops. Stir fry for thirty seconds and then turn off the heat. Immediately add a second large knob of butter to cool the pan.
  9. When the liquid in the first pan thickens, test the texture of the orzo. If it is still hard, add 1/4 cup of hot water and continue simmering. Repeat until the orzo is just right, then pour the scallops and butter into the pan and mix well.
  10. Spoon the orzo into your serving dishes. Dust with black pepper and garnish with the green scallion bits.

Notes

  • I suppose I should start off by explaining what the Japanese Wafu-style is. It translates as ‘Winds in Harmony’ and refers to the way the Japanese prepare Western dishes to suit local tastes. Its a style of cooking that developed gradually after WWII and has now become immensely popular in family restaurants in Japan. You could go as far as to say it is a type of fusion cuisine. Salad dressing containing soya sauce, yozu or sesame oil and mayonnaise containing wasabi are both examples of Wafu.   
  • One important aspect of Wafu cooking is it tends to be balanced with delicate flavours. If you want to stay true to the Wafu style, stay away from strong tasting ingredients like garlic, olive oil, bacon, blue cheese. A little cream is ok, but not too much. 
  • This is quite a flexible recipe and you can substitute a number of ingredients to create many different varieties of the pasta. You could for example swap the corn for baby asparagus (you might want to add a bit of sugar though), the shaved ham for smoked turkey or the scallop for clams.
  • The prime flavour for the sauce is Miso. For more information on Miso, refer to this page
 

Tags: , , , , , , , ,

Miso Glazed Chicken Breast

(serves 2)
This is a great recipe that turns something healthy but boring like chicken breasts into something exciting and exotic. Miso with honey is great as a glaze and it also lets you stick on a layer of sesame seeds to provide that crispy crunch. Together they compensate for chicken breasts’ lack of skin. The recipe also comes with its own side dish which provides something wet to go with each mouthful of chicken.     
 

Ingredients Miso Glazed Chicken

  1. Chicken Breast (2 large halves)
  2. Potato (1 large)
  3. Onion (1)
  4. Garlic (2 cloves)
  5. Miso
  6. White Sesame Seeds
  7. Sesame Oil
  8. Mustard
  9. Brandy
  10. Chicken Stock Cube

Preparation 

  1. Brine 2 large chicken breast halves for. For information on brining chicken, refer to this page.
  2. Make a marinade out of 1T sesame oil, 2t miso, 1t honey and 1t brandy.
  3. Flush the brined breasts with water and marinate them in the marinade.
  4. Dissolve a chicken stock cube into 1 cup of hot water.
  5. Cut an onion into half rings and a large potato into 1/3 inch cubes. Pan fry the onion and potatoes in a few T of vegetable oil on low heat until the onion begins to get translucent.
  6. Add the chicken stock to the pan together with 2t of crushed garlic,1t mustard and 0.5t of sugar. Continue to simmer on low until the pan is almost but not quite dry and drizzle on 1T of sesame oil, then turn off the fire.
  7. The simmering will take some time so in the meanwhile, preheat the oven to 180oC (350oF)
  8. Grease a baking tray and position the chicken breasts in the centre of the tray. Spoon some left over marinade onto the chicken, carefully making sure none drips onto the tray. Sprinkle on 4T of white sesame seeds. Spoon a second round of marinade onto the chicken. Add any left over marinade into the simmering pan.
  9. Place the chicken in the oven for 13 minutes. If your chicken breasts are big, increase the cooking time by a further 2 minutes. In any case, when you notice that the chicken is beginning to shrink, remove it from the oven immediately.
  10. Serve the chicken breast using the onion and potatoes as a bed. Pour any drippings onto the plate as well, but not over the chicken.

Notes

  • The beauty here is that the miso marinade allows the sesame seeds to stick to the chicken while the sesame seeds allow a second round of marinade to go onto the chicken.
  • You can also cook this in a toaster oven. Its less powerful so you should cook the chicken breasts for 10 minutes at 150oC followed by another 10 min at 200oC. 
  • For information on Miso, refer to this page.
  • I cooked the carrots in the picture separately, so that’s why there is no mention of carrots in the recipe.
 
2 Comments

Posted by on December 14, 2014 in A Kobi Original, Japanese, Main Courses, Poultry, Recipe


Tags: , , , ,

Spaghetti with Seafood in Miso Cream Sauce

(serves 3 full portions)
Spaghetti in Miso Cream is quite the quintessential Japanese pasta and is on the menu in family restaurant chains all over Japan. You will find the fusion-style dish a refreshing adaptation of the more traditional pasta sauces. This recipe is a special version of the dish with crustacean flavour infused into the miso cream. To accompany the pasta, I have used soft tender scallop slices and lightly cooked morsels of prawn.    
 

Ingredients Miso Pasta

  1. Scallops (8=150g)
  2. Large prawns (4=300g)
  3. Miso
  4. Crushed Garlic (4t)
  5. Sesame Oil (1/3 cup)
  6. Cream (100ml)
  7. Spaghetti (300g)
  8. Shredded Nori (Dried Seaweed)
  9. Coriander Seed Powder
  10. Honey
  11. Cognac

Preparation 

  1. Mix 4T of sesame oil with 0.5t salt, 1t coriander seed powder.
  2. Cut the heads off the prawns and stir fry the heads in a pot with a few dashes of oil and 2t of crushed garlic. Use a low flame and when the garlic begins to brown add 1.5 cups of water. Cut the heads up with a pair of scissors while they are in the pot and leave to simmer. You should end up with a rich red broth.
  3. Slice each scallop into 3 round slices.
  4. Shell and devein the prawns. Slice the prawns lengthwise into 2 and then into small pieces.
  5. Marinate both the scallop and prawn pieces with the salted sesame oil but in separate bowls.
  6. Mix together 2 heaped t of miso with 2t of crushed garlic. Fry this mixture in a pan with 3T of oil on low heat. After a minute, add 3T cognac and 1t honey.
  7. Slowly pour in 100 ml of cream and mash the miso till you get a nice even emulsion with no lumps. Pour in the prawn head stock through a strainer. Simmer down till you get a nice sauce and remove from heat.
  8. Put 300g of spaghetti into the pot of boiling water with 1t salt and a dash of oil.
  9. Reheat the sauce and when it is boiling add the prawn meat. When the prawn meat has curled, add the scallop slices and immediately turn off the fire. Mix well to make sure no scallop slices are stuck together and leave for a minute.
  10. By this time the pasta should be al dente. Strain and plate the spaghetti, and pour the sauce over it.
  11. Garnish with black pepper, some Nori and serve.

NotesPrawn Stock

  • If you want to go the extra mile, add Uni (raw sea urchin) together with the scallops into the pan in step 9. It is the Japanese equivalent of adding truffle shavings to a pasta.
  • The stock will not be red (see photo) or have a rich taste if you use small prawns or shrimp. The prawns have to be large, i.e. 4 per 300g. 
  • Most of the greyish stuff in the ‘spine’ of the prawn is roe. When deveining the prawn, you really only want to find and pull out the alimentary canal. 
  • You’ll notice I did not mention olive oil. The taste of miso is quite distinctive and will clash with the hint of olives. You’ll do better with a milder vegetable oil.
  • Reduce the amount of cream by half if you want a very light sauce.
  • For more information on Miso, refer to this page
 

Tags: , , , , , , ,

Types of Ramen, Styles of Ramen

Types of Ramen: The Perfect Ramen
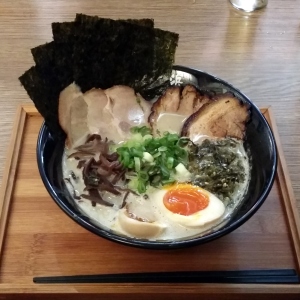
Ramen is a noodle in soup dish which originally made its way from China into Japan when the country reopened its borders during the Meiji Restoration. The dish was refined and improved to such an extent over the past century that it has all but overshadowed its original Chinese cousins on the world stage. The world of Ramen is pretty complicated and this post will systematically categorize the different styles of Ramen that are common in Japan along with their various soup flavours, broth types, accompanying meats and toppings. It doesn’t teach you how to cook Ramen, but you’ll know how to order different types of Ramen at a restaurant or recognize the various types at the supermarket.

The word ‘Ra’ means pulled (into) while ‘Men’ means noodles. That’s how the noodles were made in the old days, a single lump of dough was manually stretched and folded in half dozens of times til it formed a bunch of thin noodles. The noodles are machine made today but the dough is still made from the same basic ingredients: flour, salt, normal water and an alkaline mineral water called kansui. It is the kansui which give Ramen noodles their unique bounce and taste and it also makes them yellow even though they contain no egg. As raw ramen noodles are alkaline and have some flour dusted on them, they have to be boiled separately from the soup. If you would like to try making your own ramen noodles from spaghetti I have a recipe here.

Ramen noodles come in many different varieties but they essentially belong to one of two types, low or high alkaline. The low alkaline noodles are thin and straight. They have a stronger taste of wheat, and have a heavier texture. They also tend to get soggy faster. The high alkaline variety are a brighter yellow colour, have a lighter feel and are more springy. They also add a layer of flavour as they have a taste of their own. Wavy ramen and thick ramen noodles belong to this second category. 

There is lots of debate over which type of noodles go best with which kind of soup and many say thin soups should go with the thin noodles cause they have higher surface area etc. , but you needn’t worry too much about this, the Ramen shop will typically pair the noodles with the soup for you and you rarely get to choose. There is a tradition in some shops to allow you to add extra noodles halfway while eating (called kaedama) but I recommend against this as the soup is not really hot enough by this time. Some others allow you to add rice to the left over soup, this I think is the better idea. 

Broths Ramen
Basic ramen broth does not have too many ingredients. It is usually made from pork bones, chicken bones or a combination of the two. In certain recipes dashi, which is a consommé made from Bonito(dried salted tuna) flakes or Niboshi(dried salted anchovy) is simmered with Konbu(a kind of kelp) and blended into the meat broth to create a purer clear broth. Fresh seafood may be used occasionally in certain regional varieties, but usually not beef and probably never mutton.

Flavour Types
For Ramen, broth and flavour are distinct and separate. This is one of the unique things about Ramen. Think of it as: broth + flavouring = soup.  A Ramen is usually defined by its flavour which affects its final taste. There are 4 primary types of Ramen soup flavours: Shio, Shoyu, Miso and Tonkotsu.

  • Shio (She-Oh)
    means salt and this is traditionally the way Ramen soup is flavoured. All Western broths would be considered of the Shio type. The salt doesn’t affect the appearance of the broth and therefore Shio soup tends to light coloured and clear. Shio flavoured soup will tend to be a tad saltier than the other types.
  • Shoyu (Show-You)
    means soy sauce and this is next oldest flavour type. Instead of salt, a sauce made by fermenting soya beans is used to make the broth salty. This sauce is not your regular table soya sauce, but typically a special sauce with additional ingredients made according to a secret recipe. The broth for Shoyu is the only type that tends not to contain pork. Shoyu soup is also usually clear, but is dark coloured and sweeter than Shio soup.
  • Miso (Me-So)
    In more recent times, Miso paste has also been used to give Ramen broth its savoury taste. If Miso is used, it is immediately obvious as the soup will be opaque. Shio or Shoyu  flavoured soups merely accent the flavour of underlying broth, while miso leaves a fuller complex taste in the mouth since it also has a strong taste of its own.
  • Tonkotsu (Tong-Coats-Zoo)
    is technically not a true flavour since it is contains either salt or soy sauce. It is made from boiling ground up pork bones (ton=pig, kotsu = bones) for 12-15 hours till all the collagen has dissolved into the stock as gelatine (details here). The result is a rich whitish soup that is distinct enough to consider Tonkotsu as a separate fourth flavour of Ramen. To be clear, the use of pork bones does not automatically mean the soup is of the Tonkotsu type. If the pork bones are boiled whole for a relatively shorter period, the result is just regular pork broth.

Meat IngredientsRamen Components
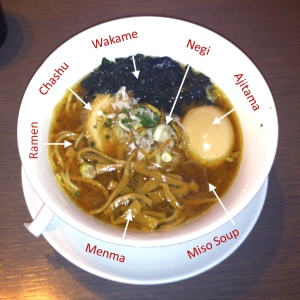
The most common type of meat served in Ramen is Chashu which is another type of food borrowed from China and subsequently modified over decades. It is basically a pork belly tied into a cylinder, braised and then served in slices. What the pork is braised in differs from recipe to recipe but general ingredients include soya sauce, sake, mirin and sugar. In my humble opinion, the Chashu is the hardest part to get right in a Ramen. Chashu often goes hand in hand with Shoyu Ramen since the braising liquid can form part of the ‘shoyu’. Sometimes the pork belly is braised in its original shape but also sliced. You can refer to my own oven braised Chashu recipe here.

Another item that one finds in their Ramen more often than not is Ajitama, a soya sauce seasoned boiled egg with its yolk still runny. The Chashu braising liquid also comes in handy when seasoning these eggs. Ramen can also be served with fresh seafood, Kamaboko(a bouncy fish cake with a characteristic pink swirl) or with no meat at all. Unlike for soba or udon soup noodles, slices of beef are rarely served with Ramen, although new age Wagyu Ramen has been making an appearance lately.

Toppings and Condiments
Whilst the number of possible ingredients used for Ramen broth is quite limited, a large variety of ingredients are used as toppings to differentiate one Ramen from another. The more common toppings include Nori (a type of seaweed paper), Wakame (a type of rehydrated seaweed), Menma (preserved bamboo shoots), Negi (scallion), Kikurage (black fungus), juliened leek, sesame seeds, fried garlic and pickled plum/ginger.  A lot of Ramen shops will also top off with a proprietary spicy sauce or a ball of spicy miso to give a kick to the soup. This way customers can chose how spicy they have their Ramen is.

Regional Styles
The way Ramen is cooked has more or less evolved over the past century along geographical lines. Tonkotsu is the primary flavour of Kyushu Island in the South while Miso is generally associated with Hokkaido Island in the North. The central island of Honshu is home to the Shoyu flavour. Even within these demarcations, local variations have sprung up and are known by their city or prefecture of origin. Many of these variations feature local produce that is famous nationally. The following is a list of the main varieties (that I have come across anyway) of Ramen.

Tokyo Ramen

Tokyo style Shoyu Ramen

  • Tokyo style Ramen
    Tokyo style Ramen is the archetypical Shoyu flavoured Ramen. Many Ramen stalls originally served soba in a dashi soup and when the use of Shoyu was introduced, the practice of using dashi was retained. Today chicken stock and shoyu is mixed with dashi to produce the unique Tokyo style Ramen. Tokyo Ramen is usually served with Chashu, Kamaboko, half an Egg, and is topped with chopped leek and preserved bamboo shoots. In Yokohama, the port of Tokyo, pork is used instead of chicken for the broth resulting in the iekei sub-variation.
  • Asahikawa style Ramen
    This is a less well know shoyu type Ramen that is distinguished by its use of a combination of dried fish and pork to boil the stock, to moderate the porky-ness of the stock. Like all Ramen from Hokkaido it is designed with cold weather in mind, and in this case it means the use of rendered pork lard to create an oily stock.  The choice of soy sauce as the flavour stems from the fact that in WW2 alcohol was discouraged and the local brewery had to switch to producing soy sauce. Asahikawa Ramen uses roughly the same toppings as shoyu ramen from Tokyo (see above).
  • Champon from Nagasaki
    Champon is a specialty of Nagasaki which was invented by a Chinese cook as a Meiji era equivalent of affordable fast food, for the Chinese students who were studying there. It is the most Chinois of all Ramen and today Champon is served at every restaurant in Nagasaki’s Chinatown  The home of Champon is said to be the famous Shikairo in Nagasaki. Champon is practically the only ramen from Kyushu which does not use a Tonkotsu soup. Unlike all other ramen, Champon uses special noodles that are cooked in the soup itself. This ramen is served with a stir fried mix of pork, seafood and cabbage.
  • Hakodate style Ramen
    As all ramen was originally Shio flavoured, Shio ramen wasn’t invented in any particular place. However, when one mentions Shio ramen, a bowl of Hakodate style Ramen comes to mind immediately. Hakodate is where the tradition of making ramen soup flavoured with salt has remained unchanged even as new flavours and styles were introduced all over Japan. Hakodate style ramen is usually made with a chicken broth that is skimmed frequently, resulting in a light golden coloured soup. Very often Hakodate Ramen comes with chicken meatballs.
  • Hakata style Ramen
    Tonkotsu type ramen originated on the warmer Southern island of Kyushu where most of Japan’s pig farming is done. Hakata is a district in Fukuoka City, the biggest city on Kyushu and the style of ramen from there is universally recognized as the standard version of tonkotsu. Hakata Ramen is usually topped with Chashu, egg, scallion, sesame seeds and pickled ginger.
  • Kurume style Ramen
    A close cousin of Hakata Ramen is Kurume(Koo-Roo-Mare) Ramen. This is thought of as the original way Tonkotsu was made before it was modernized into the Hakata style. Its soup is similar but even richer in pork taste (from adding pig’s head, trotters etc. to the broth). The noodles of this variety come topped with fried pig lard bits and dried seaweed.
  • Kumamoto style Ramen
    Kumamoto prefecture is in the middle of Kyushu and its style of ramen is yet another variation of the Tonkotsu type. It is served with stewed pork belly, and a generous amount of fried garlic together with the oil the garlic was fried in. Toppings include pickled ginger and julienned leek.
  • Kagoshima style Ramen
    Kagoshima is a port at the Southern tip of Kyush. Here the soup is lighter as it is made from a mixture of pork tonkotsu and clear chicken broth. Kagoshima is home to Kurobuta pork, which makes their chashu all the more delicious. Other types of noodles, similar to those from ‘nearby’ Okinawa or Taiwan are sometimes served in place of regular ramen noodles.
  • Kitakata style Ramen
    This style of Ramen has a unique shoyu flavoured soup made from pork broth mixed with dashi made from dried anchovies. It hails from the city of Kitakata in Northern Honshu which purportedly has the highest concentration of Ramen shops in the world. Kitakata style Ramen features flat noodles and is typically served with sliced pork belly, leek and fish cake.
  • Sapporo style Ramen 

    The Sapporo Ramen Story

    The city of Sapporo is in the Northern Island of Hokkaido and it is the bastion of Miso flavoured Ramen. The first use of miso in Ramen soup was by chef Omiya of Aji no Sanpei (the shop is still operating today) in Sapporo in 1954. Chicken or pork bones are used for the broth and when combined with red Miso paste makes for a rich soup, perfect for the cold weather up North. Traditionally, vegetables and minced pork are stir fried in a wok with miso, and the broth is added as a final step. Hokkaido is home to the big vegetable and dairy farms of Japan as well as several fishing ports. Today the inclusion of the top natural produce of Hokkaido in the toppings (butter, corn, leek, roasted scallops) and soup (seafood) in Sapporo style Ramen has become common practice.

    Wakayama Ramen

    Wakayama Ramen with Pork Ribs

  • Tokushima / Wakayama style Ramen
    Tokushima style Ramen is the most popular style of Ramen on Shikoku Island, the smallest of the 4 main islands. It uses a combination tonkutsu-shoyu soup which is deep brown in colour. This ramen is served with a raw egg instead of an almost-cooked one. The other special thing is it is served with baraniku, a kind of stewed pork rib. A sub-variation of the Tokushima style is Wakayama style Ramen. Wakayama is on the main island of Honshu, just across the inland sea from Tokushima which is probably why Wakayama Ramen can be described as a Tokyo style Ramen served in Tokushima soup. For instance it will be served with a boiled runny-yolk egg instead of a raw one.
Ebi Ramen

Prawn Ramen

Special Ramen Soups
This next category covers some of those Ramen that are served in non-traditional soups and thus don’t fall under any of the regional styles above. One popular variety is the Ebi Ramen, where a meat stock is fortified with prawn heads, giving it it’s characteristic reddish hue. This prawn soup is unlike any other kind of ramen soup you have ever tasted. Besides the standard condiments Ebi Ramen is also topped off with some unusual ones like deep-fried shallots and sakura shrimp. One famous shop known for this type of Ramen is EbiKin; it is located just outside the (old, not sure if the market has moved yet) Tsukiji Fish Market in Tokyo. If you would like to try making this style of ramen, I have a recipe here.

Chicken Ramen

Torikotsu Ramen

The other type of nouveau ramen I really like is Torikotsu Ramen. The stock of this type of ramen is made in a way similar to Tonkotsu but using chicken instead. After a long boiling time the resulting soup is similarly milky, heavy with gelatine and strong in meat flavour. This distinguishes it from the Hakodate style soup which is also made from chicken, but is clear. Torikotsu is typically topped with things like fried shallots, cabbage, scallion and perhaps a wedge of lemon. In some cases even the accompanying Chashu can be made from chicken as well. To try this type of less-common ramen, may I suggest a small Ramen chain in the Yokohama area called Matsuichiya. If you would like to try making this style of ramen, I have a recipe here.

Dry Ramen Styles

  • Tsukemen (Dipping Ramen)tsukemen-1200
    This is a form of ramen where the noodles comes dry in a plate. The stock is concentrated into a thick soup and is served separately. The idea is to bathe each mouthful of noodles in the sauce before immediately eating them, which is why Tsukemen is usually translated as Dipping Ramen. There is no traditional flavour to the soup, and this just depends on what soup the ramen shop specializes in. The are two reason certain people prefer tsukemen; firstly the flavour is quite intense (but not more salty) compared to normal ramen and secondly the noodles are sort of lukewarm instead of piping hot when you eat them, so you can eat this really fast.
  • Hiyashi Chuka (Cold Ramen)
    Hiyashi Chuka translates as ‘Cold Chinese’ noodles. They are not from China per se, but were first invented by a Chinese restaurant in Japan, some say from the city of Sendai. This type of Ramen is served chilled in a sweet sauce and was traditionally served in summer as a refreshing chilled alternative to hot Ramen in the days before air-conditioning became commonplace. It fact some restaurants still only serve it only in Summer. Thus all the typical ingredients of Hiyashi Chuka, cucumber, ham, omelette and imitation crab sticks are things which taste good chilled. Hiyashi Chuka comes in two main varieties, there is the standard variety that uses a sauce based on vinegar, sugar and soy sauce. The more modern Goma variety uses a creamy sesame sauce. I have a recipe for making the Goma style Cold Ramen here.
  • Abura Ramen (Oil Ramen)
    This third type of dry Ramen is not as common as the above two, but is perhaps the best style of ‘dry’ Ramen. The Abura Ramen (also called Mazesoba when it is made with soba noodles instead) is best described as a fusion of Tsukemen and Hiyashi Chuka into a style of noodles that resembles Italian Pasta. Essentially the noodles are tossed in a meaty tsukemen like sauce that is fortified with oil and vinegar. Sometimes a raw egg is added as a sauce thickener, just like you’d see in a Fettuccine Carbonara. The toppings vary, but usually include diced charshu, chopped scallion. The result is a ramen with the taste of soup, but no actual soup. Abura Ramen is served at goldilocks temperature, not chilled like Hiyashi Chuka, nor piping hot like Tsukemen.
Quality Ramen

Quality Ramen Pack

Supermarket bought Ramen
In this final section I am going to discuss home-cooked Ramen. Quality ramen from the supermarket normally comes in rectangular 2 serving packs. If they are available, they will be found in the refrigerated (not frozen) section. The packing will generally indicate the style (e.g. tonkotsu on the yellow pack) of the ramen. If its a really good product, there will be a picture of a famous Ramen chef whose recipe the product is based on. The noodles are soft, sealed seperately within and the instructions will tell you to cook them separately from the soup. The soup will come in the form of a large pouch containing a condensed soup paste. You’ll need to procure all the meat ingredients and condiments yourself separately, resulting in an authentic ramen. If you don’t have any chashu lying around the house, try pan-fried luncheon meat (please do not quote me on this) and perhaps some seasoned runny yolk boiled eggs made according to my recipe. The easiest condiments to use are perhaps Japanese dehydrated kelp, dried seaweed sheets and sesame seeds. You can pre-combine some as described here.

Soba stick ‘Ramen’

A second type of noodles is the off-the-shelf ramen-style soba stick noodles. Technically buckwheat soba noodles means this is not a true ramen but the soup pack that comes with with them is a concentrated form of a recognized ramen soup. These stick noodles also come in dual servings. The packaging will be flat and long, and typically indicate the regional style (Kumamoto, Kagoshima, Nagasaki from left to right in photo) of the soup, often with a map even. It’s not as good as the quality ramen above but on the plus side, they keep for a long time and don’t need to be refrigerated.

If your pack of noodles is the type where you just boil a hard cake of noodles in water or fill a paper cup with boiling water and add some soup powder after the fact, this isn’t ramen at all; its only regular instant noodles. If the noodles are cooked in the soup and not separately, this is a dead giveaway that you’re not making ramen. Besides being hard to the touch, the other tell-tale difference is these inferior noodles are always made with 1 serving. These instant noodles are dried by deep frying them in oil and the soup powder contains a heavy dose of MSG so this type of noodles is not too healthy. The packaging will neither give a ramen flavour nor style, but will be described by the meat (e.g. chicken, seafood) used to manufacture the soup powder.


Tags: , , , , , , , , ,

Japanese Style Baked Seafood

(serves 4)
Creamy morsels of tasty seafood, baked to perfection in a fusion version of seafood newburg or lobster thermidor. One cannot help but be amazed at the wonderous properties of miso that allow a wholesome meal to be cooked without salt, sugar, spices, hebs or cheese for that matter. I’m sure you’ll find this dish a refreshing change.

Ingredients

  1. Lobster/Crayfish meat (200g)
  2. Crab meat (100g)
  3. Medium Prawns (100g)
  4. Scallops (100g)
  5. Mushrooms (1.5 cups diced)
  6. Leek (3/4 cup chopped)
  7. Pressed Garlic (2t)
  8. Milk (1 cup)
  9. Miso (3t)
  10. Honey (1t)
  11. Mayonnaise (4t)
  12. Brandy (3T)
  13. Flour (1T)

Preparation

  1. Its much easier to de-shell lobster and crab if they are pre-boiled, so do this before anything else if you procured the raw variety. Canned dressed crab is an easier option for crabs.  Its alright to leave the prawns (de-shelled) and scallops raw.
  2. Cut all your seafood meat into 1/2 inch pieces, keeping the raw meat seperate from the cooked. Also cut your leek into thin diagonal discs and your mushooms into 1/4 inch cubes.
  3. The miso base comes first. In a small pan, fry in oil 2t of garlic that has been through a press until they begin to brown, then spoon in 3t of miso followed by 3T of brandy. Stir fry for a minute and then add 1/4 cup of water, using it to mash the paste into an emulsion. When the mixture reboils, drizzle in 1t of honey before removing from heat.
  4. In a larger pan fry the leek under high heat in a few T of oil, until it begins to soften.  Add in your prawn and scallop and continue to stir occasionally until the meat begins to shrink.
  5. Keep the heat on high. Add few more T of oil and then sprinkle on 1T of flour. Stir-fry for a further minute to cook the flour and then pour in 1 cup of milk slowly, while stirring.
  6. When the milk starts to bubble and thicken, add miso mixture, the cooked meat, and the mushrooms. Cook for 1 minute further and then remove from fire.  Mix in 4t of mayonnaise and 2t of black pepper.
  7. Spoon the seafood mixture into either individual ramekins or a casserole dish to await baking. When the time comes, preheat your oven to 200oC (390oF) and bake for 15 minutes. I think this bake is best served with steamed white rice but you can use other staples instead, but preferably not potatoes.

Notes

  • Crustacean meat turns mushy very quickly when it is not cooked quickly. So its always preferable to cook lobsters, prawns, crayfish, crabs, scampi etc under high direct heat. That’s why we shouldn’t put raw seafood into sauce and let the baking cook it.
  • As a option you may reserve the lobster or crab shells as baking vessels, as shown in the photo. For an all-in-one meal I sometimes place a bed of cooked rice under the seafood mix before baking (there’ll be no room to do this if you are using the shells of course).
  • I have on occasion substituted whole oysters for the crustacean meat with good results. You might want to give it a try. In Japan, they would use julienned white turnip instead of leek, you can experient with that as well.
  • If you are not familiar with miso, which one might consider the analogue of cheese in Japan, refer to this post of Kobi’s Kichen.


Tags: , , , , ,

What is Miso?

Miso is a savoury fermented paste of soybeans and rice, and sometimes barley. It has a distinctive amino acid-rich salty taste and is used extensively in Japanese cuisine in soups, salad dressings, sauces, marinades and glazings. Miso also features to a lesser degree in Korean and Chinese cooking. As miso mixes with both oil and water, it is easily blended with many other ingredients like honey, soy sauce and alcohol. Because of this versatility, in recent times Miso has been gaining traction in the fast growing world of fusion cuisine. 

There are some nice Korean varieties but for our purposes I’ll only discuss the types of miso from Japan, which are universally accepted as of the highest quality and available in stores around the world. Miso has two primary ingredients. Firstly, there is the Koji, which is mold cultured on rice (kome koji), soybeans (mame koji) or barley (mugi koji). The second key ingredient is soybeans, which the koji is used to ferment. Salt and water make up the remaining ingredients. Because there are three types of Koji and the ratio of Koji to soybeans, fermentation time and conditions, cooking method (steaming or boiling) can all vary, miso comes in dozens of varieties. Though it would be a gross generalization, for convenience you can group them into five types. They are:

  • Rice Miso (米味噌 = Kome-miso)
    The vast majority of miso made in Japan is of this variety. Rice miso as the name implies is made fermenting rice koji with boiled soybeans. It comes in many shades of dark yellow and light brown and is aged from 6 to 12 months. This is the miso that one would typically use in miso soup, miso ramen and miso salad dressing. Rice miso is what you would call a medium or middle of the road variety and if someone mentions miso without specifying which type, they are usually referring to this miso. If you intend to stock only one type of miso, this is the one. Rice miso loses some flavour and aroma as it is cooked, so you should turn off the heat as soon as your soup boils. Shinshu Miso, also known as Yellow miso, is a popular sub-type of rice miso.
  • Red Miso (赤味噌 = Aka-miso) 
    This is a stronger tasting variety of miso, originally from the Tohoku region in Northern Honshu, made with a longer aging period (1 to 3 years). Though it is called red miso, I would describe its colour more as a dark brown. This colour is a result of steaming the soybeans instead of boiling them. The koji is made from rice and/or barley. A higher ratio of soybeans to koji is used in red miso and thus it contains more protein than other types, which gives it its intense flavour. Red miso has the special characteristic of developing a longer lingering and richer taste (the Japanese called this Kokumi) as it is cooked or boiled (i.e. the opposite of rice miso). For this reason, red miso is often used in braised dishes, as a seasoning in cooked dishes such as curry and also as a glaze. Examples of recipes that use Red Miso are my Miso-cured Chicken Wings, Spaghetti in Miso Cream Sauce and Japanese Style Baked Seafood.

  • White Miso (白味噌 = Shiro-miso)
    This is a milder variety which is made using a low ratio of soybeans to koji. The koji is made made from rice and sometimes barley. It is not actually white; I would describe its colour as more of a beige. The light colour is a result of its short fermentation period, which can be as short as a few weeks. The higher ratio of rice results in a high carbohydrate content, so white miso is often described as sweet or even creamy. One common dish that specifies the use of white and not any other type of miso because of these mild and sweet qualities is miso-cured Black Cod. If Miso is an ingredient in a dessert, say in cheese cake, it will also very likely be of this variety. Kyoto’s Saikyo shiro-miso which uses a rice koji is considered by many to be the best White Miso. It is even lighter in colour than regular white miso.
  • Soybean Miso (八丁味噌 = Hatcho-miso)
    This is a rarer all soybean type of miso made with soybean koji, and has the darkest colour of all types of miso. The name Hatcho is derived from the Hatcho district of Okazaki City in Aichi where is was developed 400 years ago, though varieties are also made elsewhere (generically called mame miso). Soybean miso has slight astringent and bitter overtones and is held in high regard, even considered by some to be the king of miso. Like for red miso, the soybeans are steamed and hatcho miso is used in cooking as opposed to soups.
    x
  • Blended Miso (合わせ味噌 = Awase-miso)
    This is a mixture of any of the above, just as one would blend whiskies create new varieties. These can be used as if it is a rice miso.

To summarize, for soups and salads and general use, use rice (yellow) miso or blended miso. For sauces, glazing and braising, red miso is the more appropriate miso. And if you need a something mild and/or sweet, go with white miso. Even if you are not into Oriental cooking, you will find miso a great way to impart an additional layer of flavour in many types of Western dishes. Simply use it in place of salt. Depending on where you are, you can think of miso as a seasoning agent in the same class as Maggi Sauce, Marmite or Vegimite. To give you an idea of which miso goes with what – I would use yellow miso in French Onion Soup or Lobster Thermidor, red miso in a Cassoulet or Ossobuco and white miso for Caesar’s Salad Dressing or Cheese Cake.

Miso typically comes in a transparent plastic tub which has a loosely fitting cover. It should be stored it the refrigerator once the tub is unsealed. I usually fold a piece of cling film in four and place it over the top of the tub before closing the lid for a snug fit. Never touch the miso in the container with anything other than a clean spoon. If you take these steps, miso can easily be kept for over a year.

A Chinese Alternative to Miso – Red Beancurd

  • Although miso originated in China, I’d generally avoid the blackish stuff that passes as miso in China; its of a poor quality and if I’m not mistaken, they typically make it as a by-product of fermenting soya sauce. Chinese miso is mostly used as an intermediate ingredient for other flavouring agents, like hoisin sauce.
  • There is however something miso-like from China that merits attention, and that is red fermented beancurd (南乳). Instead of using cooked soybeans like miso, as the name implies, soybeans are first made into regular tofu, and it si this tofu that is fermented. A red yeast grown on rice (i.e. the koji) is introduced to tofu cubes in a glass jar, and then the tofu is left to ferment. At some point salt, water and Chinese wine are also added. Eventually the jars are sold to the customer.  
  • As fermented bean curd doesn’t instantly disintegrate in liquid, there is a pretty standard way to turn it into a sauce. You first heat up a pan with oil, and then add 1T red bean curd, 1T Chinese wine, 1T soy sauce and 1t sugar, mash everything into a smooth sauce, then add water to create the consistency desired. 
  • Fermented red beancurd is what I think of as the Chinese equivalent of red miso. It has great umami qualities and goes well with meat. Use it for marinating meat, and also for stews, even vegetarian stews.     
 
2 Comments

Posted by on January 14, 2010 in Chinese, Ingredients, Japanese


Tags: , , , , ,