(6 portions) Drunken Chicken is a Chinese classic, the equivalent of a cold cut, similar in concept to jellied ox tongue. It is essentially succulent bite sized chunks of chicken that are infused with flavour, perfect as a cold starter or a one piece amuse bouche. Making it takes quite a bit of time but requires next to no effort or skill, since my recipe doesn’t involve steaming and uses very few ingredients. As an added plus, you can make your Drunken Chicken well ahead of time and keep in the fridge until its needed.
Brine 2 boneless chicken legs in 1.5 cups of cold water containing 1 heaped T of salt and 1t sugar for 4 hours. If its a hot day, add a few ice cubes to the water every hour or keep the chicken in the fridge for the four hours.
Drain the chicken and trim off any visible clumps of fat with kitchen shears. Marinate in a mixture of 6T of Chinese wine and 2t of liquid smoke for an hour.
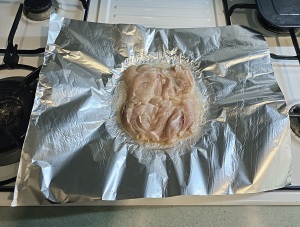
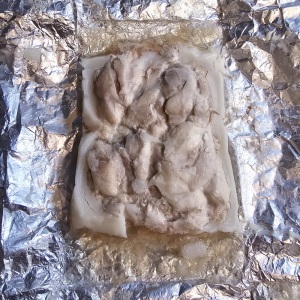
Place a large sheet of foil (refer to the photo for size) on a plate and press the foil to the plate to capture the depressed centre of the plate. Spoon 1T perilla oil into the middle of the foil and then place one chicken leg with the skin side down on the foil. Rotate the chicken 360 degrees to spread out the oil. Spoon half of the marinade over the chicken.
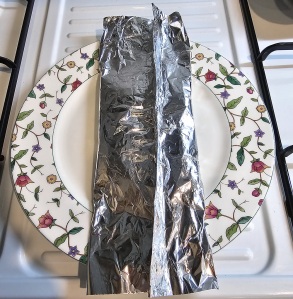
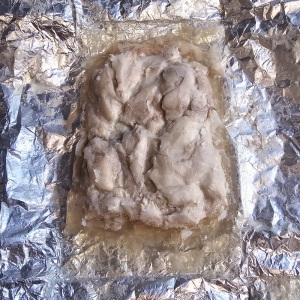
Wrap the chicken in the foil. The first step is the bring the 2 long edges together and fold/roll the edge until you get a flat tube. Next you roll up the other two edges until you get a parcel. As you do the folding, take care to flatten all the rolls neatly to make the parcel as water tight as possible. Also, try to trap as little air as possible inside the parcel as this air will expand in the oven.
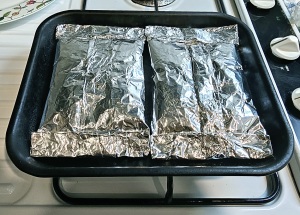
Repeat the process for the second chicken leg; both parcels should be able to fit onto the toaster oven tray.
Preheat the oven to 180oC (360oF). Set the timer for 20 minutes and place the tray in the oven.
After the toaster oven turns itself off, leave the parcels undisturbed in the toaster oven until they reach room temperature. I usually leave them in the toaster for 2 hours or more.
Put the parcels into the fridge. They should be in the fridge for several hours at minimum and in fact you can keep them in the fridge for several days as the meat is nicely sealed up.
Preparation
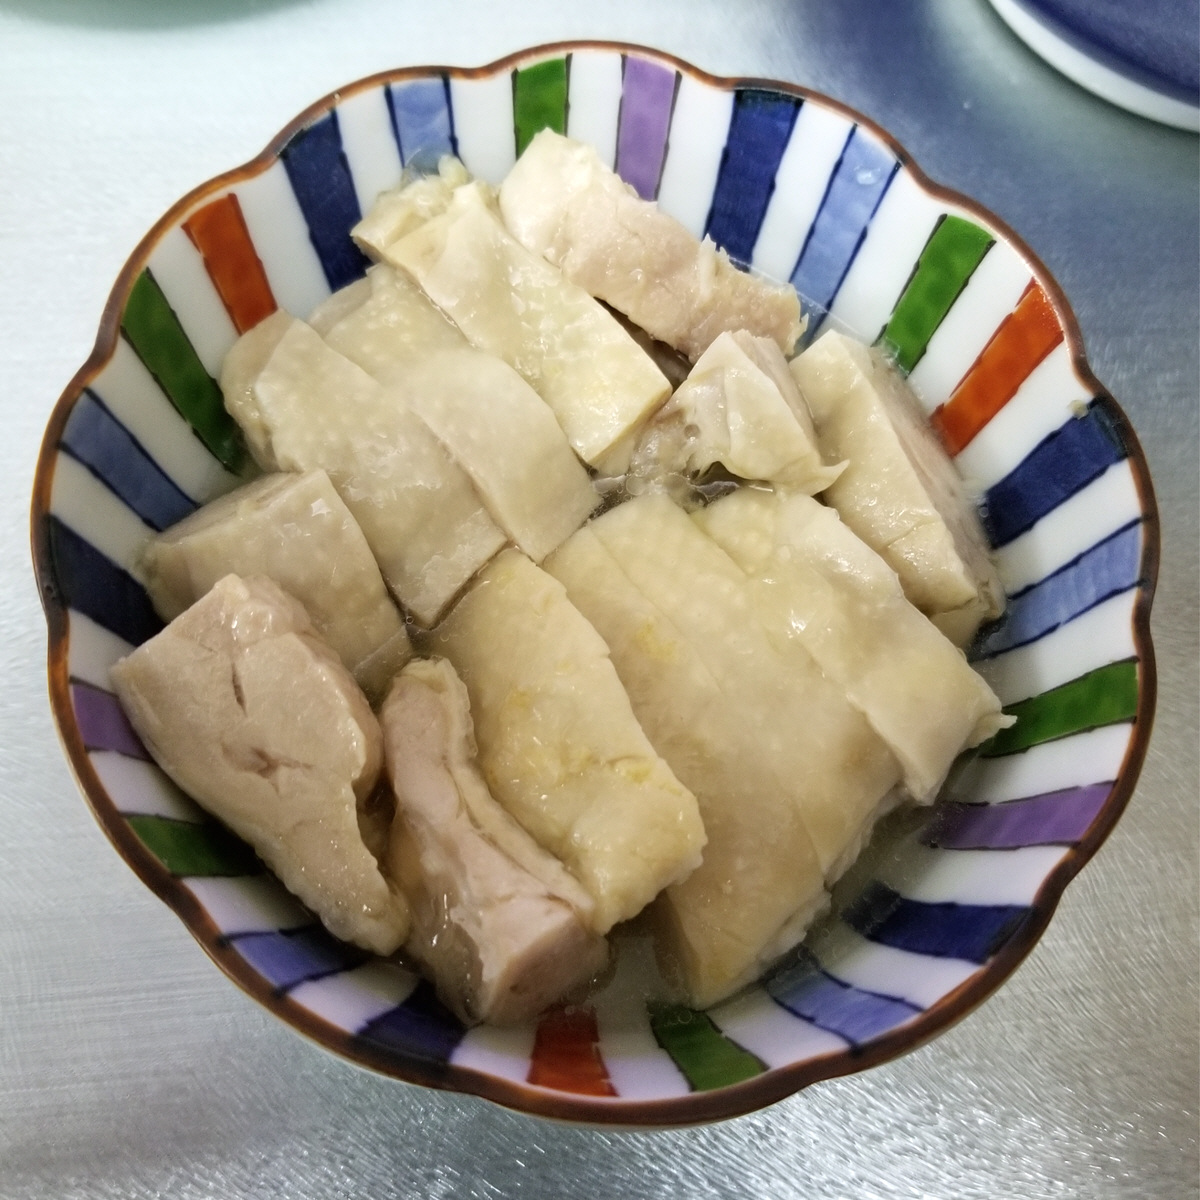
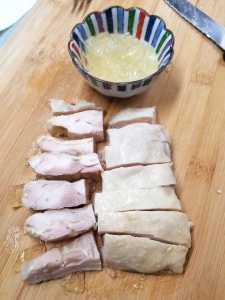
When its time to serve your Drunken Chicken, unwrap the foil and remove the white solidified fat with a fork. You must do this quickly as it softens very soon after it leaves the fridge.
The chicken will be encased in a jelly created from chicken essence and what is left of the wine after all the alcohol has evapourated. This is the all important gravy of Drunken Chicken. Scrape off as much of the jelly as you can into a bowl. Add 2T of boiling water to the jelly and leave the bowl in a bath of hot water to warm up.
Meanwhile, cut the meat into bite sized pieces and arrange then on to a serving plate or bowl. You may choose to put them into multiple pieces of smaller crockery if you intend to serve individual portions.
When the jelly has fully liquefied, spoon the resulting liquid over the meat. The general idea is for the meat to be still cold while the gravy is at room temperature.
Notes
If find certain ingredients hard to come by, you can use substitutes. Sherry is the standard western alternate to Chinese wine, and oil infused with any flavour, say walnut or rosemary will work just fine. In this sense what I have described is a cooking style in addition to a recipe for a specific dish.
If you are a purist and love the taste of wine in your food, you may choose to add 2T of Chinese Wine instead of 2T of water in step 2 above.
It will be perfectly fine if you use frozen chicken, because of the brining. You can also use other parts of the chicken.
When the parcels are put into the fridge I suggest you place them on a plate as they very often leak very slightly, until the jelly has formed.
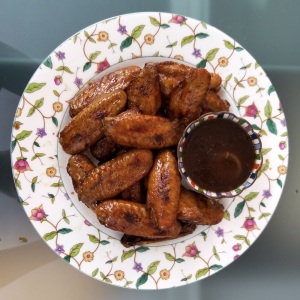
(serves 2-3) This is a recipe for BBQ wings, the type you’d find in a sports bar. For years I tried to cook these wings at home in the same style with limited success. Then one day I discovered the secret to marinating chicken wings. Most recipes use the method of brushing the wings with sauce as you cook them, because its very difficult for flavours to penetrate chicken skin and reach the meat within, but this recipe doesn’t. The secret is counter-intuitive: you have to cook the wings before marinating them.
Ingredients
Chicken Wings (20 mid joint, 700g)
Shallots (4)
Garlic (1 bulb)
BBQ Sauce (1/3 cup)
Cumin
Mustard
Liquid Smoke
Whiskey
Preparation
In a medium sized pot, mix 1/3 cup of BBQ sauce with 1.5 cups water, 1t mustard, 1t cumin and 1t salt.
Peel the garlic and shallots and put them whole into the pot.
Rinse your chicken wings and add them to the pot.
Bring the pot to a boil. After 5 minutes of boiling, carefully fish out the chicken wings without damaging the skin. Put the wings in a Tupperware-like of container.
Continue to simmer the sauce until it has halved in volume. This should take perhaps fifteen minutes. Turn off the heat and stir in 1t liquid smoke and 1T whiskey.
After the sauce has cooled sufficiently, pour it into the container with the wings. Cover and leave the wings to marinate in the fridge overnight, or in any case for at least six hours. Shake once or twice to allow the marinade to reach between the wings.
Preheat your toaster oven to 200oC (390oF) degrees.
Arrange the wings on a wire rack in the toaster oven tray and bake for 25 minutes. You’ll need to do this in two batches as the wings should not touch each other.
Warm up the leftover marinade in the microwave or in a saucepan. You can serve the wings either with the BBQ sauce separate or coated with the BBQ sauce.
Notes
The most important thing you can do is cover your toaster oven tray with foil, so you don’t have to wash off the carbonized BBQ sauce.
Do not boil the wings for more than 5 minutes. You want the wings to be cooked, but not the skin to soften too much.
If you are cooking the wings in a full sized oven, it will probably take less than 25 minutes. They are done when you notice dark splotches develop. You can of course also simply cook the wings over a actual BBQ.
The same method works for all kinds of sauces you might want to flavour wings with, like teriyaki or oyster sauce. Just boil for five minutes and marinate overnight in the fridge.
(makes 2 dozen wings) Chicken wings are a party staple and a favourite among children, and the unique blend of Miso and honey will make your wings all the more popular. I have yet to meet a person who didn’t like my Miso-cured wings. The vast majority of Miso-flavoured wing recipes make you cook the wings twice, the second time after painting on a miso glaze. My method does away with this troublesome glazing procedure and cooks the wings in one go. Furthermore, curing allows the flavour of miso to penetrates all the way into the meat.
You need to begin the day before. Defrost and rinse your wings.
Leave the wings to drain in a colander or strainer for at least 5 minutes.
Arrange the wings on half of a large dish cloth. Fold the empty portion over and press down gently to dry the wings as best you can. Unfold and allow the chicken to dry further while you make the marinade. You can place a sheet of paper towel between the chicken and the cloth to make the cloth easier to wash, but don’t try using paper towels alone or you end up using half a roll.
In a ceramic bowl mix the following: 2T red miso, 2T honey, 1T mirin, 1T tahini, 1T sesame oil, 1t soya sauce and 1t turmeric. You can also add 1t of liquid smoke if that is your preference. (nb. the T’s for the pastes are heaped ones)
As many of these ingredients are from the fridge you will need to microwave the mixture for about 15 seconds before they will can mix well. Alternatively, put the bowl in a larger bowl of hot water for a while. Stir and mash down with the bottom of a table spoon until all the lumps are gone and you end up with a smooth paste.
Place the wings in a gallon zip lock and add the marinade. Squeeze out most of the air and then massage the bag and roll it around to get the marinade evenly over all the wings.
Place the bag flat in the fridge overnight. Some water will be drawn out from the wings making the marinade a bit more watery, that is normal. Flip the bag over once every 6 hours or so to ensure the curing is even.
The next day the wings will be cured. Arrange them on a wire rack in a tray(s) and allow the wings to warm to room temperature. The wings should not be touching each other. Don’t leave any splotches of marinade on the wings as these will become black patches of burnt skin as the excess sugar carbonizes in the oven.
Preheat your oven to 180oC (350oF). Place the tray(s) in the oven for 20 minutes. The time may vary a bit from oven to oven, so decide when the wings are ready by visual inspection.
Notes
The issue with most marinades is they are too watery and they drip off when they heat up in the oven, hence the need to paint on a layer of glaze at the end. That’s why this recipe emphasizes keeping the wings dry, so do not skip steps for 2 and 3. The tahini and turmeric play an important role in keeping the marinade thick so do not substitute them for something else. Also do not add any additional liquid to the marinade.
You can also use a toaster oven. Set it to 200oC (390oF) and bake each batch for 25 minutes – the toaster oven is weaker than a regular oven, but can do the job – 8 wings at a time as shown in the photo.
You can also skewer the wings and cook them over a BBQ.
You can also use white miso, but you will need 3T instead of 2T as it is less salty. The white miso version is milder and sweeter. I typically use 2T white and 1T red when I make my wings.
(serves 2) Here we have a simple no fuss way to cook salmon by wrapping it in foil and steaming it in its own juices in the oven. Miso with its strong distinct flavor is one of the best ways to marinate meats which don’t absorb flavor easily, such as fish. Steaming is one of the best ways to cook salmon fillets as you don’t need to overcook the outside to ensure the middle is done. Put the two together and you have the trappings of a great salmon recipe. This recipe is also great for BBQ and toaster oven friendly as well.
Ingredients
Salmon (Belly Fillet, 400g)
Coriander (chopped, 1 cup)
Miso
Minced Garlic
Sesame Oil (1/4 cup)
Honey
Cointreau
Preparation
Rinse and pat your salmon fillet dry with a kitchen towel. We want the belly cut (the type without a bone in the middle).
Prepare 1 cup of chopped coriander. I usually just hold a bunch in hand and snip away with scissors from the top. We only want the leafy portion.
Mix 1T of miso, 1T minced garlic, 1T Honey, 1T Cointreau and 1/2 t pepper with 1/4 cup sesame oil. When the mixture is even, mix in the chopped coriander.
Place a large piece of foil on a plate. You can see from the photo it is the same plate the salmon is served on later. Spoon one third of the miso coriander mixture onto the foil as a base for your salmon.
Position the salmon on the base. If you look carefully at the right side of the upper picture (you can click on photo to zoom in), I cut off the thinner tip of the fillet and stacked it back on in a way to make the thickness of the salmon even, like a brick.
Spoon on the rest of the marinade, making sure some of the coriander adheres to the side. Wrap up the foil by rolling the long edges of the foil together, then crumpling in the two ends.
Place the foil parcel in the fridge. You can cure the salmon overnight if you wish. The minimum curing time is 2 hours in the fridge plus one hour to warm up to room temperature.
Preheat your oven to 180oC (350oF). Put the foil parcel in and turn the temperature down to 150oC (300oF). Bake for 8 minutes, 9 if you insist on having your salmon 100% cooked.
Allow the parcel to rest for a further 5 min once removed from the oven. Then cut open and serve.
Notes
One of the purposes of the coriander is to allow the marinade to adhere to the salmon instead of pooling at the bottom of the foil parcel. If you don’t like coriander, you will need to replace it with Italian parsley or something similar instead of just skipping it altogether.
(serves 2) Baked Salmon is one of those dishes that is a good fit for the unique qualities of the toaster oven, allowing it to be cooked to tender perfection every time. This recipe is fuss free and fast, you can manage it in under 15 minutes if you are versed in the ways of the kitchen. The dish also comes complete with pasta and veggies cooked in the juices of the salmon, making it a complete meal in of itself. This recipe is for 2 servings but can easily be scaled down to 1.
Ingredients
Salmon Fillet (2 belly fillets = 450g)
Pasta (140g)
Garlic (9 cloves = 3/4 bulb)
Mayonnaise
Coriander Seed Powder
Butter (30g)
Misc Vegetables (optional)
Preparation
Put a few cups of water with 1t salt and a knob of butter to boil in a pan. You can also use a pot, but a pan means one less thing to wash up later. Also preheat the toaster oven, after you remove the baking tray.
Peel the garlic and mince it through a garlic press. Wet the garlic with a touch of olive oil. I normally use bottled garlic (see notes), a great time saver.
Sprinkle a generous amount of salt on the salmon fillets, including the sides and wait 20 minutes for the par-curing to complete. Rinse the salt off, pad dry with paper towels and dust with black pepper and coriander seed powder.
If you plan to have veggies, you can use practically any type, par boil them in the pan at this stage.
Arrange the garlic on the tray in the shape of the fillets. Place the fillets on the garlic in the position shown in the picture below. Cover the fish with thin slices of butter.
Put the tray into the (hot) toaster oven and readjust the dial to 5 minutes. When the toaster goes ding! leave the fish in for a further 5 minutes to slow cook.
In the mean while, fish out the veggies and throw the pasta into the same boiling water. When the pasta is semi soft, drain the water away and turn off the heat, leaving the pasta in the pan.
When the 10 minutes is up, temperarily place the salmon onto a plate. Mix 1T of mayo into the hot drippings of salmon oil, butter and garlic. Pour the mixture over the pasta in the pan. Fire up the pan and add the veggies.
Put the salmon back on the now empty tray and use a kitchen torch or cigar lighter to crisp the skin evenly. Then put the whole thing back into the toaster to keep it warm.
When the pan is searing hot, add 1/4 cup of water. Stir fry till the pasta is al dente and then plate the pasta together with the salmon.
Notes
THIS IS POST NO. 100.
Salmon comes in three cuts. Tail fillets, Darne cross sections, and Supreme thick boneless fillet. Use only Supreme cuts for this recipe and preferably don’t use salmon that has been frozen before.
Salmon is one of those special fish which you don’t have to fully cook, like beef steak. My 5+5 timing results in nice pink tender meat which sloughs off easily in layers that melt in your mouth. If you want it more well done, set the dial to 6 minutes.
To ensure even cooking, position the salmon with the thin ends touching to the side, and the fish slightly towards the back of the tray. This is because the center and back of the toaster oven is always hotter.
If you don’t have a kitchen torch (and I strongly recommend you get one) your other alternative is to peel away the skin since it will not be cooked sufficiently on the thinner parts of the fish that are further from the heating element.
I keep a bottle of store bought minced garlic in oil in the fridge for recipes where minced garlic is cooked. Its perfect for this recipe. Or you can just make some of your own ahead of time.
(serves 1, scalable to many) Rice Pudding is a surprisingly popular dish around the globe, even in places which don’t eat rice as a staple. This particular recipe is of the English variety and is a dessert. Besides being absolutely scrumptous, my recipe is a quick and convenient one. As each portion is made individually, it is totally scalable. It only takes about forty minutes to complete, including baking time.
Ingredients
Rice (2T)
Cream (3T)
Custard Powder (0.5t)
Sugar (1t)
Raisins (1T)
Pine Nuts (1T)
Butter
Nutmeg
Golden Syrup
Preparation
The recipe assumes you are using mini-ramekins. Any kind of small baking container which holds half a cup of water will do.
I’ve found that using Japanese Rice for rice pudding is best. It is a short grain which remains wetter when cooked, but at the same time has a very nice chewy texture. Start by placing 2T of raw rice in your ramekin. Fill the container with cold water and give it a good stir to rinse the rice, then pour away the water.
Marinate your raisins in 1T of dark rum. This step is optional in case you are adverse to liquor.
In a bowl, mix 0.5t custard powder and 1t sugar with a spot of hot water, stirring it till you get a smooth consistency. Next, stir in 3T cream and a sprinkle of nutmeg. Add the whole mixture to the rice.
Add boiling water (about 4T) to the ramekin till you almost reach the rim, followed by a small knob of (salted) butter. Cover the ramekin with aluminium foil, just use one foil even if you have multiple ramekins.
The baking is simple, just remember : 15+10+5 for the toaster oven. Have the toaster oven on for 3 minutes to preheat it and then bake the ramekin for fifteen minutes. If you are making more than one portion at a time (you can do up to 4 in a standard toaster oven), add 1 minute to the initial 15 minutes for every extra ramekin.
After 15 minutes, lift off the foil and add 1T raisins and 1T pine nuts. Stir the rice to get all of it off the ramekin bottom, this makes for a fluffier pudding. Cover again with the same foil and bake for a further 10 minutes (again add 1 minute for every extra ramekin).
After 10 minutes remove the foil, drizzle on a flat t of golden syrup per portion and then bake uncovered for a final five minutes. This will dry up the pudding and give it a nice crust.
Notes
You can use cinnamon instead if you don’t like the spicy taste of nutmeg.
If you can’t find golden syrup or don’t know what it is, use maple syrup or honey.
If you use a regular oven it will take longer as the heat is less direct. If you use 1-cup ramekins instead of mini ramekins, it will take longer too because of the greater volume. I can’t list all the baking times for various combinations, just remember that the rice-custard must have been boiling for a few minutes before the part where you add the raisins and pine nuts. You can also do the initial stages of the baking by boiling in a pot to saved time.
(2 big or 4 small sandwiches) Croque Monsieur is the ultimate grilled ham and cheese sandwich, one of my favourite things to have for lunch. Leave it to a Frenchman to make something as mundane as a sandwich into a gourmet dish. After you have had a properly made Croque Monsieur with a béchamel topping, like me you won’t be wanting to eat any other kind of ham and cheese sandwich again.
Ingredients
Bread (1 mini loaf)
Emmental Cheese
(1.25 cups grated)
Sliced Ham (100g)
Egg (1)
Butter
Flour
Milk (2/3 cup)
Nutmeg
Cognac
Preparation
Grate a block of emmental till you get 1.25 cups of grated cheese. The block would be roughly equal in size to half a block of butter.
Slice your bread into four slices such that two slices can fit into the toaster oven at a time. They need to be twice as thick as a typical slice of bread, so you can’t use regular pre-sliced bread. I prefer a raisin loaf for that extra sweetness myself , but it doesn’t really matter what bread you use as long as its crust is not hard.
Beat one egg in a large flat container. Butter 2 slices of bread on one side and place them buttered-side up into the egg. The idea to to have only the bottom half of the bread soaked in egg, so you’ll need to do both slices at the same time. Place the two slices into the toaster oven, this time with the buttered-side down in the toasting tray and grill till the top browns a bit. This should take about ten minutes, depending on your toaster oven.
In a frying pan, melt 3T of butter on low heat. Sprinkle in 1 heaped t of flour and stir fry till it foams up and darkens slightly. Drizzle in 2/3 of a cup of milk, stirring all the while to get rid of any lumps. Sprinkle in a flat t each of nutmeg and pepper. When you see a nice white sauce, turn off the heat. Then add 1T of cognac and half of your cheese. Mix well to get a cheese sauce. When this cools further, you should end up with a cheese paste.
Arrange your ham slices on the toasted egg-bread. If you like, you can spread a bit of mustard on the bread before that. For croque monsieur, I usually prefer thinly sliced deli ham (the type with water added) as it is softer and adds more bounce to the bite. Sprinkle half the remaining grated cheese on the ham and then cover with the other two slices of bread.
Spread the cheese paste on top of the sandwiches and then sprinkle the remaining grated cheese over the paste. Toast in the toaster oven again till the cheese becomes a nice golden brown. This should take 15 -20 minutes. Parts of the bread that are not covered by the cheese paste will likely get burnt. Use a pair of kitchen scissors to trim some off that off and serve.
Notes
Croque Monsieur means Mister Crunchy in French.
A regular Croque Monsieur does not contain any egg. When served with a fried or poached egg, the same sandwich is called a Croque Madame. Technically, my version is a cross between the two.
Gruyère is often used in place of Emmental for Croque Monsieur, as both of these cheeses have a buttery flavour. Raclette is another option. Have a look at Cheese Pagefor more details.
(serves 4) The consumption of fresh figs has diminished from ancient times because of their short shelf life. Neverthelsss they are a prize to be treasured in the kitchen because of their unique natural sweetness. This simple recipe cooks figs just enough to soften them slightly while allowing them to retain their natural flavour. You will find this light dessert perfect as a pre-dessert, or even as a palate cleanser when served cold.
Ingredients
Fresh Figs (4)
Marscapone (80g)
Honey (4t)
Cinnamon powder
Preparation
Almost quarter your figs, leaving just a little at the base to hold the fuit together.
Using a tissue, lubricate the tray of your toaster oven with 1t of oil to prevent sticking. Then arrange your quatered figs on the tray (you may use a regular oven with grill as well if you don’t have a toaster oven, or if you are making multiples of 4).
Drizzle 1t of honey onto each fig.
Arrange a dollop of marscapone onto the centre of each fig using two teaspoons and sprinkle a generous amount of cinnamon on the marscapone.
Bake for 10 minutes.
Before it hardens, spoon the caramelized honey over each of your figs as soon as you take it out of the toatser oven.
Serve either hot or cold.
Notes
Even if your figs fall apart, do not dispair, you can reassemble them as the joint is covered by the marscapone.
If you are using the figs as a side to another dessert, you can bake them as halves instead of quarters for easier handling.
Did you know the fig is actually a flower and not a fruit?