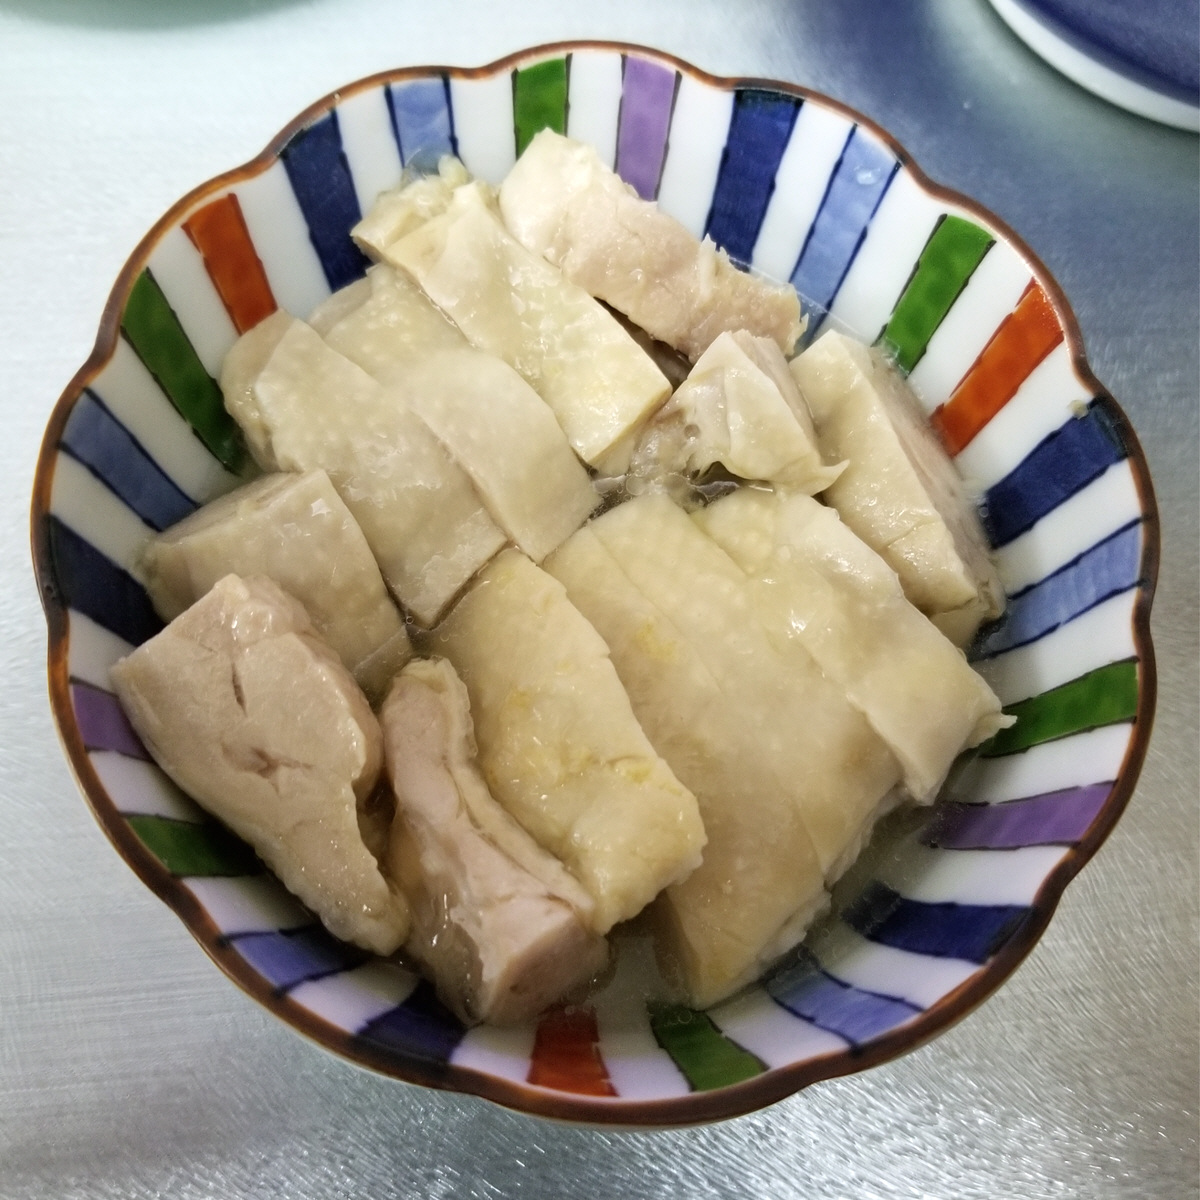
(6 portions) Drunken Chicken is a Chinese classic, the equivalent of a cold cut, similar in concept to jellied ox tongue. It is essentially succulent bite sized chunks of chicken that are infused with flavour, perfect as a cold starter or a one piece amuse bouche. Making it takes quite a bit of time but requires next to no effort or skill, since my recipe doesn’t involve steaming and uses very few ingredients. As an added plus, you can make your Drunken Chicken well ahead of time and keep in the fridge until its needed.
Brine 2 boneless chicken legs in 1.5 cups of cold water containing 1 heaped T of salt and 1t sugar for 4 hours. If its a hot day, add a few ice cubes to the water every hour or keep the chicken in the fridge for the four hours.
Drain the chicken and trim off any visible clumps of fat with kitchen shears. Marinate in a mixture of 6T of Chinese wine and 2t of liquid smoke for an hour.
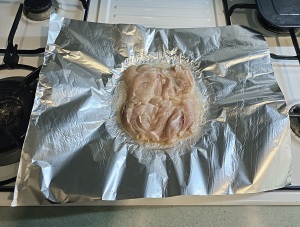
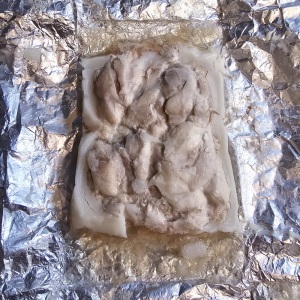
Place a large sheet of foil (refer to the photo for size) on a plate and press the foil to the plate to capture the depressed centre of the plate. Spoon 1T perilla oil into the middle of the foil and then place one chicken leg with the skin side down on the foil. Rotate the chicken 360 degrees to spread out the oil. Spoon half of the marinade over the chicken.
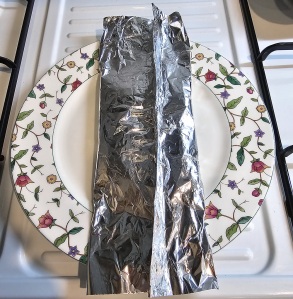
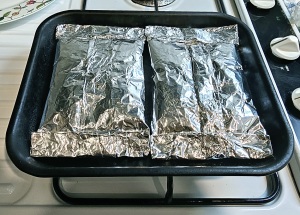
Wrap the chicken in the foil. The first step is the bring the 2 long edges together and fold/roll the edge until you get a flat tube. Next you roll up the other two edges until you get a parcel. As you do the folding, take care to flatten all the rolls neatly to make the parcel as water tight as possible. Also, try to trap as little air as possible inside the parcel as this air will expand in the oven.
Repeat the process for the second chicken leg; both parcels should be able to fit onto the toaster oven tray.
Preheat the oven to 180oC (360oF). Set the timer for 20 minutes and place the tray in the oven.
After the toaster oven turns itself off, leave the parcels undisturbed in the toaster oven until they reach room temperature. I usually leave them in the toaster for 2 hours or more.
Put the parcels into the fridge. They should be in the fridge for several hours at minimum and in fact you can keep them in the fridge for several days as the meat is nicely sealed up.
Preparation
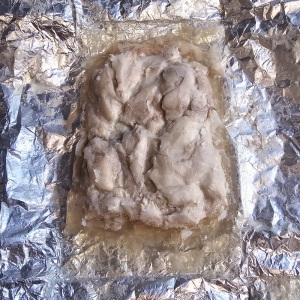
When its time to serve your Drunken Chicken, unwrap the foil and remove the white solidified fat with a fork. You must do this quickly as it softens very soon after it leaves the fridge.
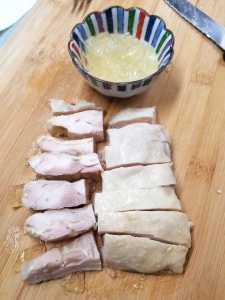
The chicken will be encased in a jelly created from chicken essence and what is left of the wine after all the alcohol has evapourated. This is the all important gravy of Drunken Chicken. Scrape off as much of the jelly as you can into a bowl. Add 2T of boiling water to the jelly and leave the bowl in a bath of hot water to warm up.
Meanwhile, cut the meat into bite sized pieces and arrange then on to a serving plate or bowl. You may choose to put them into multiple pieces of smaller crockery if you intend to serve individual portions.
When the jelly has fully liquefied, spoon the resulting liquid over the meat. The general idea is for the meat to be still cold while the gravy is at room temperature.
Notes
If find certain ingredients hard to come by, you can use substitutes. Sherry is the standard western alternate to Chinese wine, and oil infused with any flavour, say walnut or rosemary will work just fine. In this sense what I have described is a cooking style in addition to a recipe for a specific dish.
If you are a purist and love the taste of wine in your food, you may choose to add 2T of Chinese Wine instead of 2T of water in step 2 above.
It will be perfectly fine if you use frozen chicken, because of the brining. You can also use other parts of the chicken.
When the parcels are put into the fridge I suggest you place them on a plate as they very often leak very slightly, until the jelly has formed.
(the dressing is for 6 portions) This is one of the three great American salads (the others being the Waldorf and Caesar) and one of my favourites. It takes a bit of work but it is easily the best looking salad in the world. If you were looking for a salad to impress, look no further. The standard Cobb will have crumbled Blue Cheese sprinkled all over it but I’ve incorporated it into the dressing instead. This way, anyone who doesn’t have a taste for strong cheese can apply a different salad dressing.
Ingredients
Blue Cheese (70g)
Sour Cream
Mayonnaise
Lemon
Honey
Chopped Parsley
Lettuce (half a head)
Ingredients of your choice
Preparation of Blue Cheese Dressing
Chop the Blue Cheese roughly into little cubes. The smaller you cut them, the less mashing you’ll need to do later.
Place the crumbled cheese into a bowl and add 4T of Sour Cream. Using a table spoon, mash the cheese into the bottom of the bowl in a circular motion until it is mostly incorporated into the Sour Cream. You’ll want to leave some small bits of cheese, so just mash enough to ensure are no clumps.
Add 2T Mayonnaise, 1T water, 2t lemon juice, 1t honey, 0.5t pepper. Mix well until the dressing is homogeneous.
Stir in 1T of chopped parsley. Depending on the type of blue cheese used, you may want to add a pinch or two of salt. Taste before you decide if it needs salt.
As long as you keep the blue cheese dressing in the fridge covered with cling film, you can make the dressing ahead of time.
Preparation of the Salad Itself
Slice the lettuce finely and arrange it to form a bed for the salad. You can use individual dishes as I did or just one big plate.
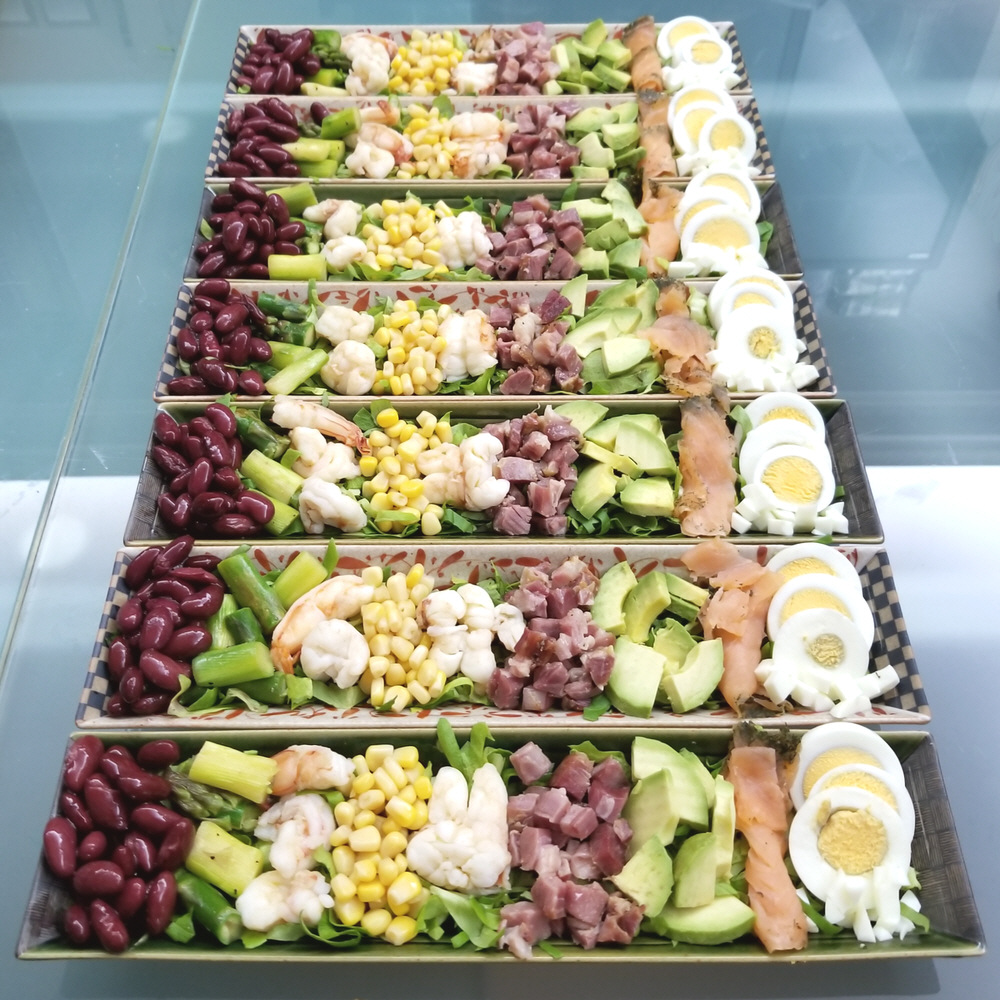
I didn’t specify what to use in the ingredients section as there is no set rule as to what the signature foods of the Cobb Salad are (other than blue cheese). In the picture what I used was (from left to right) canned kidney beans, sauteed asparagus, prawns, canned corn, lobster, diced ham hock, avocado, smoked salmon and sliced boiled eggs.
Other items commonly appearing in a Cobb Salad include roast chicken, tomatoes, bacon, purple onions and zucchini.
The important thing is keep in mind is you need a variety of colours to get the visual rainbow effect. Plan your colour scheme ahead of time to keep similar colours separated; it will be a pain to change the positions of the ingredients later.
Cook whatever ingredients you need to beforehand (for instance boiling the eggs) and cool them in the fridge, as hot food will wilt the lettuce. The idea is to have everything ready and then assemble the salad all at once to ensure freshness.
If you are using avocado, which I highly recommend, you should make sure they are sufficiently ripe (skin almost black and the body no longer firm to the touch).
Notes
The trick to keeping your avocado slices from oxidizing (turning brown) is blanching. Put the whole avocado in boiling water for ten seconds and then transfer immediately into a bowl of iced water.
Roquefort is the ‘normal’ cheese for Blue Cheese salad dressing, but my preference is for Stilton. It is creamy, it’s smell/taste is not as aggressive as Roquefort or Gorgonzola and it is less salty. Its no wonder the Brits call it the King of Cheeses.
Blue Cheese normally comes in 300 gram wedges. If you do not intend to use/eat the remaining cheese anytime soon, you can freeze it, as long as you’ve wrapped it properly in cling film. You should first divide the remaining cheese into individual portions so you won’t need to defrost the cheese to cut it. The other thing blue cheese is great for is quattro formaggi pasta sauce or pizza.
(serves 6) Making a fresh savoury cold appetizer is not easy, but this recipe does the trick. This Mango Shrimp cocktail uses a ‘cocktail sauce’ that contains no tomato or vinegar, even though it looks exactly like the usual shrimp cocktail. The secret comes from using prawn heads and paprika to make the cocktail sauce red instead of tomato sauce. I guarantee your guests will be pleasantly surprised when they taste the first spoonful and find the cocktail is neither sour nor tangy.
Ingredients
Mid-sized Prawns (400g)
Avocado (2)
Asparagus (8 spears)
Mango (1 large)
Minced Garlic
Mayonnaise
Milk
Mustard
Brandy
Paprika
Preparation
Place 2 Avocados into the fridge.
Cut off the heads of your prawns and snip off the whiskers. Using kitchen scissors, cut the shell of each prawn down the back and pull out the intestines.
Fry 2t of minced garlic with 1T of oil in a pan on hig heat. When the garlic begins to brown, add the prawn heads and stir fry till they are fully red, then add a cup of water and 1T brandy. Turn the heat down to a simmer. Crush each prawn head with a wooden spatula to release their flavour.
Add the prawn bodies to the pan and fish them out again when they are curled up and red on both sides. Pour the pan’s contents through a sieve into a bowl.
Return the reddish prawn stock to the pan. Add 2T mayonnaise, 2T milk, 1t mustard and 1t paprika to the pan. Simmer until the liquid thickens into a thin orange sauce. Put the ‘cocktail sauce’ into the fridge to thicken and cool.
Peel and dice the prawns. Wrap in cling film and place into the fridge.
Cut off the bottom quarter of each spear of asparagus and then use a peeler to remove any fibrous skin at the bottom end. Par boil the Asparagus for 2 minutes, you can use the same pan. Cut the asparagus into pieces and place them in the fridge.
Cut the mango on both sides of the seed. Using a knife, carve a crisscross grid on each of the ‘halves’. With a large spoon, spoon out the mango cubes, one row at a time. Put the mango cubes in the fridge.
When it is time to serve the shrimp cocktail, halve the avocados and extract the seed using the blade corner (the part next to the handle) of a large knife. Delicately spoon out the flesh and dice. Try not to do this ahead of time as avocado darkens fast when exposed to air.
Toss the 4 components of your cocktail together in a salad bowl and assemble the mixture on individual soup dishes. Drizzle the ‘cocktail sauce’ over the mixture and serve immediately.
Notes
To make the cocktail more substantial, you can serve it as a salad by adding a bed of shredded lettuce.
Try to dice everything to similar dimensions. Form a picture mentally of the final result before you start slicing and dicing. For the asparagus consider only the length of each bit as you can’t adjust the diameter.
One option is to add a flat t of cumin along with the paprika, to add some more heat and give your cocktail a kick. This is the way the French would do it, but its not for everyone.
Choose your uncooked ingredients carefully. The avocado should be just becoming black for the flesh to be soft. If the avocado is still crunchy to the bite, it is too raw. If it is mushy, then it is too ripe. The mango should be ripe enough that its not sour. Taste both of these before putting them in the fridge, to give yourself the opportunity to procure replacements if necessary.
Prawns have to be of a minimum size before their heads develop flavour. In spite of the name, you should not use shrimp (i.e. small prawns). For this recipe, individual prawns should weigh no less than 50g (i.e. 8 or less prawns that add up to 400g).
Going the extra mile: If you want the cocktail to have a nice clean look, you cannot toss the avocado together with the rest of the components as they will ‘grease’ up everything else. The best way to avoid this is to arrange the components separately in stripes like a Cobb salad or like a pie chart. Layering in a wine glass will work as well. Another thing you can do is shock the asparagus in ice water after blanching, to make them a brilliant green.
(serves 6) Coleslaw is the perfect chilled and tangy salad to go with BBQ and deep fried dishes. It’s also visually appealing, with just the right proportion of green, white, red and purple. Coleslaw is an easy salad to make, but its also quite difficult to perfect. Follow this recipe, which contains all the traditional elements of a proper slaw, and you will get it right every time.
Ingredients
Cabbage (1 head)
Carrot (1 large)
Purple Onion (1/2)
Mayonnaise
Rice Vinegar
Mustard
Maple Syrup
Caraway Seeds
Raisins (40g)
Salt
Preparation
Spoon 3 heaped T of mayonnaise and 1 heaped t of mustard into a small bowl ahead of time, so they can warm to room temperature.
Add 2T of rice vinegar to the mayonnaise and mix until there are no more lumps. Add 1T Maple syrup, 40g of raisins, 1 heaped t of caraway seeds and stir. Place the dressing in the fridge.
Cut the cabbage in quarters and divot out the stem. Cut the cabbage into 5mm slices and then manually break apart the slices into strips.
Make a brine using 4 cups of water with 2T of salt and 2t of sugar. Soak the cabbage in the brine solution for 25 minutes.
After rinsing, lay the cabbage on a tea towel. Roll the towel up and while holding both ends, shake to dry the cabbage. Open up the towel on the table.
Cut a purple onion in half from top to bottom. Peel off the dead layers and then slice half of the onion into 3mm slices. Manually break the onion slices into individual half rings.
Using a serrated peeler, peel away and discard the outer layer of a carrot. Continue to ‘peel’ the carrot until the entire carrot is gone. Cut the carrot strips in half.
Arrange the onion and carrot over the cabbage. Transfer the three veggies into a salad bowl by the fistful. This is a great way to create an evenly distributed slaw.
Spoon the dressing over the coleslaw and then toss.
Leave the coleslaw in the fridge for half an hour to mature, toss again before serving.
Notes
Brining the cabbage removes the water that would otherwise leach out after a while and make your coleslaw a watery mess. Some recipes simply ask you to salt the cabbage directly, but I think brining applies the salt more evenly and lets you use the right amount of salt every time.
Making the dressing first gives time for the flavour of the caraway and raisins to infuse into the dressing. If you don’t allow the mayonnaise to warm up first, your dressing will be lumpy.
While they have the same shape and size, fennel seeds (light brown) are not the same thing as caraway seeds (very dark brown). I would not consider fennel seeds an alternative; only use them in coleslaw as a last resort.
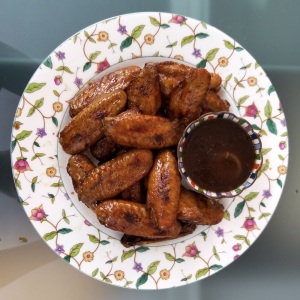
(serves 2-3) This is a recipe for BBQ wings, the type you’d find in a sports bar. For years I tried to cook these wings at home in the same style with limited success. Then one day I discovered the secret to marinating chicken wings. Most recipes use the method of brushing the wings with sauce as you cook them, because its very difficult for flavours to penetrate chicken skin and reach the meat within, but this recipe doesn’t. The secret is counter-intuitive: you have to cook the wings before marinating them.
Ingredients
Chicken Wings (20 mid joint, 700g)
Shallots (4)
Garlic (1 bulb)
BBQ Sauce (1/3 cup)
Cumin
Mustard
Liquid Smoke
Whiskey
Preparation
In a medium sized pot, mix 1/3 cup of BBQ sauce with 1.5 cups water, 1t mustard, 1t cumin and 1t salt.
Peel the garlic and shallots and put them whole into the pot.
Rinse your chicken wings and add them to the pot.
Bring the pot to a boil. After 5 minutes of boiling, carefully fish out the chicken wings without damaging the skin. Put the wings in a Tupperware-like of container.
Continue to simmer the sauce until it has halved in volume. This should take perhaps fifteen minutes. Turn off the heat and stir in 1t liquid smoke and 1T whiskey.
After the sauce has cooled sufficiently, pour it into the container with the wings. Cover and leave the wings to marinate in the fridge overnight, or in any case for at least six hours. Shake once or twice to allow the marinade to reach between the wings.
Preheat your toaster oven to 200oC (390oF) degrees.
Arrange the wings on a wire rack in the toaster oven tray and bake for 25 minutes. You’ll need to do this in two batches as the wings should not touch each other.
Warm up the leftover marinade in the microwave or in a saucepan. You can serve the wings either with the BBQ sauce separate or coated with the BBQ sauce.
Notes
The most important thing you can do is cover your toaster oven tray with foil, so you don’t have to wash off the carbonized BBQ sauce.
Do not boil the wings for more than 5 minutes. You want the wings to be cooked, but not the skin to soften too much.
If you are cooking the wings in a full sized oven, it will probably take less than 25 minutes. They are done when you notice dark splotches develop. You can of course also simply cook the wings over a actual BBQ.
The same method works for all kinds of sauces you might want to flavour wings with, like teriyaki or oyster sauce. Just boil for five minutes and marinate overnight in the fridge.
This is my 20 page guide to cakes from around the world. The countries these cakes, pastries, pies and desserts come from include France of course, and Italy, Germany, Great Britain, Austria, Japan and America. With it you’ll be able to name your cake and eat it too. With the guide they’ll be no more not knowing the name of the cake you just ate or wondering how you are ever going to order it again.
Sample of one of the pages
The PDF was actually made for another of my blogs, but since it is related to food I thought it would fit right in here. Don’t expect anything too fancy or detailed; a lot of it is just cut and paste from here and there on the internet, but it’s put together everything in one place and does the job.
(serves 6) Bananas Foster is a version of Cherries Jubilee using Bananas instead. It’s actually a very easy dessert to make, requiring little in the way of expertise or special ingredients, and it doesn’t take too much time either. In this recipe I’ve added French Toast to the line up; the two are a great together if you don’t like your desserts too sweet.
Ingredients
Bananas (500g)
Bread (Half a Loaf)
Eggs (2)
Butter (100g)
Dark Rum (1/4 cup)
Sugar (3T)
Golden Syrup
Vanilla Ice Cream
Powdered Cinnamon
Preparation
Beat 2 eggs in a shallow dish.
Cut two 1.5 inch thick slices of bread from a whole loaf and further cut each slice into three equal portions. Soak the bread, on both sides, in the dish until all the egg is gone. This will take several minutes.
Melt 1T of butter in a pan. Pan fry the soaked bread on very low heat, flipping occasionally until the egg is fully cooked. Leave the resulting French Toast on a wire rack to cool.
Place 100g of butter, 3T white sugar and 1/2 t of salt in the same pan. Dissolve the sugar in the butter under low heat.
In the meanwhile quickly slice your bananas. Cut diagonally across the banana to get oval shaped slices. The slices should be 1/2 inch thick.
When the sugar has fully dissolved, add the banana slices and turn up the heat.
Stir fry gingerly. When the butter and bananas begin to darken, drizzle on 1T of golden syrup followed by a sprinkle of 1t of powdered cinnamon. Finally pour in 1/4 cup of dark rum.
Continue to stir fry. Stop and turn off the fire when the sauce thickens sufficiently.
Arrange the French Toast on one big plate or many small plates. Pour the banana caramel mixture over the French Toast and top off with small scoops of vanilla ice cream.
Notes
There are many varieties of banana, and the one that you choose is important as it will determine the texture of the dessert you end up making. In my opinion small is better than big.The standard Cavendish (i.e. the big ones on the left in the photo below) get mushy more easily when cooked. I find smaller varieties like the Emperor Banana tend to retain their structural integrity better under heat. You’ll have a better chance of finding them at a fruit store as opposed to a supermarket. In all cases, the bananas should be at the threshold of getting ripe and definitely not over ripe with black spots. 500g is 3 large or 8 small bananas.
To add some flair you can serve your Bananas Foster as a flambé. The best way to do this is to preheat the rum in a metal ladle directly over the fire at the stove. Tip the ladle such that the rum is about to spill onto the fire to ignite it. Pour the burning rum over the rest of the dish at the dining table. While this is entertaining, it does impair your ability to control the viscosity of the resulting sauce, so be aware of this.
Banana liqueur is one of the traditional ingredients of Bananas Foster but I find it is superfluous, and besides you’ll end up with a bottle lying the house for years with little other use. It’s infinitely more important to add the pinch of salt which is left out in many recipes. If you do decide to add it, just add 2T to the rum.
Most recipes specify brown sugar. I don’t because it burns more easily and I find caramelizing white sugar actually works better in exchanging flavour between the bananas and the sauce. I believe that’s why I haven’t a need for banana liqueur.
To my knowledge, Bananas Fosters was first created in New Orleans, which makes sense since there are plenty of banana plantations in the Caribbean.
(serves 10) New England or Boston Clam Chowder, the ultimate blending of seafood and vegetables in a hearty soup. When you are making America’s most famous soup there are a few things you want. Thicken the chowder without any taste of flour, make the chowder faster without having to wait an eternity for the potatoes to disintegrate, give the chowder rich layers of flavour. After a lot of trial and error, I think I have come up with just the right recipe to achieve all these things.
Ingredients
Canned Clams in Brine (4 x 184g)
Bacon (6 slices)
Canned Anchovies in Oil (50g wet weight)
White Wine (0.5 cup)
Potatoes (4 large)
Leek (1 stalk)
Onions (2)
Scallion (10 stalks)
Mascarpone (125g)
Bread (4 slices)
Hon Dashi
Sherry
Dill Weed
Preparation Part I
Cut the crust off 4 slices of bread and leave in the fridge to dry overnight.
Peel the potatoes. Boil 2 (not all 4) of them in a large pot with 10 cups of water.
While the potatoes are boiling, cube the bread into 1cm pieces and crush them into crumbs in a plastic bag with a mallet. Toast the bread cubes lightly if they are not crispy enough to be smashed.
Dice 5 slices of semi-frozen bacon and allow them to thaw.
Fish the potatoes from the pot after boiling them for 20 minutes. Keep the water on a low simmer and put the bread crumbs in.
Julienne the onions. Partially open a tin of anchovies and pour its oil into a pan. Fry half of the onions on low heat in the pan, stirring occasionally.
In the meanwhile dice the remaining 2 potatoes into 1cm cubes. Julienne the scallion and the leek. Don’t add them to the pot just yet; you can put the cut vegetables with the raw onion bits.
When the onions have become limp and translucent, mash the anchovies in the tin itself and add to the pan. Stir fry for a minute to mix the anchovy into the onions, turn up the fire and then deglaze the pan with half a cup of white wine. Bring to a boil and after a minute pour the contents of the pan into the simmering pot.
Next, stir fry the bacon bits in the same pan. When the bacon fat has rendered and the bacon begins to brown add the brine from the clams, reserving the meat for later use. A minute after it reaches boiling, pour the contents of the pan into the (still simmering) pot.
When all the breadcrumbs have melted, mash the 2 cooked potatoes and add the mash to the pot followed by all the vegetable bits (including the raw potato). Add 1T of Hon Dashi pellets, 1T dill weed and 1t sugar. Top up with water such that everything is submerged. Continue to simmer for another 30 minutes stirring occasionally, then leave the pot covered on the stove to cool.
When you are about ready to serve your clam chowder, bring the pot back to a boil and add the clam meat. Place 125g of mascarpone in a bowl with some hot liquid from the pot. Mix until all the lumps are gone and pour back into the pot.
Add 3T of sherry and 1t black pepper, simmer for a further 5 minutes and then add salt (and sugar) to taste. Serve with oyster or other similar type of unsalted crackers
Notes
If you have fresh small neck clams you can add that to the chowder in step 11, but you still need to use the canned clams, for the clam brine.
Yes I did not use any celery in my recipe, its not essential in my opinion. If you insist on adding some chopped celery, fry them with the onions in step 6.
If you are using waxy type potatoes, you can keep the skin on the diced potatoes if you prefer. Depending on the size of your potatoes you may need more than 4; I’ve assumed the use of large ones. For a thinner chowder, use only 1 mashed potato.
If you don’t have any Hon Dashi, you can substitute in any kind of seafood-type stock cube.
(serves 12) Jambalaya is an all-in-one rice dish specific to the American South-east. If I’m not mistaken Jambalaya means Ham-Rice. While some consider Jambalaya a spicy version of its cousin the Spanish Paella, I tend to think of it as a heavier meatier version, as is the way with all things American, and that’s the way I make mine, with lots of smoked or cured meat. I use a special extra ingredient, minced pork sausage filling, this flavours the rice really nicely. I also grill the chicken and seafood separately first, this flavours the fresh meats really nicely.
Ingredients
Clams in Shell (600g)
Prawns (16 large)
Chicken Legs with Thigh (3)
Smoked Pork Belly (400g)
Breakfast Pork Sausages (400g)
Chorizo Sausages (250g)
Onion (2)
Capsicum (2)
Celery (2 cups, chopped)
Diced Tomatoes (1 can, 400g)
Raw Jasmine Rice (4 cups)
Chicken Stock Cube (1)
Whisky
Cayenne Pepper
Paprika
Cumin
Oregano
Thyme
Preparation
Soak and agitate the clams in cold water.
Boil about 7 cups of water in a pot with one chicken stock cube. Cut the heads of your prawns just behind the carapace and snip off all whiskers. Place the heads into the boiling stock pot. Add 1T cayenne pepper, 1T oregano, 1T thyme, 1t salt, 1t sugar. Keep the stock on a low simmer.
Shell and then devein the prawn bodies and cleave each prawn in half if they are big. Marinate in a bowl using 1T paprika, 1T cumin, a pinch of salt and a dash of oil.
In a second larger bowl rub 3 chicken legs with 1T paprika and 1T cumin and 1t of salt. Grill the chicken for 5 minutes and then the add the prawn and grill for another 5 minutes. Dissolve any left over marinade and the drippings in hot stock and then pour the liquid back into the stock pot.
Dice 2 cups of celery, 2 onions and 2 capsicum (i.e. bell pepper).
Debone the cooled grilled chicken and cut it into large chunks. The chicken bones can go into the stock pot.
Dice the smoked pork belly. Cut the lard portions into smaller pieces (10 o’clock) and the meat portions into larger cubes (8 o’clock). Slice the Chorizo into slices (4 o’clock). Remove the skin of the pork sausages (2 o’clock) and mix the filling with 1/4 cup of water to loosen it.
Spoon 4T of vegetable oil into a large frying pan. Add the pork belly and Chorizo and fry on medium heat till their lard renders. Next, add the sausage filling as well and stir fry until the minced pork browns.
Remove the meat. Reserve 4T of the flavoured oil leaving the rest in the pan. Stir fry the celery and onion in the same pan until they are limp. Then add 4 cups of rinsed jasmine rice and stir fry for a further minute.
Transfer the rice into a Dutch oven (i.e. a baking vessel with a cover). Open the can of diced tomatoes, pour the liquid into the stock pot and the tomato pieces over the rice.
Preheat your oven to 200oC (390oF). Throw the clams into the stock pot together with 1/4 cup of whisky and bring it to a boil for a minute .
Ladle boiling stock over the rice until the liquid is level with the rice. Follow this with all the cooked meat and the diced capsicum. Mix well. Add the prawn heads and clams (only those that opened) from the stock pot.
Place the Dutch oven in the oven with its cover on. Reduce to 150oC (300oF) when you can smell the jambalaya cooking. After 45 minutes in the oven, check if the rice (deep under the surface) is both cooked and dry. When the rice is perfect, allow it to rest inside the oven with the cover off.
In the meanwhile discard the chicken bones from the remaining stock and add the reserved pork oil to the pot. Boil this down till it begins to thicken into a sauce.
Taste the rice and salt the sauce as necessary (i.e. this is your last chance to adjust the taste of the jambalaya). Spoon the sauce over your jambalaya and serve.
Notes
This is a recipe for a very large amount of food. You can halve the portions if you don’t have that many people. There shouldn’t be any scaling issues.
Between two baking containers of the same volume, always use the one that is flatter. The Jambalaya will cook more evenly. A Jambalaya more than four inches deep will tend to have wetter rice at the bottom. An alternative is to use two containers. Use foil if your flatter containers don’t have covers.
Why not just cook the jambalaya on the stove? Because there is a tendency for the bottom of the pot to burn. You can try that after you have perfected the oven method.
Why do we have to grill the chicken and prawns first? This is a great way to sear some flavour into them so they don’t taste like boiled meat. The high heat will also remove any freezer taste.
Add more cayenne pepper if you like your jambalaya spicy.
I used Chorizo sausage as Andouille it is not easily found in many parts of the world. If you can’t find smoked pork belly, use a brined ham hock, salted pork neck or cubed pancetta (but not sliced bacon). I also left out the customary calamari as squid gets very hard when it is over cooked.
Use capsicums of 2 different colours for a better visual impact.
(serves up to 8) Corn Maque Chaux is a New Orleans type of cream style corn with carries to this day a hint of century-old French and American Indian influences. It’s a delightful side dish which is simple yet immensely satisfying. Corn Maque Chaux’s defining feature is its lightly cooked corn kernels which retains their sweetness and crispiness. This makes it go really well with roasted meats and steak. To accentuate the flavour of the fresh corn, mine is a light version without bacon or garlic.
Ingredients
Corn (4 ears)
Capsicum (1)
Onion (1)
Butter (30g)
Chicken Stock cube (1)
Cream (1/4 cup)
Whiskey
Paprika
Tarragon
Thyme
Preparation
Start by shaving the corn kernels off the ears. Don’t cut that closely to the cob, and leave some sharp edges.
When you are done, scrape the edges to release a sort of corn mush which will be used to thicken the gravy.
Finely dice 1 onion and 1 capsicum (a.k.a. bell pepper?).
Dissolve 1 chicken stock in 1/2 cup of hot water. Add the corn mush and 1/4 cup whiskey to the stock.
Fry the onion bits with a large slab of butter on a low flame in a large pan till they becomes limp. Add the capsicum and continue the slow stir fry until the onion begins to brown.
Add the stock, and corn kernels and continue to simmer. Next add 2t paprika, 2t thyme, 2t tarragon and a sprinkle of black pepper. Follow this up with 1/4 cup of cream.
Continue to simmer until the liquid boils down to the consistency of a light gravy. The sauce will thicken on cooling. Serve your maque choux warm or cold.
Notes
I think Maque Chaux is pronounced Mark Chu, like an Chinese dude’s name.
Scrape with the blade perpendicular to the cob. Do not carve bits of the cob off by holding the blade at an angle.
Some people add little bits of crayfish or prawns to their maque chaux. Marinate the meat lightly in oil, pepper and salt and add it to the mix towards the end so it isn’t overcooked.
Leftover Maque Choux is very versatile and has many uses, as part of an omelette, as the topping of a ramen.

 Ingredients
 Notes
Notes