(serves 4)
In winter curry is a really nice hearty food that warms you up. This is a great basic Southern Indian curry recipe suitable for most palates and ideal for those cooking curry for the first time. It is mild in two ways. The grassy flavour of mutton is greatly reduced and so people who don’t like the taste of lamb may find it actually quite nice. It is also not very spicy, so those who don’t fancy spicy foods might still find it acceptable.
Ingredients
- Lamb Belly (500g)
- Potato (2 Large)
- Carrot (1)
- Onion (1)
- Shallots (4)
- Coconut Milk (1 Cup)
- Curry Powder
- Caraway Seeds
- Cumin
- Turmeric
- Vegetable Cube
Preparation
- Cut the lamb into one inch cubes. Trim off any obvious large layers of fat. It’s easiest to do this when the meat is semi-frozen, but warm to room temperature using water before proceeding with the next step.
- Place the lamb pieces in a pot and pour in boiling water from a kettle until the water level is a inch above the meat. Stir, wait 5 minutes, and pour the water away.
- Take the meat out of the pot and dry the pot over the stove.
- Peel and julienne 4 shallots. Using a low flame, pan fry the shallot slices in 4T of oil.

- When the shallot begins to brown add 4T Curry Powder and 2T Cumin to the pot and stir fry. Add water a bit at a time until you end up with a watery paste.
- Add 5 cups of water. When this comes to a boil, add the lamb belly pieces followed by 1t turmeric, 1t caraway seeds, 1 vegetable cube, 2t sugar and 2t salt.
- Cover the pot and keep it on a low simmer for 45 minutes.
- In the meanwhile, peel and cut the carrots into half inch thick discs and the onion into twelve wedges. Peel and cut each potato in 4. Dice one of the quarters into tiny cubes (you want them to disintegrate).
- After the 45 minutes is up, add the vegetables and 1 cup of coconut milk and simmer for a further 30 minutes. Boil uncovered and use this period to manage the thickness of curry to what you prefer.
- This curry can be prepared ahead of time and reheated for serving. Depending on the curry powder you may need to add more salt. Remember to taste before serving.
Notes
- Your curry is ideally served with rice, which you will also have to cook. A long grained rice is ideal, like Indian Basmati or Thai Jasmine rice. Any kind of sturdy bread, like Paratha, Naan, or even French Baguette would be an alternative staple.
- In case you are wondering what kind of curry powder to buy, you can refer to the contents of the curry powder I use pictured above. Once you examine what curry powder is made of, you’ll realize that the addition of 2T of cumin in the recipe serves to dilute the overall amount of chili, thus making the curry less spicy.
- The coconut milk also makes the curry less spicy, so if you want a more spicy curry, use only half a cup of coconut milk.
- If you are the type who wants the full flavour of lamb, skip step 2 whose purpose is to reduce the grassy overtones of the lamb. You can also use a lamb stock cube instead of a vegetable stock cube. As for myself, I usually use 1T of red miso in place of the vegetable cube. This really enhances the taste of the whole dish.
- This recipe can easily adapted to make chicken curry. Leave out the caraway seeds and use a chicken cube instead. Chicken doesn’t need to be cooked for that long so skip the entire 45 minute simmer and add the chicken pieces together with the vegetables in step 9.
- If you want a more northern taste to your curry, use plain yogurt in place of coconut milk and cherry tomatoes in place of the carrots.
Tags: Coconut, Cumin, Curry, Lamb, Onion, potato, Rice
(serves 6)
On a whim I decided to combine two of my favourite Chicken and Rice recipes, Chicken and Porcini Risotto and Chicken A La King. It turned out to be yet another match made in culinary heaven. The rich nutty flavour of porcini goes very well with the special brand of sweetness that comes with capsicum. The recipe also uses brined chicken breast to keep the chicken extra tender and separate from the rice.
Ingredients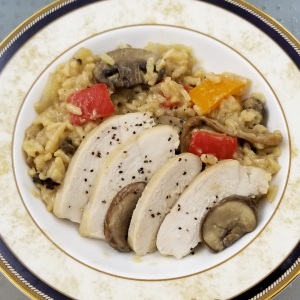
- Dried Porcini Mushrooms (30g)
- Arborio Rice (1.25 cups)
- Brown Mushrooms (150g)
- Chicken Wings (4)
- Chicken Breasts (2 halves)
- Capsicum a.k.a. Bell Pepper (2)
- Onion (1)
- Garlic (1T minced)
- Butter (50g)
- Grated Parmigianino-Reggiano (1/2 cup)
- Cream Cheese
- Rosemary
Early Preparation
- Brine and poach chicken breasts as per the procedure given in this post. You can do this ahead of time and then warm up the chicken breasts in the hot stock before slicing them.
- Simmer 4 chicken wings in 4 cups of water with half an onion and 1t salt. Continue simmering until the meat is practically falling off the bone, adding water is necessary. You can also use 8 mid joints. Start making the stock at the same time you begin the brining.
- You also need to soak your porcini in 2 cups of water. Use cold water, as hot water will give the porcini a slight rubbery texture after it rehydrates. Keep in the fridge.
Preparation
- Bring your chicken stock to a slow simmer. Add the juices from the poached chicken breast and the porcini water (but not the porcini itself) to the stock pot.
- Cut the capsicums in half and remove the stem, core and seeds. Cut the tops and bottoms off and add them into the stock. Cut the sides into 1/4 inch squares and set them aside.
- Cut the brown mushroom into thick slices.
- Mince the garlic and julienne the remaining half of the onion into1/8 inch pieces. In a large pan, fry the onion bits on low heat in 2T of oil until they become yellow and limp. Add the garlic and continue pan frying for a minute.
- Turn up the heat on the pan and add the rice into the pan, stirring well.
- After another minute, add a ladle of stock (liquid only) to the pan and reduce the heat to produce a low simmer. Add the capsicum pieces to the pan at this stage.
- Stir until the risotto begins to dry, then add another ladle of the hot chicken stock. Stir frequently to prevent sticking. The stock pot must be kept simmering to avoid shocking the rice. Continue doing this for about 20 minutes.
- In the meanwhile grate the Parmigianino finely. Cut ¼ of a block of butter into 1 cm cubes and mix it with the grated cheese. Allow the butter to soften out in the open. This forms the mantecatura.
- Dissolve 1T of cream cheese in the last ladle of hot stock before adding it to the pan. Add both the brown mushrooms and the porcini at this stage.
- When your risotto is al dente you can let it almost dry up, after which you turn off the heat. Total simmering time varies a bit with the type of grain you are using, so rely on taste and appearance to decide if the risotto is done and not a timer.
- Stir in the mantecatura and let the risotto rest with the cover on for five minutes. Slice the Chicken breasts.
- After tasting, you may add a bit of salt or more grated cheese to the risotto as a final adjustment if you deem necessary. Arrange the sliced chicken over your plated risotto. Garnish with black pepper.
Notes
- My first risotto recipe contains many of the finer points on making risotto, which I have opted not to repeat here. You should refer to that post if you don’ make risotto often.
- Capsicums comes in 4 different colours which have different tastes. Red is sweet and easiest on the taste buds, Green is an acquired taste as it is less ripe and bitter. Orange and yellow capsicums are in between the two. I would recommend you use red and orange for this dish.
- For reference these are my Chicken A La King and Porcini and Chicken Risotto recipes.
Tags: Capsicum, Chicken, Italian Cuisine, Mushroom, Parmigiano-Reggiano, Porcini, Recipe, Rice, Risotto
(serves 3)
Chicken A La King is simple conceptually, but it is one of the most difficult dishes to perfect. My mom taught me how to make this the standard way when I was young and over the decades I’ve developed my own improved method of preparing Chicken A La King, one that has superior flavour and at the same time avoids all your typical A La King problems (see notes). I have yet to taste a better version in any restaurants I’ve tried – something I can’t say about any of my other recipes.
Ingredients 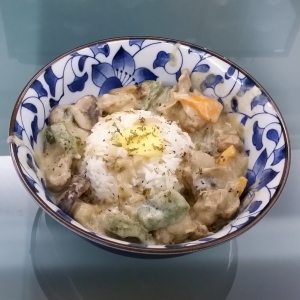
- Chicken Legs with Thigh (2)
- Capsicum a.k.a. Bell Pepper (1)
- Brown Mushrooms (150g)
- Leek (1)
- Milk (1 cup)
- Butter (100g)
- Flour (3T)
- Anchovy in Oil (10g)
- Chicken Stock Cube (1/2)
- Cream Cheese (1T)
- Worcestershire Sauce
- Sherry
- Coriander Seed Powder
- Cooked Rice (4 cups)
Preparation
- Pour 1 cup of milk in a cup and spoon 1T of crea
 m cheese into a bowl, to let them warm up.
- Fry 2 slivers of anchovy in its oil in a pot until you can mash the anchovy into a fine suspension. Add 3 cups of water and half a chicken cube and bring to a low simmer.
- Cut the leek in two and put the top (green) part into the stock pot. Slice the bottom portion lengthwise into half, then cut into 1/8 inch thick half rings. Cut the mushroom into 1/4 inch thick slices. Cut the capsicum into 1/2 inch squares; making sure you discard all the seeds and white pulp.
- Debone the chicken legs and add the bones to the stock pot. Cut the meat into bite sized chunks – its more important that the pieces of chicken are of the same thickness than of the same volume. Place any excess flaps of skin into the stock pot.
- Mix 1T of oil, 1T Worcestershire sauce, 1t coriander seed powder, 0.5t salt in a large bowl. Put the chicken chunks into the bowl and mix well.
- Stir fry the leek pieces in a large pan with some oil on low heat until they begin to go limp. Turn up the fire and push the leek to one side of the pan.
- Add the chicken when the pan is really hot and stir fry until no visible part of the chicken is raw. Then combine with the leek and continue to stir fry until the chicken is cooked (i.e. shrunk a bit like the first photo). Move the chicken to a temp container.
- Melt 70g (1/3 of a standard block) of butter in the same pan on low heat. Spoon in 3T of flour and stir fry until the flour begins to darken. Very slowly add the cup of milk a bit at a time while stirring continuously with a flat spatula to combine all three ingredients. When all the milk is used up, continue the process by adding the hot chicken stock instead. Finally, stir the cream cheese into the sauce. When you are done you should have a smooth velvety white sauce.
- Add the diced capsicum to the sauce and continue to simmer, until the capsicum is no longer rigid. This will take a while, perhaps 10 minutes, add hot water as needed. Next add the mushrooms and 1T of sherry. When the mushrooms begin to shrink, add the chicken and simmer for 1 more minute. Sprinkle on black pepper and taste the sauce to see if salt is required.
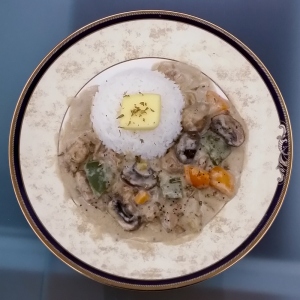
- Serve with steamed white rice, topped with a knob of butter.
Notes
- Capsicums comes in 4 different colours which have different tastes. Red is sweet and easiest on the taste buds, Green is an acquired taste as it is less ripe and bitter. Orange and yellow capsicums are in between the two. A mixture of two types would be visually pleasing if you are cooking a double portion.
- If you are using chicken breasts instead of legs, you should brine them first. There will be no need to marinate the brined chicken pieces as they are already salty.
- Chicken A La King is supposed to be served with steamed white rice. If you don’t have rice, the other permissible option for Chicken A La King is puff pastry cups (a.k.a. vol au vent). I am against serving it with bread or pasta as some websites show.
- How is my recipe different from the commonly used ones?
- 1. Cooking the chicken separately under a high heat will remove any freezer taste.
- 2. Using chicken stock enhanced with anchovy brings out the flavour of chicken in the white sauce.
- 3. The extended cooking time for the sauce removes any residual taste of flour and fully infuses the sauce with the taste of the capsicum.
Tags: Anchovy, Butter, Capsicum, Chicken, Milk, Mushroom, Rice
(serves 4)
Paella is a culinary gift from the Valencia region of Spain to the rest of the world. In this version we have a combination of meats from land, sea and air, simmered to perfection with saffron-infused rice in the pan. Not that many people cook Paella because they believe it requires a special variety of rice from Spain and a special cast iron Paella pan. It does not, everybody can cook a reasonably authentic Spanish Paella even if they are not from Spain. My recipe uses Japanese Rice, the ideal substitute rice for Paella.
Ingredients 
- Prawns (4 large)
- Chicken Leg with Thigh (1)
- Black Mussels (8)
- Smoked Pancetta (80g)
- Spicy Chorizo Sausage (80g)
- Onion (1)
- Tomatoes (1)
- Raw Japanese Rice (1 cup)
- Lemon (2 wedges)
- Saffron Threads
- Garlic
- Parsley
- Paprika
- Oregano
For this recipe you’ll need a large frying pan that is 11 inches in diameter and 2 inches deep (I’ll assume you don’t keep a cast iron paella pan just lying around). It should come with a cover and can be a bigger but no smaller. Ideally you should also use a diffuser like the one shown below to make the heat even, but it is not essential.


Preparation
- Debone the chicken leg and cut the meat into bite sized chunks. Cut the heads off your prawns just behind the carapace and snip off all whiskers. Shell and devein the prawn bodies and slice lengthwise down the middle to bisect each prawn.
- Boil 2 cups of water in a pot. Add the chicken bones and prawn heads into the boiling stock pot and keep the stock simmering on a low flame.
- Slice the Chorizo. Set aside 8 slices of Chorizo and put the remaining slices of Chorizo into the simmering stock pot.
- In the meanwhile marinate the chicken and prawn meat in a mixture of 2T oil, 1t oregano, 1t chopped parsley, 1t paprika and flat 0.5t of salt.
- Julienne the onion into small bits, press enough garlic to get roughly 1T of minced garlic and dice 1 tomato.
- Soak and agitate the mussels in some cold water. Strain, then clean and de-beard the mussels. Add the mussels to the stock pot and turn off the fire after a minute.
- Dice your pancetta into little cubes. Drizzle a little bit of oil onto your frying pan. Stir pancetta on low heat until half the fat has been rendered from the meat. Remove and set aside the pancetta but keep the oil in the pan.

- Add the onion to the pan. Continue stir frying on low heat until they begin to brown. Next add one cup of Japanese rice and continue to stir fry for a short while to coat the rice grains.
- Pour the stock through a strainer into the pan. Add the garlic, tomatoes together with 1t paprika, 1t oregano, 1t of saffron threads, 0.5t sugar and the juice from 2 lemon wedges. Top off with enough water to bring the water level one third of the way to the top.
- Bring the pan to a low simmer. Start the clock when you notice the water bubbling and reduce the fire to the minimum. You should aim for all the visible water and bubbling to disappear at the 25 min mark. You can achieve this by using a cover to conserve water and by adding boiling water. Even when the bubbling stops there is still a bit of water below the surface so remove the cover and don’t turn off the heat just yet.
- As the rice is cooking, place the prawns, chicken, the reserved slices of Chorizo and pancetta bits in a casserole (or baking tray) and place in a preheated oven. Grill till the prawns twirl up. Turn off the oven but leave everything in the oven so it stays warm.
- At the 30 min mark carefully arrange the mussels and all the grilled meat on or into the rice and spoon the drippings from the grilling onto the rice evenly. Cover the pan once again. The ‘socarrat’ or crust should form at the bottom of the pan at this stage. After two minutes turn off the fire and wait for a further five minutes with the cover still on while the rice gets properly fluffed up and reaches its maximum size.
Notes
- The ideal rice for Paella is a short-grained Spanish variety like Bomba, but those are not easy to buy outside of Europe. Many tend to use Italian Arborio as a substitute because it also happens to be short grained but that is entirely the wrong type of rice to use. Rice meant for risotto cannot absorb too much water without becoming mushy because of its high amylopectin content which is why risotto is eaten wet and al dente. Paella must be cooked until it is dry outside but fully hydrated inside which is what makes Japanese rice ideal in this case.
- A personal secret ingredient when I cook my paella is cod liver oil. I usually add some diced smoked cod liver and use some of the oil that comes in the tin instead of olive oil. This adds tons of rich seafood flavour.
- You can also use mussels that were pre-cooked in brine and frozen but pour away the brine. It is very easy for Paella to get overly salty. Sometimes I use clams instead of mussels.
- Try not to disturb the rice too much; you can move the rice around a bit at first if you notice the heat in the pan is uneven but once the rice begins to soften you should leave it alone or the delicate rice grains will break. You definitely do not want to keep stirring continuously like you are cooking a risotto.
- You will notice I boiled some of the Chorizo in the stock. In my opinion this is the best way to extract its flavour to the rice. Do not add the boiled mushy Chorizo back to the rice, only the Chorizo that was grilled with the chicken can be used as a topping.
Tags: Chicken, Chorizo, mussels, Pancetta, Prawn, Rice, Sausage, Seafood, Spanish, tomatoes
(serves 5)
My Lobster Thermidor recipe avoids the main pitfall of the traditional in-the-shell method; You can have your lobster meat nice and tender since you don’t have to cook it an extra time to first remove the meat from the shell. It is also simple and easy, you don’t have to worry about procuring whole fresh lobsters, halving them without breaking the shell, removing meat from the claw, serving an odd number of servings etc. In addition, you avoid the hassle of making a béchamel sauce. And it still tastes rich and creamy.
Ingredients
- Lobster Tails (2=300g)
- Mushrooms (100g)
- Onion (0.5)
- Mascarpone (200g)
- Emmental (100g)
- Parmesan (70g)
- White Wine (0.75 cups)
- Cooked Rice (2 cups)
- Garlic (3t)
- Butter
- Tarragon
Preparation
- Boil 3/4 cups of long grain rice, this will become 2 cups when it is cooked.
- Fully defrost your raw lobster tails if they come frozen. Separate the meat from the shell. Cut the meat into bite sized morsels.
- In a bowl mix 20g of warm butter, 3t of crushed garlic, 0.5t of salt and 0.5t of white pepper. Add the lobster and mix well. Leave it to marinate while you do the next steps.
- If your cheese did not come grated, grate it now. In any case leave the cheese out to warm.
- Julienne half an onion into small bits and slice the mushrooms into thin slices. Pan fry the onions on low heat with a large knob of butter, adding the mushrooms once the onion begins to brown.
- When the mushrooms become limp turn up the heat and add 3/4 cup of white wine. I tend to use chardonnay for its woody flavour. Let the mixture boil and reduce for 1 minute.
- Turn off the fire. Add the Mascarpone to the pan and stir till it has melted. Next, gradually sprinkle on and stir in the grated emmental as you bring the mixture back to a low simmer. Finally sprinkle on two thirds of the parmesan. Turn off the fire as soon as the cheese has melted. Season with 0.5t salt, 0.5t sugar, 1t black pepper and 1T of tarragon.
- Preheat your oven to 200oC (390oF).
- Divide your cooked rice into 5 ramekins. Press the rice down lightly till it is flat, but do not compact it. Arrange the lobster meat on top of the rice.
- Spoon the cheese sauce evenly into the ramekins and sprinkle the remaining parmesan over the top of each ramekin.
- Bake for 15 minutes or until brown spots begin to appear on the surface.
Notes
- Make sure you let the emmental warm to room temperature before using it or it will separate into oily rubbery clumps.
- You can use semi cooked orzo pasta if you are not used to cooking rice, but rice goes better with this dish. For more information on rice, refer to my White Rice Page.
- The easiest way to separate the meat from the shell is to cut the shell in two lengthwise with a pair of scissors along the ‘spine’.
- For alternative cheeses, refer to my Cheese Page.
- Butter is essential to the taste of lobster thermidor, do not substitute with olive oil.
Tags: Cheese, Emmental, lobster, Mascarpone, Mushroom, Parmigiano-Reggiano, Rice
(serves 12)
Jambalaya is an all-in-one rice dish specific to the American South-east. If I’m not mistaken Jambalaya means Ham-Rice. While some consider Jambalaya a spicy version of its cousin the Spanish Paella, I tend to think of it as a heavier meatier version, as is the way with all things American, and that’s the way I make mine, with lots of smoked or cured meat. I use a special extra ingredient, minced pork sausage filling, this flavours the rice really nicely. I also grill the chicken and seafood separately first, this flavours the fresh meats really nicely.
Ingredients 
- Clams in Shell (600g)
- Prawns (16 large)
- Chicken Legs with Thigh (3)
- Smoked Pork Belly (400g)
- Breakfast Pork Sausages (400g)
- Chorizo Sausages (250g)
- Onion (2)
- Capsicum (2)
- Celery (2 cups, chopped)
- Diced Tomatoes (1 can, 400g)
- Raw Jasmine Rice (4 cups)
- Chicken Stock Cube (1)
- Whisky
- Cayenne Pepper
- Paprika
- Cumin
- Oregano
- Thyme
Preparation
- Soak and agitate the clams in cold water.
- Boil about 7 cups of water in a pot with one chicken stock cube. Cut the heads of your prawns just behind the carapace and snip off all whiskers. Place the heads into the boiling stock pot. Add 1T cayenne pepper, 1T oregano, 1T thyme, 1t salt, 1t sugar. Keep the stock on a low simmer.
- Shell and then devein the prawn bodies and cleave each prawn in half if they are big. Marinate in a bowl using 1T paprika, 1T cumin, a pinch of salt and a dash of oil.
- In a second larger bowl rub 3 chicken legs with 1T paprika and 1T cumin and 1t of salt. Grill the chicken for 5 minutes and then the add the prawn and grill for another 5 minutes. Dissolve any left over marinade and the drippings in hot stock and then pour the liquid back into the stock pot.
- Dice 2 cups of celery, 2 onions and 2 capsicum (i.e. bell pepper).
- Debone the cooled grilled chicken and cut it into large chunks. The chicken bones can go into the stock pot.

- Dice the smoked pork belly. Cut the lard portions into smaller pieces (10 o’clock) and the meat portions into larger cubes (8 o’clock). Slice the Chorizo into slices (4 o’clock). Remove the skin of the pork sausages (2 o’clock) and mix the filling with 1/4 cup of water to loosen it.
- Spoon 4T of vegetable oil into a large frying pan. Add the pork belly and Chorizo and fry on medium heat till their lard renders. Next, add the sausage filling as well and stir fry until the minced pork browns.
- Remove the meat. Reserve 4T of the flavoured oil leaving the rest in the pan. Stir fry the celery and onion in the same pan until they are limp. Then add 4 cups of rinsed jasmine rice and stir fry for a further minute.
- Transfer the rice into a Dutch oven (i.e. a baking vessel with a cover). Open the can of diced tomatoes, pour the liquid into the stock pot and the tomato pieces over the rice.
- Preheat your oven to 200oC (390oF). Throw the clams into the stock pot together with 1/4 cup of whisky and bring it to a boil for a minute .
- Ladle boiling stock over the rice until the liquid is level with the rice. Follow this with all the cooked meat and the diced capsicum. Mix well. Add the prawn heads and clams (only those that opened) from the stock pot.
- Place the Dutch oven in the oven with its cover on. Reduce to 150oC (300oF) when you can smell the jambalaya cooking. After 45 minutes in the oven, check if the rice (deep under the surface) is both cooked and dry. When the rice is perfect, allow it to rest inside the oven with the cover off.
- In the meanwhile discard the chicken bones from the remaining stock and add the reserved pork oil to the pot. Boil this down till it begins to thicken into a sauce.
- Taste the rice and salt the sauce as necessary (i.e. this is your last chance to adjust the taste of the jambalaya). Spoon the sauce over your jambalaya and serve.
Notes
- This is a recipe for a very large amount of food. You can halve the portions if you don’t have that many people. There shouldn’t be any scaling issues.
- Between two baking containers of the same volume, always use the one that is flatter. The Jambalaya will cook more evenly. A Jambalaya more than four inches deep will tend to have wetter rice at the bottom. An alternative is to use two containers. Use foil if your flatter containers don’t have covers.
- Why not just cook the jambalaya on the stove? Because there is a tendency for the bottom of the pot to burn. You can try that after you have perfected the oven method.
- Why do we have to grill the chicken and prawns first? This is a great way to sear some flavour into them so they don’t taste like boiled meat. The high heat will also remove any freezer taste.
- Add more cayenne pepper if you like your jambalaya spicy.
- I used Chorizo sausage as Andouille it is not easily found in many parts of the world. If you can’t find smoked pork belly, use a brined ham hock, salted pork neck or cubed pancetta (but not sliced bacon). I also left out the customary calamari as squid gets very hard when it is over cooked.
- Use capsicums of 2 different colours for a better visual impact.
Tags: Chicken, Chorizo, Clams, Pork, Prawn, Rice, Sausage, Scallop, Seafood
(serves 3)
Here we have an unusual flavour for risotto, the trademark combination of pancetta, parmigiano and raw egg yolk known as Carbonara. Arborio rice is a good deal more starchy than pasta so its not as simple as making a carbonara sauce and pouring it over cooked rice. We also desire some bits of other crunchy morsels in the rice to give our risotto a bit more textural variety. Therefore I’ve had to improvise with some other additional ingredients….
Ingredients 
- Cubed Pancetta (300g)
- Luncheon Meat (200g)
- Bacon (3 slices)
- Arborio Rice (1 cup)
- Parmigiano-Reggiano (1/4 cup)
- Onion (1)
- Spring Onion (8 stalks)
- Mushrooms (100g)
- Butter (40g)
- Eggs (2)
- Cream (1/2 cup)
- Basil
- Brandy
- Turmeric
Preparation
- Start with the stock first. Cut the luncheon meat into 1cm cubes and boil them in 4 cups of water. When the water is boiling, add 3 slices of bacon, 4 stalks of spring onion and 1 flat t of turmeric. Simmer for 1 hour.
- While the simmering is going on, fry 300g of cubed pancetta on low heat in a pan. While the pancetta is being fried (you only need to move it occasionally), dice 1 onion finely.
- When the lard has been melted off the pancetta, remove the bits of meat, leaving the oil in the pan. Stir fry the onion bit over a low flame in this oil till they begin to caramelize.
- Next, add 1 cup of Arborio rice to the pan and continue to stir fry for 5 minutes and then turn off the heat.
- Cut the remaining spring onion into small bits, keeping the bits from the bottom half separate from the bits from the top half. Also, slice your mushrooms, and grate 1/4 cup of Parmigiano-Reggiano. Mix the cheese with 30g of diced butter.
- By this time, the 1 hour on the stock to be up. Keep the fire going under the stock. Reheat the pan on low heat and then ladle some of the boiling stock (liquid only, not the solids) into the rice. Keep the pan on a low simmer, stirring occasionally. Add more stock whenever the rice begins to dry. Add more water to the stock pot when that begins to dry up.
- After 20 minutes, add 1/4 cup cream, 3T of brandy and 1t of sugar. Then mix in the mushroom slices, 1T of chopped basil and the white portion of the chopped spring onions.
- Soon thereafter the rice will get to the al dente stage. At that time turn off the heat and add another 1/4 cup of cream, 2 egg yolks, the pancetta bits and the cheese-butter mixture. Give everything a thorough mixing and keep covered for 10 minutes while the rice fluffs up.
- You shouldn’t need to add any salt but taste for saltiness anyway, just in case. Plate and serve immediately after the 10 minutes is up. Sprinkle on some black pepper and use the remaining green part of the chopped spring onions as garnishing.
Notes
- If you are making risotto for the first time, refer to this earlier recipe for more details on risotto making.
- If you like Carbonara, you might be interested in my Lagsana Carbonara or Fettucine Carbonara recipes.
- I normally don’t add cream to my risotto, but this is a Cabonara after all.
- For this recipe both the smoked or sweetened pancetta varieties are suitable.
Tags: Italian Cuisine, Luncheon Meat, Pancetta, Parmigiano-Reggiano, Rice, Risotto
(serves 3)
Coq au Vin is a wholesome simmered dish which hails from France. Traditional Coq au Vin recipes typically get you to boil your chicken to death as the flavour of the red wine matures and seeps into the meat. This method doesn’t work too well with chicken breasts which become dry and hard. To keep your chicken breasts tender, you’ll see from the recipe that I’ve taken a different approach. Since the aim is to cook a (more) healthy dish with white meat here, I’ve also factored in a way to bypass the need for chicken skin or lardons to react with the tannin in the wine.
Ingredients 
- Chicken Breasts (600g)
- Luncheon Meat (200g)
- Onion (1)
- Shallots (8)
- Mushrooms (100g)
- Carrot (1)
- Garlic (1 bulb = 12 cloves)
- Red Wine (1 cup)
- Port (1/4 cup)
- Brandy (1/4 cup)
- White Rice (1T)
- Butter
- Chicken stock cube (1/2)
- Sage
- Thyme
- Oregano
- Paprika
Preparation
- Before proceeding with the rest of the recipe, brine your chicken breasts overnight or for at least 8 hours according to the recipe in this earlier post.
- Dry the brined chicken breasts with kitchen towels and rub on a dusting of paprika.
- Peel the garlic, shallots and onion. Cut the onion into 8 ‘quarters’ and slice the carrot into 1/3 inch pieces.
- Slice the luncheon meat (a.k.a. spam) block into 5 slices. Place this into a pot with half a mashed chicken stock cube, 1 cup of red wine, 1/4 cup port and 3 cups of water. Turn on the heat and bring to a low simmer.
- Add the garlic cloves, onion, shallots and carrot pieces. Sprinkle in 1 heaped T of raw rice that has been rinsed (2T if cooked, without the rinse).
- Add 1t each of chopped sage, thyme and oregano. Simmer on low heat for 1 hour, uncovered. Top up with a bit of water as and when needed.
- OK, its one hour later. Melt 20g of butter in a second pot which is just big enough to fit the chicken breasts flat and without overlapping. When the butter begins to darken, sear the chicken breasts briefly in the butter to seal them and then quickly add the wine stew minus the luncheon meat.
- Top off with 1/4 cup brandy and the mushrooms (cut into halves). Make sure all the chicken is completely submerged.
- Bring to a boil for about 5 minutes, or until you notice that the meat is just beginning to shrink. Turn off the fire and leave covered for half an hour while the chicken continues to slow cook. You can serve your Coq au Vin anytime thereafter, but its best to leave the pot to sit for a few hours as more wine flavour will be infused into the chicken.
- Briefly bring to a second boil before serving. If you need to thicken the stew further, boil it down but with the chicken breasts temporarily taken out – return the chicken to the pot for a final quick reheat. Taste and add salt if needed at the very end.
Notes
- As you’ve noticed, we do the cooking in two stages. Making the wine vegetable stew first without the chicken is the ticket to getting the wine to mature without overcooking the chicken breast. This is followed up by a short cooking time and long soaking time for the chicken to get tender flavourful chicken, a technique they use in making Hainanese Chicken Rice.
- Normally chunks of salted pork fat called lardons and chicken skin are needed to neutralize the tannin of red wine. This is where the luncheon meat comes in. In fact since luncheon meat contains ground up connective tissue, it works even better to mature the red wine. The other good thing about using luncheon meat is that it can be removed easily.
- The rice is a convenient way to thicken the stew without the trouble of making a roux with flour.
- Burgundy, which is light, is normally the wine of choice for Coq au Vin while a heavier wine like Bordeaux is used for braising collagen rich beef cheek and oxtail. With all the collagen in luncheon meat, you can afford to use a heavier wine for a more robust stew.
Tags: Chicken, French Cuisine, Luncheon Meat, red wine, Rice, Stew
(serves 3)
Claypot Chicken Rice is Cantonese comfort food classic where rice is flavoured with sausage and sweet soya sauce. Traditionally, Claypot Chicken Rice is cooked in a claypot as the name implies but in modern times it is very often cooked in a rice cooker at home so it is done perfectly every time. The recipe is somewhat special in that the rice and chicken are cooked separately, and then again together. Additional items used to flavour the rice are fragrant Chinese sausages and Shiitake mushrooms. The chicken is tenderized with bicarbonate of soda, making it super tender and juicy.
Ingredients
- Chicken Thigh & Leg (2)
- Red Chinese Sausage (1)
- Brown Chinese Liver Sausage (2)
- Dried Shiitake Mushrooms (6)
- Raw Jasmine Rice (1.5 cups)
- Minced Ginger (1/2 a thumb)
- Dark Soya Sauce
- Chinese Wine
- Sesame Oil
- Golden Syrup
- Coriander Seed Powder
- Corn Starch
Preparation
- Soak 6 dried shiitake mushrooms in 1 cup of cold water plus 1T soya sauce and 1t sugar for 2 hours. After the first hour snip off the stems and discard them, then cut each mushroom in half and continue soaking. Soaking overnight is fine.
- Debone the chicken legs and cut the meat into bite sized chunks, trim off all the loose skin and fat. Mix 3T soya sauce with 1T golden syrup, 1t of salt, 1t sugar and Chinese wine in a big bowl and marinate the chicken with this. Separately mix 1t corn starch with 1/2 cup of cold water until it completely dissolves and then stir this into the marinating chicken.
- Cut off the tip of the sausages with the string attached and slice them into 1/3 inch pieces.
- Rinse the raw rice a few times in the detachable rice cooker pot, draining the water each time. Use Jasmine Rice or any other type of long grained rice. Pour in the mushroom water (but not the mushrooms) and top up with water until the water level is 1/4 inch above the rice (i.e. this is a bit less than the amount of water you would normally use) and set the rice cooker to ‘cook’.
- Strain the marinade from the chicken, into the container containing the mushrooms.
- Finely slice the ginger after peeling it. Fry the ginger in 3T of vegetable oil in a pan on high heat. When the ginger begins to brown and the oil is really hot, add the chicken. Stir fry the chicken until no visible part of the meat is raw.
- Next, add the marinade and mushrooms to the pan. Bring to a simmer and sprinkle in 1t white pepper and 1t coriander seed powder.
- When the rice cooker goes to ‘keep warm’, arrange the contents of the pan on top of the (now almost fully cooked) rice inside the rice cooker (see picture below). Sprinkle the left over liquid from the pan into the rice cooker evenly.
- Set the rice cooker to cook a second time, if it has a quick cook function use that. When the rice cooker returns to ‘keep warm’ mode again, your chicken rice is done.
Notes 
- The reason we are using 2 brown sausages to one red one is that the red sausages are longer. Chinese sausages should be easy to find in any Chinatown. If you really hate liver, use 2 red sausages instead.
- If you can’t find any of the brown Chinese sausages, you can use braunschweiger (i.e. liverwurst) instead. They will be different in size, so adjust the quantity accordingly. For reference, a Chinese sausage is 6 inches long and 3/4 inch in diameter.
- You can make your claypot chicken rice well ahead of time and reheat with the ‘keep warm’ function of your rice cooker.
- If you don’t have a rice cooker, you will need a clay pot. It will be very difficult to cook this in a metal pot so I suggest you don’t try. The rice gets burnt very easily.
- If you like this recipe, have a look at my Oyakodon recipe, which is the Japanese version of chicken rice.
Tags: Chicken, Chinese Cuisine, Mushroom, Recipe, Rice, Sausage, Shiitake
(serves 3)
Oyakodon a.k.a. Oyako Donburi a.ka.a Oyako Rice Bowl is a scrumptious mixture of tender simmered chicken pieces with scrambled eggs served on piping hot rice. The chicken is marinated in a semi-sweet sauce which when combined with the flavour from shiitake mushrooms and dashi broth results in the perfect sauce to go with rice. It’s no wonder Oyakodon is one of the most popular rice dishes in Japan. As it is an all-in-one complete meal, Oyakodon is quite a convenient dish to serve, it can be made in under an hour.
Ingredients 
- Chicken Thigh & Leg (2, boneless)
- Onion (1)
- Eggs (4)
- Dried Shiitake Mushrooms (4)
- Cooked Japanese White Rice (3 bowls)
- Scallion (3 shoots)
- Ginger (1t)
- Dark Soya Sauce
- Mirin
- Hon Dashi
- Sesame Oil
- Dried Seaweed (optional)
Preparation Part I
- Julienne the scallion into small 1/8 inch slices, keeping the white bits seperate from the green bits.
- If you didn’t buy your chicken legs deboned, you’ll need to debone them yourself. Seperate the skin from the meat as well. Trim off any large bits of fat from the meat and then cut the meat into bite sized chunks.
- In a bowl mix 4T soya sauce, 2T mirin, 1T sesame oil, 1t sugar, 1t pureed ginger and the white part of the scallion. Marinate the chicken pieces in this.
- Fry the skin in 1T of vegetable oil in a pan on low heat until the skin gets crispy. There is no need to move the skin save to flip it once.
- In the meanwhile dissolve 1t hon dashi pellets and 1t sugar into 1 cup of room temperature water. Soak your shiitake mushrooms in this.
- Peel and slice the onion into half rings.
- Rinse your rice and set it to cook in a rice cooker.
- At this stage the mushrooms would have softened a bit. Snip the stems and discard them. Slice the mushrooms into 1/4 inch strips and continue to soak them in the same liquid.
- Remove the skin from the pan, leaving the oil in the pan.
- Let the chicken marinate while the rice gets cooked, for about thirty minutes.
You may do everything in part I ahead of time
Preparation Part II
- Beat 4 eggs in a bowl with 1T mirin. Leave them in the open to warm up.
- Pan fry the onion pieces in the pan with the chicken oil until they begin to soften.
- Turn up the heat. When the pan is hot, drain any remaining chicken marinade into the bowl with the mushroom.
- Add the chicken pieces to the pan and stir fry the chicken, ensuring all surfaces are browned. Turn the heat down when the meat begins to shrink. Next, add the mushroom slices, including all the liquid. Sprinkle liberally with pepper and continue cooking until the liquid has been reduced by half in volume.
- Push the chicken pieces to the side of the pan and pour the egg mix into the middle (which will still contain sauce). Turn off the heat after 30 seconds or until just half of the egg mixture begins to solidify. Mix everything in the pan one last time without smashing up the soft egg too much.
- Scoop your cooked rice straight from the rice cooker into 3 large bowls, filling them 3/4 of the way up. Top off each bowl with the contents of the pan, including all the sauce. The egg should continue to cook til it is slightly runny.
- Sprinkle on the green bits of the scallion immediately while everything is still steaming hot. You may also add some thin strips of dried seaweed (Nori) if you like.
Notes
- Oyako means Parent and Child, a reference to main ingredients being Chicken and Egg .
- If you are going out to buy mirin for the first time, check out my What is Mirin? page first. If you really cannot get your hands on some mirin, you can also find out how to make a substitute there.
- What if I can’t find any shiitake mushrooms? The flavour from the shiitake (She-tar-kay) mushrooms is important too. If you really need to, try substituting with dried Porcini or Morel. Don’t use fresh mushrooms as they will impart an unwanted bitter gamey taste.
- What if I don’t know how to cook rice? Refer to my White Rice Page. It goes without sayinh, it’s best to use Japanese rice for this dish.
- If you like, you can cut the chicken skin that has been fried crispy into little pieces and sprinkle it on with the scallion at the end. You should not however leave the skin on the chicken. Together, there is no way to cook the skin properly and yet leave the chicken meat tender.
- Please note – the egg in the photo is a bit over cooked, it should be a bit runnier. My bad. If you want your egg to have a nicer colour and texture, use 4 yolks with 3 egg whites instead.
Tags: Chicken, Egg, Japanese Cuisine, Mirin, Mushroom, Recipe, Rice


