RSS

Tag Archives: Seafood

Oven Baked Nonya Otak-otak

(serves 8)
Otak-otak is a terrine-like grilled fish delicacy from South-east Asia, an exotic spicy dish that works as a western appetizer. There are many varieties of Otak-otak from Thailand all the way down to Indonesia; this version is of the Straits Chinese style featuring coconut milk, popular in Singapore and Penang. Otak-otak is usually grilled in banana leaves and contains other ingredients uncommon in the Western kitchen, but I have worked out a modified recipe that resolves these issues.  

Ingredients

  1. White Fish Fillets (500g)
  2. Yeo’s Minced Prawns in Spices (2x160g tins)
  3. Coconut Milk (160 ml)
  4. Onion (0.5)
  5. Egg (1)
  6. White Sandwich Bread
  7. Lemon
  8. Cucumber
  9. Sherry
  10. Lemongrass
  11. Tarragon

Preparation

  1. Dice half an onion and pan fry the pieces on low heat in a pan with a dash of oil. When the onion begins to get limp turn up the heat and add the two cans of minced prawn to the pan and continue frying until you see bubbling. Sprinkle on 2t lemongrass and 1t tarragon and transfer the contents of the pan to a large mixing bowl when it has cooled down.
  2. Make a brine out of 1T salt, 1t sugar, 1T of lemon juice and 2 cups of water. Cut the fish into chunks and put them in the brine them for 20 minutes (and no more). Rinse and place the fish pieces on a tea towel to dry. You can do this concurrently with step 1.
  3. Cut 2 slices of plain bread into small cubes. If the bread is fresh and the crust is still soft you can keep the crust, otherwise trim the crust off. Pour in 160 ml of coconut milk over the diced bread followed by 1 egg, 1T of sherry and 1t of sugar. Mix well, then add the fish.
  4. Place a quarter of the fish and bread mixture in a food processor and give it a 2 second pulse (and no more) on low power. Transfer the resulting fish paste to the mixing bowl with the shrimp and onion. You want the fish paste to be coarse but even, so you cannot blend too much at a time. Repeat another three times to use up all the fish and bread. Stir  everything in the mixing bowl until you get an even colour.
  5. Preheat your oven to 150oC (300oF).
  6. Pour the seafood mixture into a medium sized casserole dish. The casserole dish should be big enough such that the thickness of the seafood is no more than one inch. Cover the casserole dish, if it doesn’t have a cover you can use aluminium foil snugly crimped over the top.
  7. Place the casserole in the oven. The idea is not so much to bake the fish but to steam it. After 40 minutes, remove from the oven and allow to cool. There will be bulge in the centre initially but this will flatten over time. What you have now is a seafood terrine of sorts.
  8. When the terrine is cold, and this can be several hours later or even overnight (in the fridge), put it back in the oven, this time uncovered, for twenty minutes at 200oC (390oF). This will boil off most of the free liquid, refine the aroma and give the Otak-otak a nice crust – as shown here.
  9. While still hot, cut the Otak-otak into slices and serve on untoasted plain white bread with some thin cucumber slices.

Notes

Yeo’s Minced Prawns in Spices

  • As the fish is cooked for an extended time, there is no point in using fresh fish. I typically use frozen pangasius fillets myself , they are cheap and readily available, but really any kind of white fish is fine. The important thing is to dry the fish (draining on a colander is insufficient) properly after brining as the Otak will end up too wet if you don’t.
  • Yeo’s Minced Prawn in Spices a.k.a. Prawn Sambal is a key ingredient that contains in a single tin every ingredient you need for cooking Otak you won’t find in your kitchen larder. Last time I checked, you can order it from Amazon. Its not the perfect solution, but its better than looking for weird ingredients like candlenut and galangal.
  • If you don’t like your food spicy, you can use just one tin of the minced prawn instead of two (the child’s version I call this), but you’ll need to add salt and sugar to compensate.
  • To bring your Otak-otak to the next level, you can add chunks of whole seafood. For example you could brine a few scallops along with the fish, dice them and add them in step 6. Canned or bottled clams would work well also. If you bake cakes and have pandan essence around, a few drops will also do wonders. 
  • Instead of on bread, you can also serve Otak-otak with some white rice cooked with coconut milk.
  • The Thai version of Otak-otak has a different name, which is Hor Mok Pla.  


Tags: , , , , , ,

Seared Scallops with a Duxelles Wine Sauce

(serves 4 – 6)
This recipe pairs Scallops with its traditional complimentary ingredients, such as mushrooms, wine and cream,  a combination that is sure to be a crowd pleaser. Searing on a flavoursome crust is a great enhancement to pleasant but somewhat monotonous scallop flesh, but somehow when you sear scallops at home it never turns out quite right. To make seared scallops to restaurant standard there is no complicated technique involved. All you need is the right ingredients and the proper procedure ….     

Ingredients

  1. Large Scallops (18)
  2. Onion (1)
  3. Mushrooms (200g)
  4. Garlic (1T minced)
  5. Mustard
  6. Coriander Seed Powder
  7. White Wine (0.33 cup)
  8. Cream (0.5 cup)
  9. Tarragon
  10. Butter
  11. Lemon

Preparation

  1. Defrost your scallops ahead of time.
  2. Prepare a brine of 1T salt, 1t sugar, the juice of a wedge of lemon in two cups of water. Place the scallops in the brine for twenty minutes. Do not go beyond twenty minutes or the scallop flesh will become too salty.
  3. Rinse the scallops and wrap them in a tea towel to dry them as much as possible. Leave them there until step 7.
  4. Julienne the onion and dice the mushrooms into 1cm pieces. Mince a few cloves of garlic.
  5. Fry the onion pieces in a pan on a low fire with a dash of oil until they are limp, but not caramelized. Add 1T of minced garlic and stir fry for 1 minute further.
  6. Turn the heat up and add the wine, followed by the cream and 1t mustard, 1t coriander seed powder and 0.5t sugar. Stir till the mustard melts away and then add the mushrooms. Simmer until the liquid dries off enough to produce a thick sauce. Sprinkle on black pepper and salt to taste to complete your duxelles sauce.
  7. In a different pan melt a large knob of butter on high heat. When the pan is really hot and the butter darkens a bit, place half the scallops in the pan, and keep them cooking on the same side. Move the scallops around in a circular motion one at a time with tongs but do not flip them. Add more butter if the pan begins to dry. When you notice the searing along the bottom edges flip each scallop over and repeat the procedure until the other side gets seared too, then remove the scallops onto a plate temporarily.
  8. Sprinkle a pinch of tarragon on to the mushroom duxelles and begin reheating it.
  9. Do the same as step 7 for the second batch of scallops after adding a new knob of butter. When this lot is done, turn the fire off and add the first batch of scallops back into the pan. Stir fry for a short while with the fire off to coat the sides of the scallops. This will also serve to warm up the first batch.
  10. Spoon some of the duxelles sauce on each plate to form a bed for the scallops and then arrange three (or four for four servings) scallops on each bed. Serve immediately.

Notes

  • There is no point in buying fresh scallops, the frozen ones will do nicely. You should however buy the more expensive ‘dry’ (not to be confused with dried) variety that are frozen without additional processing. You can identify these by their colour, which is ivory white. ‘Wet’ scallops are those that have been soaked in sodium tripolyphosphate to bloat their size. Thus type of scallop is toothpaste white because of the bleaching effect of the phosphates, and they shrink when cooked anyway. If you are unsure, you can’t go wrong with scallops from japan that come in a paper box.
  • Do not skip the brining. This is essential for two reasons. Firstly, it is the only way to put taste inside the scallop instead of on its surface; this is very important for big scallops. Secondly this removes extra water from scallops; if there is too much internal water, the scallops will get fully cooked and rubbery before they even start searing.
  • You cannot use vegetable oil to sear the scallops. Butter contains impurities which starts the browning process.
  • I did not specify a cooking time because this will vary with the thickness of the scallops and how well you like them cooked. I like to cook my scallops medium like steak so they don’t shrivel up, but its up to you. Use a lower fire and pan fry for longer if you like your scallops more cooked.
  • I made the diced potatoes in the photo separately, and they are not part of the recipe per se.
 
Leave a comment

Posted by on November 14, 2018 in Appetizers, French, Recipe, Seafood


Tags: , , , , , ,

Japanese Rice Paella in a Frying Pan

(serves 4)
Paella is a culinary gift from the Valencia region of Spain to the rest of the world. In this version we have a combination of meats from land, sea and air, simmered to perfection with saffron-infused rice in the pan.  Not that many people cook Paella because they believe it requires a special variety of rice from Spain and a special cast iron Paella pan. It does not, everybody can cook a reasonably authentic Spanish Paella even if they are not from Spain. My recipe uses Japanese Rice, the ideal substitute rice for Paella.       
 

Ingredients

  1. Prawns (4 large)
  2. Chicken Leg with Thigh (1)
  3. Black Mussels (8)
  4. Smoked Pancetta (80g)
  5. Spicy Chorizo Sausage (80g)
  6. Onion (1)
  7. Tomatoes (1)
  8. Raw Japanese Rice (1 cup)
  9. Lemon (2 wedges)
  10. Saffron Threads
  11. Garlic
  12. Parsley
  13. Paprika
  14. Oregano


For this recipe you’ll need a large frying pan that is 11 inches in diameter and 2 inches deep (I’ll assume you don’t keep a cast iron paella pan just lying around). It should come with a cover and can be a bigger but no smaller. Ideally you should also use a diffuser like the one shown below to make the heat even, but it is not essential.


Preparation

  1. Debone the chicken leg and cut the meat into bite sized chunks. Cut the heads off your prawns just behind the carapace and snip off all whiskers. Shell and devein the prawn bodies and slice lengthwise down the middle to bisect each prawn.
  2. Boil 2 cups of water in a pot. Add the chicken bones and prawn heads into the boiling stock pot and keep the stock simmering on a low flame.
  3. Slice the Chorizo. Set aside 8 slices of Chorizo and put the remaining slices of Chorizo into the simmering stock pot.
  4. In the meanwhile marinate the chicken and prawn meat in a mixture of 2T oil, 1t oregano, 1t chopped parsley, 1t paprika and flat 0.5t of salt.
  5. Julienne the onion into small bits, press enough garlic to get roughly 1T of minced garlic and dice 1 tomato.
  6. Soak and agitate the mussels in some cold water. Strain, then clean and de-beard the mussels. Add the mussels to the stock pot and turn off the fire after a minute.
  7. Dice your pancetta into little cubes. Drizzle a little bit of oil onto your frying pan. Stir pancetta on low heat until half the fat has been rendered from the meat. Remove and set aside the pancetta but keep the oil in the pan.
  8. Add the onion to the pan. Continue stir frying on low heat until they begin to brown. Next add one cup of Japanese rice and continue to stir fry for a short while to coat the rice grains.
  9. Pour the stock through a strainer into the pan. Add the garlic, tomatoes together with 1t paprika, 1t oregano, 1t of saffron threads, 0.5t sugar and the juice from 2 lemon wedges. Top off with enough water to bring the water level one third of the way to the top.
  10. Bring the pan to a low simmer. Start the clock when you notice the water bubbling and reduce the fire to the minimum. You should aim for all the visible water and bubbling to disappear at the 25 min mark. You can achieve this by using a cover to conserve water and by adding boiling water. Even when the bubbling stops there is still a bit of water below the surface so remove the cover and don’t turn off the heat just yet.
  11. As the rice is cooking, place the prawns, chicken, the reserved slices of Chorizo and  pancetta bits in a casserole (or baking tray) and place in a preheated oven. Grill till the prawns twirl up. Turn off the oven but leave everything in the oven so it stays warm.
  12. At the 30 min mark carefully arrange the mussels and all the grilled meat on or into the rice and spoon the drippings from the grilling onto the rice evenly. Cover the pan once again. The ‘socarrat’ or crust should form at the bottom of the pan at this stage. After two minutes turn off the fire and wait for a further five minutes with the cover still on while the rice gets properly fluffed up and reaches its maximum size.

NotesPaella

  • The ideal rice for Paella is a short-grained Spanish variety like Bomba, but those are not easy to buy outside of Europe. Many tend to use Italian Arborio as a substitute because it also happens to be short grained but that is entirely the wrong type of rice to use. Rice meant for risotto cannot absorb too much water without becoming mushy because of its high amylopectin content which is why risotto is eaten wet and al dente. Paella must be cooked until it is dry outside but fully hydrated inside which is what makes Japanese rice ideal in this case.
  • A personal secret ingredient when I cook my paella is cod liver oil. I usually add some diced smoked cod liver and use some of the oil that comes in the tin instead of olive oil. This adds tons of rich seafood flavour.
  • You can also use mussels that were pre-cooked in brine and frozen but pour away the brine. It is very easy for Paella to get overly salty. Sometimes I use clams instead of mussels.
  • Try not to disturb the rice too much; you can move the rice around a bit at first if you notice the heat in the pan is uneven but once the rice begins to soften you should leave it alone or the delicate rice grains will break. You definitely do not want to keep stirring continuously like you are cooking a risotto.
  • You will notice I boiled some of the Chorizo in the stock. In my opinion this is the best way to extract its flavour to the rice. Do not add the boiled mushy Chorizo back to the rice, only the Chorizo that was grilled with the chicken can be used as a topping.
 
Leave a comment

Posted by on August 2, 2016 in Japanese, Main Courses, Poultry, Recipe, Seafood


Tags: , , , , , , , , ,

Oven Cooked Creole Jambalaya

(serves 12)
Jambalaya is an all-in-one rice dish specific to the American South-east. If I’m not mistaken Jambalaya means Ham-Rice.  While some consider Jambalaya a spicy version of its cousin the Spanish Paella, I tend to think of it as a heavier meatier version, as is the way with all things American, and that’s the way I make mine, with lots of smoked or cured meat. I use a special extra ingredient, minced pork sausage filling, this flavours the rice really nicely. I also grill the chicken and seafood separately first, this flavours the fresh meats really nicely.      
 

Ingredients Jambalaya

  1. Clams in Shell (600g)
  2. Prawns (16 large)
  3. Chicken Legs with Thigh (3)
  4. Smoked Pork Belly (400g)
  5. Breakfast Pork Sausages (400g)
  6. Chorizo Sausages (250g)
  7. Onion (2)
  8. Capsicum (2)
  9. Celery (2 cups, chopped)
  10. Diced Tomatoes (1 can, 400g)
  11. Raw Jasmine Rice (4 cups)
  12. Chicken Stock Cube (1)
  13. Whisky
  14. Cayenne Pepper
  15. Paprika
  16. Cumin
  17. Oregano
  18. Thyme

Preparation

  1. Soak and agitate the clams in cold water.
  2. Boil about 7 cups of water in a pot with one chicken stock cube. Cut the heads of your prawns just behind the carapace and snip off all whiskers. Place the heads into the boiling stock pot. Add 1T cayenne pepper, 1T oregano, 1T thyme, 1t salt, 1t sugar. Keep the stock on a low simmer.
  3. Shell and then devein the prawn bodies and cleave each prawn in half if they are big. Marinate in a bowl using 1T paprika, 1T cumin, a pinch of salt and a dash of oil.
  4. In a second larger bowl rub 3 chicken legs with 1T paprika and 1T cumin and 1t of salt. Grill the chicken for 5 minutes and then the add the prawn and grill for another 5 minutes. Dissolve any left over marinade and the drippings in hot stock and then pour the liquid back into the stock pot.
  5. Dice 2 cups of celery, 2 onions and 2 capsicum (i.e. bell pepper).
  6. Debone the cooled grilled chicken and cut it into large chunks. The chicken bones can go into the stock pot.4 Bowls of Pork
  7. Dice the smoked pork belly. Cut the lard portions into smaller pieces (10 o’clock) and the meat portions into larger cubes (8 o’clock). Slice the Chorizo into slices (4 o’clock). Remove the skin of the pork sausages (2 o’clock) and mix the filling with 1/4 cup of water to loosen it.
  8. Spoon 4T of vegetable oil into a large frying pan. Add the pork belly and Chorizo and fry on medium heat till their lard renders. Next, add the sausage filling as well and stir fry until the minced pork browns.
  9. Remove the meat. Reserve 4T of the flavoured oil leaving the rest in the pan. Stir fry the celery and onion in the same pan until they are limp. Then add 4 cups of rinsed jasmine rice and stir fry for a further minute.
  10. Transfer the rice into a Dutch oven (i.e. a baking vessel with a cover). Open the can of diced tomatoes, pour the liquid into the stock pot and the tomato pieces over the rice.
  11. Preheat your oven to 200oC (390oF).  Throw the clams into the stock pot together with 1/4 cup of whisky and bring it to a boil for a minute .
  12. Ladle boiling stock over the rice until the liquid is level with the rice. Follow this with all the cooked meat and the diced capsicum. Mix well. Add the prawn heads and clams (only those that opened) from the stock pot.
  13. Place the Dutch oven in the oven with its cover on. Reduce to 150oC (300oF) when you can smell the jambalaya cooking. After 45 minutes in the oven, check if the rice (deep under the surface) is both cooked and dry. When the rice is perfect, allow it to rest inside the oven with the cover off.
  14. In the meanwhile discard the chicken bones from the remaining stock and add the reserved pork oil to the pot. Boil this down till it begins to thicken into a sauce.
  15. Taste the rice and salt the sauce as necessary (i.e. this is your last chance to adjust the taste of the jambalaya). Spoon the sauce over your jambalaya and serve.

NotesJambalaya in pot

  • This is a recipe for a very large amount of food. You can halve the portions if you don’t have that many people. There shouldn’t be any scaling issues.
  • Between two baking containers of the same volume, always use the one that is flatter. The Jambalaya will cook more evenly. A Jambalaya more than four inches deep will tend to have wetter rice at the bottom. An alternative is to use two containers. Use foil if your flatter containers don’t have covers.
  • Why not just cook the jambalaya on the stove? Because there is a tendency for the bottom of the pot to burn. You can try that after you have perfected the oven method.
  • Why do we have to grill the chicken and prawns first? This is a great way to sear some flavour into them so they don’t taste like boiled meat. The high heat will also remove any freezer taste.
  • Add more cayenne pepper if you like your jambalaya spicy.
  • I used Chorizo sausage as Andouille it is not easily found in many parts of the world. If you can’t find smoked pork belly, use a brined ham hock, salted pork neck or cubed pancetta (but not sliced bacon).  I also left out the customary calamari as squid gets very hard when it is over cooked.
  • Use capsicums of 2 different colours for a better visual impact.
 
Leave a comment

Posted by on August 25, 2014 in American, Main Courses, Poultry, Recipe, Seafood


Tags: , , , , , , , ,

What is Hon Dashi?

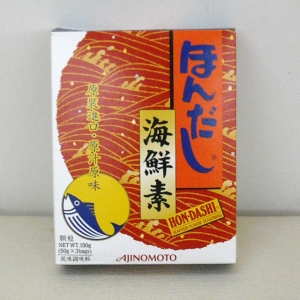
Hon Dashi is a perfect example of a fantastic flavouring ingredient that few people (outside of Japan) ever use, or even know exists. It’s high time we changed that. Hon Dashi granules are a very versatile ingredient that makes whatever you’re cooking, be it a soup, stew or risotto taste better without distracting the palate from the primary flavours of your recipe. If you’ve ever had miso soup and wondered what makes it taste so good, its not the miso, but the dashi stock that the soup is made from.

Hon Dashi (original flavour) is made primarily from Skipjack Tuna (also known as Bonito) that is dried into blocks and used like Parmesan Cheese. Anyone can make a beautiful clear fish stock by simply adding Hon-Dashi granules to hot water. In addition to having a salty taste as one would expect from stock, Hon Dashi boasts a slightly sweet and uniquely smoky undertone. You can practically use it in any recipe which calls for stock since Hon Dashi stock isn’t fishy. In fact it doesn’t even taste of fish. 

In my humble opinion, stock made from Hon Dashi is superior to any other type of instant stock that I have come across. Why does Hon Dashi have such a wonderful taste? I think it’s because of the double desiccation used in its manufacture which removes all the unwanted smells. I’m no expert but this is roughly how it’s made: The Tuna is first cured with salt over a long period of time until it is bone dry, then rehydrated and boiled in water to form a bullion. The solids are then strained away while the liquid is put through an evaporator and flash frozen. It is then crushed into granules and the granules are then thawed in a vacuum in a second dehydration where the ice sublimates directly into gas. Its a lot more technologically advanced than making your run of the mill stock cubes, sort of like replicating the conditions of outer space if you think about it. The complicated process extracts and removes the fishy odours that set in quickly when seafood is harvested, leaving a natural sweetness that is otherwise elusive.

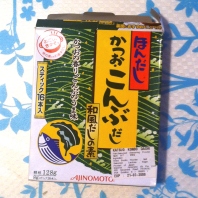
This variety contains kelp, which is what many consider to be the complete dashi.

Hon Dashi granules dissolve to create a basic bouillon called Katsuo Dashi, which is great as a cooking ingredient, but seldom consumed directly. When we refer to the Dashi that one drinks like a consomme, what is called Awase Dashi, some dried kelp (also known as Konbu) is used an second key ingredient to provide additional umami. To make some of this traditional consomme type Dashi you can follow this link to my recipe for Awase Dashi. Although it is not available everywhere, Hon Dashi also comes in a ‘with Konbu’ format (pictured on right) but this is a less flexible option as you then can’t make a bouillon without the kelp flavour. Most Japanese housewives will prefer to stock the classic Hon Dashi granules at home and add infuse the konbu flavour themselves whenever desired.

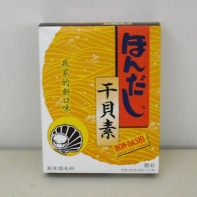
There is also a variety of Hon Dashi made from dried scallops (also known as Conpoy) instead of Tuna and it merits mention here.This scallop version has an intense shellfish flavour which is perfect for enhancing seafood dishes like Bouillabaisse and Seafood Risotto. This variety is also perfect for making Chinese soups (check out my Consommé page). 

If you have the opportunity, do try using Hon Dashi stock in your cooking. You can actually use it even if no stock is called for, as they come in granules instead of cubes. Try sprinkling on some in place of salt. However you use it, you will be adding that special hint of a flavour that will keep your dinner guests guessing as to what your secret ingredient is.


Notes

  • No, I do not own any Ajinomoto shares (manufacturer of Hon Dashi) or have any other ulterior motive for recommending this stock – pun unintended.
  • If you can’t find Hon Dashi, I have been told it is available at Amazon.com, in the grocery section.
  • Keep your opened Hon Dashi sachets in the fridge, I just fold the lip of the sachets over and secure them with a paper clip. They can last for years this way.


44 Comments

Posted by on May 26, 2010 in Ingredients, Japanese, Seafood, Soups


Tags: , , , , , ,

Red Seafood Risotto

(serves 4)
Its actually looks more orange than red, but this recipe uses crustacean heads, so that makes it a red risotto. Risotto is a dish that is conceptually simple, but difficult to master in practice. This particular risotto, which uses prawns, scallops and portobello as its core ingredients is one of my favouites.

Rather than describe how one type of risotto is made, I’ve decided to write this recipe in such a way that is becomes a generic guide to making risotto as well. So it looks like its very long, but actually it just contains many of the finer details which I usually gloss over.

IngredientsRed Risotto

  1. Tiger Prawns (6)
  2. Large Scallops (6)
  3. Arborio Rice (1 cup)
  4. Smoked Clams in oil (1 tin)
  5. Lobster Bisque (1/2 can)
  6. Onion (1)
  7. Portobello Mushrooms (2)
  8. Butter (50g)
  9. Chardonnay (½ cup)
  10. Pecorino Romano (1/4 cup)
  11. Cognac
  12. Coriander Powder

Preparation – Stock

  1. On medium heat, brown 1T of pressed garlic in 2T butter. Don’t use a non-stick pan as you’ll be scratching it later.
  2. Cut the heads of your prawns off while waiting for the garlic to brown, then stir fry the prawn heads in the garlic oil. When the heads have become completely red for a minute, pour in 1 cup of water.
  3. As the water boils, cut each head into three pieces using a large pair of kitchen scissors and then crush the heads with a wooden spatula, the type with a flat edge. Next decant the liquid through a strainer into a pot.
  4. Repeat another two times such that you end up with 3 cups of clear stock in the pot. Now add 1/2 a can of lobster bisque to complete the stock.
  • NEVER add salt to the stock as you will lose control of how salty the risotto is after the water has evaporated.
  • Commercially pre-made stock is pre-salted, making them unsuitable for risotto.

Preparation – Soffritto

  1. For the soffritto, you’ll need to use a non-stick pan i.e. a different one from the one used earlier. This will ensure that you won’t get a burnt taste from bits sticking to the bottom of the pan.
  2. Julienne the onion into pieces that are the size of rice grains and fry them in 4T of olive oil using low heat until they are limp. You should do this without caramelizing the onion. Adding a pinch of salt at the start will help keep the onion from browning.
  3. Stop here if you are preparing ahead of time, for this marks the point of no return. Once you begin the next stage, you’ll need to serve the risotto soon after it is done.
  • The onions will practically dissolve into the risotto. Many Italian recipes utilize this method, using aromatic vegetables and sometimes bacon bits, to arrive at a more complex and satisfying flavor.

Preparation – Simmer

  1. Turn up the heat on the pan and add the rice into the soffritto, stirring well to coat the kernels with oil. Continue to stir-fry for 5 minutes or so.
  2. Add the wine, and stir until it almost evaporates completely before adding a ladle of stock. After adding the stock, adjust down the heat to produce a low simmer.
  3. Each time, add just a ladle of stock, stirring frequently to prevent sticking. Add more stock each time the rice begins to dry out.
  4. In between stirring, de-shell and de-vein the prawn bodies and dice them, and dice the mushroom and scallops as well, into fingernail sized pieces. After simmering for 15 minutes, add the diced ingredients and smoked clams.
  5. Continue stirring and simmering the rice for about another 10 minutes until it is creamy and al dente, then turn off the fire.
  6. Total simmering time should have been about 30 minutes but rely on taste and appearance to decide if the risotto is done and not a timer.
  • NEVER add cold stock to risotto as repeated sudden cooling makes the rice powdery. So keep that stock on a simmer in a separate pot.
  • NEVER add all the stock at one go. You don’t know exactly how much stock you need and this takes away your control of the cooking time.
  • Constant stirring rubs off bits of the grains’ surface, giving the starch that creates a risotto’s characteristic creaminess.
  • Arborio is the standard rice type for risottos although the more expensive carnaroli rice is sometimes used. Carnaroli cooks faster and absorbs more liquid, which means it will have a stronger stock flavour.

Preparation – Mantecatura

  1. Cut a ¼ slab of butter into 1 cm cubes and mix with finely grated pecorino romano (or any other kind of hard cheese). This forms the mantecatura, which is stirred in as the finishing touch. For an extra creamy texture, you can cheat by stirring in 1T of marscapone as well. This is optional.
  2. Next, sprinkle on some black pepper, 1T of Coriander Powder, 2T of brandy and a ½ t of sugar. After tasting, you may add salt or more cheese as a final adjustment if necessary.
  • NEVER add salt before this stage, as the concentration of the stock increases flavour over time, and besides hard cheese is salty.
  • I prefer using pecorino romano as it is a stronger grating cheese which goes well with rice but other hard cheeses can be substituted if desired. Check out my Cheese Page for more details.

Resting

  1. Cover the pot and let the risotto rest for 5 minutes so that it can absorb a bit more liquid and fluff up.
  2. Garnish with a bit of coarsely grated pecorino romano as you serve.
  • This is the ONLY time you should cover it.
  • You cannot pre-make or re-heat risotto. So time it such that you can serve it immediately.
 
Leave a comment

Posted by on September 27, 2009 in Italian, Main Courses, Recipe, Seafood


Tags: , , , , , , , ,

Bouillabaisse Soup

(serves 8 )
The ‘authentic’ Bouillabaisse is meant to be a meal in itself. This however is just a recipe for a soup, hence it is called Bouillabaisse Soup. It may not be a true bouillabaisse but this recipe is much much faster than making the real thing, because it allows you to bypass hours of simmering. The important thing is – it tastes just as good.

Ingredients

  1. Lobster (2 halves)
  2. Tiger Prawns with heads (8)
  3. Salmon (300g)
  4. Mussles in-shell (8)
  5. Smoked Clams (2 tins)
  6. Cream of Tomato soup (2 cans).
  7. Leek (large, 1 stalk)
  8. Garlic (1 bulb = 12 cloves)
  9. Bicarbonate of Soda
  10. Orange Peel
  11. Chopped Basil
  12. Saffron Powder
  13. Coriander Powder
  14. Cognac

Preparation

  1. Into a large bowl, empty the 2 cans of tomato soup. Add 1t (flat) of bicarbonate of soda to the condensed soup and stir every few minutes for a quarter of an hour. Fine bubbles will foam up as you stir, this is normal. Allow to sit for a further 15 minutes. Eventually the tomato mixture will darken to a deep red, forming the rich base for your bouillabaisse.
  2. While you wait, prepare some fish stock by dissolving 2 fish stock cubes (or 4T of  Hon Dashi pellets) in a cup of hot water. Julienne the white of the leek into thin rings. Peel a garlic bulb. Leave half of the garlic as cloves and put the other half through a garlic press to mince it.
  3. Pan fry in some oil your leek rings and the garlic bulbs until the leek softens. Then add the salmon. When the salmon is cooked, check where you think there might be bones (usually near the belly cavity) and remove them. For this soup I like to have all my fish mashed into flakes, but that’s up to you. If you want some whole fish pieces, substitute part of the salmon with cod, and add it right at the end.
  4. Finally add the cup of fish stock to deglaze and pour everything into a big pot. Next add the tomato mixture to the pot, followed by a further 2 cups of water. Bring to a simmer and add the rest of the seafood.
  5. Also add 1t of orange zest (grated peel), 1t of saffron powder, 1t of powdered coriander seed, the minced garlic and simmer for half an hour and leave covered until its time to serve.
  6. Before serving, reboil and then add 2T of cognac, flavour with salt and pepper to taste. I will normally de-shelled the prawns and lobster after they have been boiled in the bouillabaisse, shred the meat then put it back into the soup, leaving the lobster claws and prawn heads as decorative pieces. You can leave them as they are if you are lazy. In each soup dish, arrange a few pieces of seafood in a manner pleasing to the eye and then at the table, dish on the soup in front of your guests and finish off with a generous garnishing of chopped basil (or mint).

Notes

  • A whole long story accompanies any bouillabaisse recipe, so here goes….Bouillabaisse is a seafood stew from the Mediterranean which the French, particularly those from Marseille, have laid claim to. In English, I’m told bouillabaisse means to boil and simmer, which is how the dish is made. End of story.
  • Purists will insist on using 10 kinds of fish, fennel seeds instead of coriander, Pernod instead of cognac, saffron threads instead of saffron powder etc. Just admit to them this is a fake bouillabaisse. In fact, to save yourself some trouble, never discuss the preparation of your bouillabaisse soup.
  • Traditionally when you are served bouillabaisse, it comes with bread. It is also ‘proper’ to serve the seafood separately to be eaten with ‘rouille’, which is just a fancy name for herbed mayonnaise. Don’t bother if you are not in France (oh heaven forbid if someday this gets translated into French). This is just a soup, and over-boiled seafood never tastes good anyway.
  • The key shortcut of this recipe is the use of canned tomato soup and bicarbonate of soda. It simulates hours of simmering. If you’re unfamiliar with bicarbonate of soda, look here.
  • You can substitute or add any kind of seafood, fresh, frozen or canned, no one will be able to tell the difference after such heavy boiling. I have tried using frozen oysters, and they fit well. Just make sure there is always a generous combination of fish, crustaceans, and shell fish.
 
Leave a comment

Posted by on September 25, 2009 in French, Recipe, Seafood, Soups


Tags: , , , ,

What are Sakura Shrimp?

SakuraKnown also as Sakura Ebi, Cherry Shrimp or Cherry Blossom Shrimp, these are tiny shrimp caught from a certain bay in Japan, the name of which eludes me at the moment. As you might gather, they are named after cherry blossoms, because of their similar colour. There are may ways to eat Sakura but if you live outside of Japan, you will have to make do with the boiled and then sun-dried variety, which is the variety which I use, and refer to.

OK, enough about the background. So what is so special about Sakura? They have a light crispy texture, and more importantly they retain (for an eternity compared to other crispy food) their crispiness even when put into liquid. This is because other crispy food is made crispy artifically by removing water through heating. If they get re-hydrated, they become decidedly uncrispy. Sakura on the other hand are naturally crunchy because they are crustaceans. This makes them the ultimate sprinkle-on-top food.

Where can you find Sakura Shrimp? At any Japanese food specialty store or Japanese supermarket. Don’t confuse Sakura Ebi with the more common Chinese shell-less dried shrimp. Those can’t be eaten without lots of cooking, and in general are unsuitable for Western cuisine. If you would like a recipe which uses Sakura Shrimp, try my Angel Hair with Sakura .

 
1 Comment

Posted by on September 24, 2009 in Ingredients, Japanese, Seafood


Tags: , , , ,