(serves 3)
Every place has its own way to prepare Korma but its features are universal. The curry is always cooked using almonds and/or cashew nuts as its base flavour, it is always light couloured and it is always mild. This last characteristic makes Korma the go to curry for anyone who are not into spicy food, and children. The Singapore method uses evaporated milk instead of yogurt or coconut milk to marinate the meat and this creates a distinct texture and taste unique to this method of preparation.
 Ingredients
- Chicken Thighs (4, deboned)
- Shallots (4)
- Ginger (1 thumb)
- Evaporated Milk (100 ml)
- Coconut Milk (150 ml)
- Almond Flour
- Curry Powder
- Cumin
- Chicken Cube (1)
- Cashew Nuts (50g)
Preparation (4-6 hours ahead)
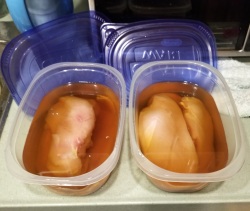
- Place the chicken into a bowl or plastic container and sprinkle in 2 heaped T of curry powder. Evenly coat each piece of chicken. Add 100 ml of evaporated milk, and mix well. Cover and leave in the fridge for a minimum of four hours.

Preparation
- Peel and cut each shallot in half. Julienne the shallots.
- Peel the ginger and cut first into slices 2mm thick. Next slice into strips and then finally cubes.
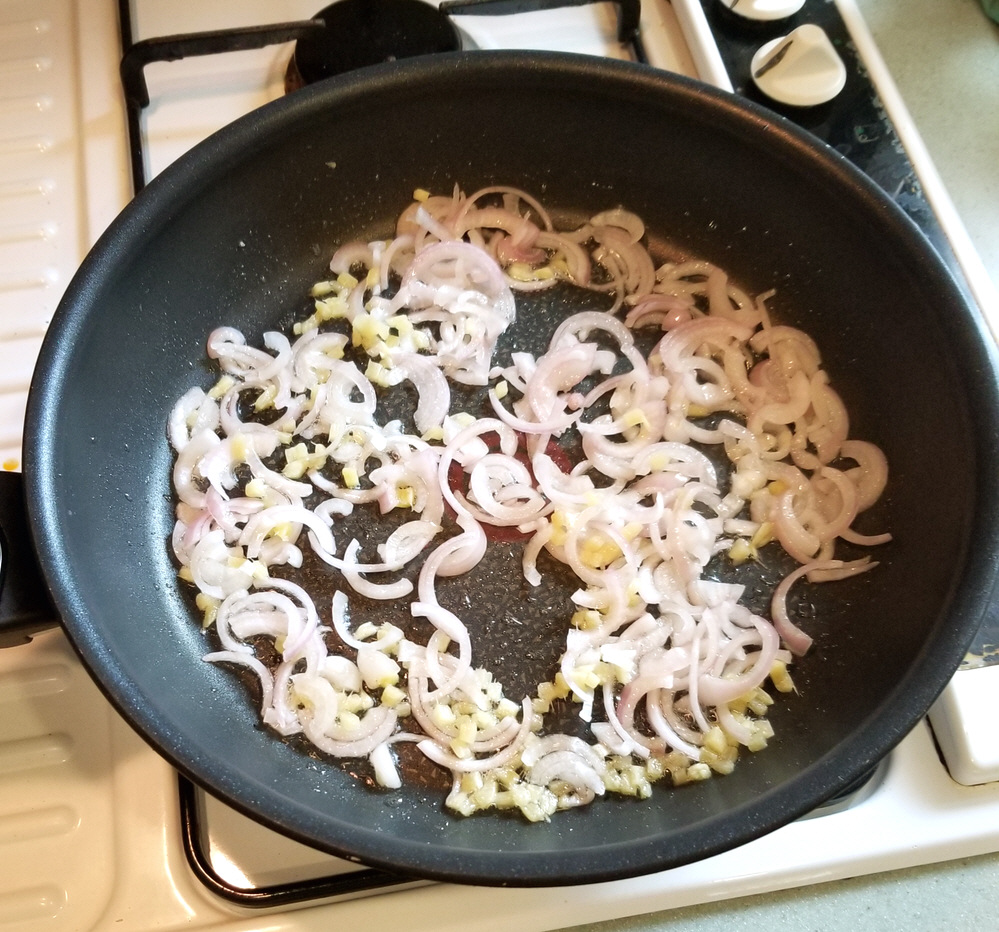
- Put 3T of oil in a large pan and add the sliced shallots and diced ginger. Pan fry until the shallots start to brown. Transfer the contents to a plate temporarily.
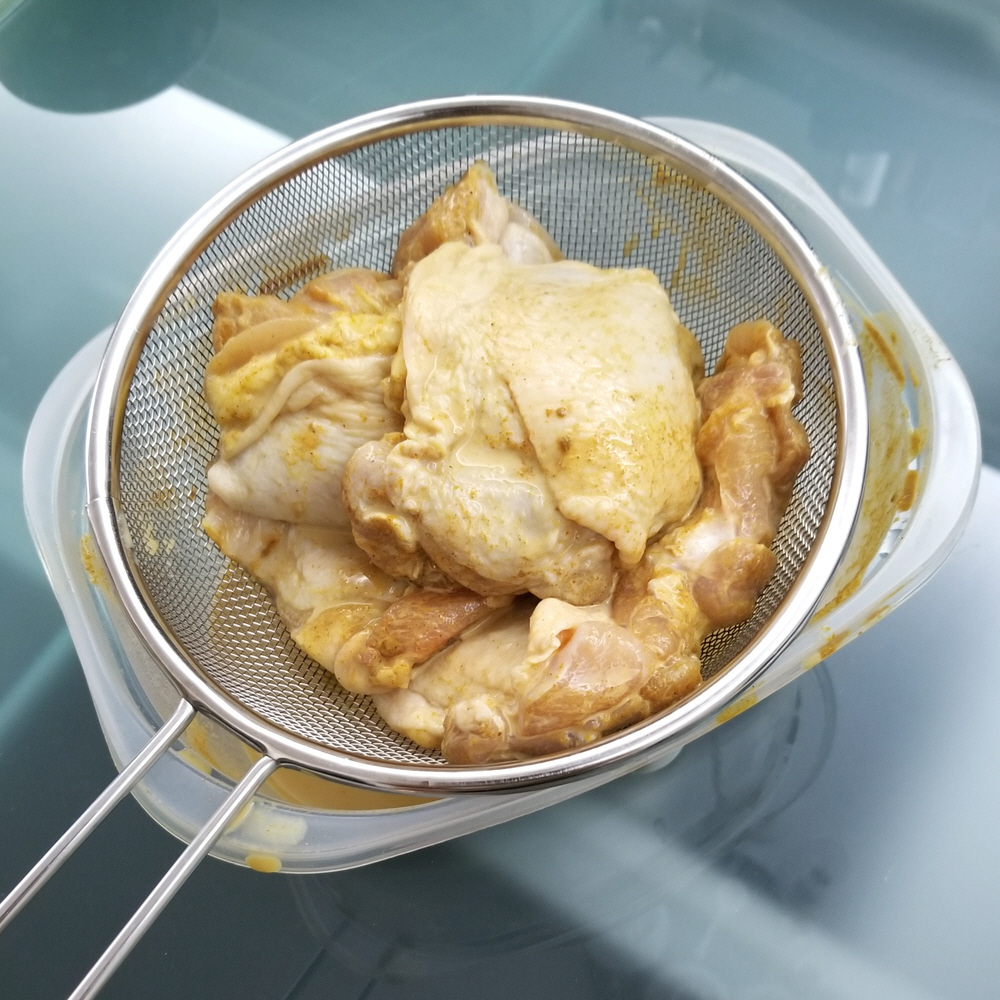
- Dissolve 1 chicken cube in 1 cup of water. Add the resulting chicken stock to the chicken and move the chicken about to wash off the marinade. Drain the chicken in a strainer over the container as shown above.
- Using the same pan, heat up 1 T of oil and pan fry the chicken. Start with a sizzling hot pan and fry the chicken skin side down for 2 minutes. Flip the chicken, turn the heat down and pan fry for a further 2 minutes.
- Transfer the chicken to a cutting board to cool.
- Pour the diluted marinade into the pan and return the shallots and ginger to the pan.

- Bring the pan to a simmer and sprinkle in 4T almond flour and 1T cumin. Stir until there are no clumps and leave on a simmer.
- By now the chicken should have cooled enough to touch. Cut each chicken thigh into about six pieces. Return the chicken together with any drippings back into the pan.
- Add 150 ml coconut milk, 50 g (1/4 cup) of roasted cashew nuts and 1t of sugar. Cover and simmer for an additional 10 minutes.
- Check if you wish to add salt before serving. Chop up 1 sprig of coriander and use it as a garnish.
Notes
- In case you are wondering what is curry powder,
 you can refer to the ingredients listed on the package of curry powder on the right. Curry powder is the base for making curries. It is not the same as Garam Masala, which is just a seasoning.
- If you’ll be making other dishes, you can prepare your korma ahead of time and just reheat to serve. It doesn’t taste any better if freshly made.
- The thicker parts of a chicken thigh will not be cooked from 4 minutes of pan frying, especially without a drop lid. That’s fine, simmering in the curry will finish the job. The idea is to caramelize the chicken and extract the oil and flavour from the skin.
- I find cutting the chicken using a pair of kitchen scissors easier than using a knife.
- Though its not part of the recipe, you should serve your korma with steamed rice or some kind of Indian bread.
Tags: Almonds, Cashews, Chicken, Coconut, Curry, Shallots
(serves 4)
The Hamburg Steak is the predecessor of the hamburger, before it was turned into a humble sandwich. That’s not to say the Hamburg Steak is simply a hamburger without a bun, for it has many more ingredients, for instance a gravy. In this sense you can think of the Hamburg Steak as a cross between a Salisbury Steak and Bangers & Mash. The city that the most people eat Hamburg steak is not Hamburg as you might expect, but Tokyo; in Japan every family restaurant will serve Hanbagu Steakey and it is cooked at home by every family. My recipe is based this delicious Japanese version of the Hamburg Steak.
Ingredients 
- Minced Beef (500g)
- Egg (1)
- Shallots (5)
- Milk (0.5 cup)
- Bread (2 slices)
- Onion (1)
- Oxo Beef cube (1)
- Mustard
- Worcestershire Sauce
- Miso
- Sherry
- Soya Sauce
- Butter
Preparation
- Leave 2 slices of bread exposed in the fridge overnight to dry out.
- Toast the bread on very low heat for 15 minutes to make them ultra crispy and then smash the bread with a mallet into crumbs (in a plastic bag).
- Peel and cut 5 shallots in half and julienne them into very thin slices. Peel and cut one onion in half and slice it into thick half rings. If the outmost layer of the onion is thin, you should discard it as it will get burnt before the rest of the onion softens.

- Pan fry the shallot slices in 3T of oil on a low flame until you notice a few pieces have turned brown (see picture). Turn off the heat and allow to cool (the shallots will darken further). After some time spoon the shallots and oil into a mixing bowl.
- Add one egg, 1/2 a cup of milk, 1T Worcestershire sauce, 1t soya sauce, 1t mustard, 1t salt to the mixing bowl and mix well. Stir in the bread crumbs. Next, add the ground beef followed by a sprinkle of 1t white pepper and fold until you get a homogenous mixture. Leave the beef to stand. Do not be concerned if there are any pieces of bread crumb visible.
- In the same pan, sauté the onion slices on low heat in 3T of oil until the onion begins to darken.
- Dissolve 1 Oxo beef cube and 1t of miso in 1 cup of boiling water. Add the stock to the pan with the onions. Follow up with 1T sherry, 1t sugar, 1t mustard and simmer until most of the water has boiled off and you are left with an onion gravy. Pour the onion gravy into a gravy boat or other vessel.
- Separate the ground beef into 4 equal parts with the end of a fork or spoon. Shape each portion into a ball in your hands, which you then flatten into a thick (1 – 1.5 inch) patty.
- Add oil to the pan (which you have cleaned) and heat up the pan. When the oil is sizzling hot, place the beef patties into the pan.
- Pan fry the beef patties for 6 minutes flipping them every minute or so. After the 6 minutes add 1/3 cup of water and cover – allow the beef to steam for a minute.
- Remove the cover and add a large knob of butter. Flip the hamburgs one last time. Turn up the heat. When most of the water has boiled off, plate the hamburgs and pour the pan’s residual liquid into the onion gravy. Spoon the gravy over the beef patties to complete your hamburg steak.
Notes 
- The staple typically served with Hamburg Steak is steamed white rice or mashed potatoes, rarely fries and never bread.
- Like other steaks, there will usually also be an assortment of cooked vegetables like carrots, egg plant, tomatoes or string beans. Many of these can be cooked together with the beef in the pan so plan accordingly. A sunny side up fried egg is also typical.
- If you don’t like the idea of an onion gravy, Hamburg Steak is also be served with a variety of other sauces, like black pepper sauce, mushroom sauce or demi-glace sauce.
- For the ‘cheeseburger’ version of the Hamburg, you don’t place a slice of cheese on the meat, but insert a block of cheese in the middle of the raw burger.
- The Hamburg Steak is supposed to be eaten well done, so don’t try to make them ‘medium’. In Japan they sometimes mix some minced pork with the beef and you definitely want to eat pork fully cooked. Even fully cooked the meat will remain tender and juicy because of the non-meat ingredients and the steaming, so there is no need to worry about your ‘burger’ becoming tough and hard unless you really overcook it a lot.
- Do not substitute onion bits for the shallots. It won’t impart the right flavour to the beef.
Tags: Beef, Butter, German Cuisine, Japanese Cuisine, Onion, Shallots, Steak
(serves 6)
Chicken Kiev is the king of chicken breast dishes, the perfect fool proof way of preventing a chicken breast from getting dry. The breast meat is kept moist and juicy because it is stuffed with butter. And when the breast is cut open, the butter serves as a sauce for the dish. No one knows for sure where Chicken Kiev comes from except that it’s not from Kiev. The Russian restaurants seemed to have claimed ownership of this dish while others insist that it was originally a French dish called Cotelettes de Volaille. No matter, it tastes just as good.
Ingredients 
- Big Chicken Breasts (6 halves)
- Butter (140g)
- Shallots (4)
- Bread (4 slices)
- Garlic (3t minced)
- Flour
- Eggs (2)
- Basil
- Mint Leaves
- Salt
- Brown Sugar
- Toothpicks
Preparation
- Begin by brining your chicken breasts overnight, for about 10 hours, in a solution of 3T Salt, 1T Brown Sugar and 4 cups of water. For details you can refer to this post.
- Place 4 slices of bread exposed in the fridge overnight to dry out.
- When the 10 hours are up, give the chicken breasts a quick rinse to end the brining process and keep them in the fridge until needed.
- Finely chop 4 shallots. Pan fry the shallot bits in 2T of oil on a low flame until you notice a few pieces have turned brown. Turn off the heat and allow to cool. In the meanwhile mince a few garlic cloves until you get 3 semi-heaped teaspoons of garlic.
- Put 140g of butter, that’s about two thirds of a block, in a bowl and cut the butter roughly into cubes. A pair of scissors is the best implement for this. Allow the butter to warm until it is
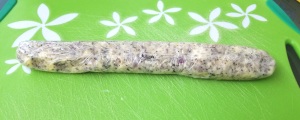 soft, then fold in the minced garlic, shallots, 1T chopped mint and 1T of chopped basil. The butter should stay opaque and not be allowed to melt at any time. Spoon the herb butter onto a large sheet of cling film and roll it into a long rod. Keep the butter sausage in the fridge until it is needed.
- Toast the bread under very low heat so it doesn’t brown, until it is dry and crisp. Place the bread into a plastic bag and smash it into crumbs using a mallet.
- The next step is to cut a cavity into each
 breast. Start by drying the chicken with a tea towel. Plunge a pointed knife about two thirds of the way into a breast from the bigger end. Carefully scrape the tip of the knife along one side of the cavity a few times in a circular motion to enlarge it. Flip the knife over and do the same to the other side of the cavity. While you are doing this, take extra care at all times not to let the knife pierce out through the surface. At the same time you should do your best not to enlarge the opening.
- Cut the butter sausage into six cylinders. Do this while it is still in the cling film. Unwrap one cylinder of butter, halve it lengthwise and push both pieces into the cavity one after another, as far as they’ll go. Repeat the same procedure for the remaining breasts.
- Beat two eggs. Cut a one inch piece off the tip off each chicken breast. Dip these trimmings in the egg and after folding or rolling each piece, use them to plug up the openings. Secure each plug with a wooden toothpick. If you inadvertently punctured any of the breasts earlier, you can attempt to ‘repair’ the damage with toothpicks as well.
- Coat each breast in flour, taking care to cover every part of the breast, especially the area around the plug.
- Heat up a frying pan with some oil. Roll a breast in egg and then the breadcrumbs until it is nicely coated.
 Put the breast straight into frying pan. Pan fry for about a minute, making sure the entire surface is cooked. A pair of kitchen tongs will be helpful in achieving this. Control the fire to make sure the bread doesn’t get burnt. Leave the breast to rest on a wire tray inside a baking tray. Do the same for the remaining breasts, adding more oil to the pan for each new breast.
- Preheat your oven to 175oC (350oF). Place the tray of chicken into the hot over for 20 minutes, or until you notice the chicken begin to shrink.
- It’s best to serve the Chicken Kiev straight out of the oven. Sprinkle lightly with white pepper while the chicken is still on the baking tray. Remember to remove the toothpicks after plating.
Notes 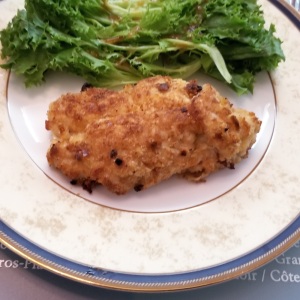
- Purists will no doubt point out that the proper way to make Chicken Kiev would be to pulverize a butterflied chicken breast into a very thin schnitzel which is then rolled around a slab of butter. This method has its merits but is quite labour intensive. Should you ever choose to try it, you should season the chicken instead of brining it.
- Chicken breasts can be plump and roundish or elongated and you should buy the former. I find those from Denmark and Holland are very suitable for stuffing. If the breast is of the elongated type, it will be too flat, making the carving a proper cavity for the butter doubly difficult.
- Don’t expect a large amount of melted butter to gush out when you cut the chicken as some of the butter will be infused into the surrounding meat. If you desire more flowing butter, you can increase the amount of butter to a full block. But in order to do this the cavity has to large; maybe you can wait until you have had some practice at cutting cavities into chicken breast before attempting to use more butter.
- There is no ‘standard’ herb to use for the butter. You can substitute other herbs of your liking, or even add things like sautéed mushrooms to the butter. I even used a bacon onion dip once instead of butter and it tasted great.
- If you have a large number of diners, it may be easier to just deep fry your Chicken Kiev in one go instead.
Tags: Butter, Chicken, French Cuisine, Garlic, Herbs, Russian Cuisine, Shallots
(serves 4)
This is a very unauthentic recipe for kebabs, but it is however a great way to cook stew-type cuts of beef without actually making a stew. Its actually more of a cross between shish kebab and boeuf bourguignon. I think of it more as a Provencal-style dish than Persian. We start out by making a stew in white wine and end up drying up the stew into a nice tasty glazing for the beef chunks.
Ingredients 
- Beef Shank (800g)
- Carrot (1 large)
- Eggplant (1 large)
- Garlic (12 cloves = 1 bulb)
- Mushrooms (200g)
- Shallots (8)
- White Wine (1 cup)
- Oxo Beef Cube
- Pesto
- Oregano
- Thyme
- flour
Preparation
- Cut your beef into large cubes after removing any chunky bits of connective (white) tissue. Besides using beef shank, other appropriate cuts would be rib fingers, brisket or cheek. Lightly salt the beef.
- Preheat your over to 150oC (300oF). Dissolve1 Oxo beef cube in 1.25 cups of hot water.
- Peel an entire garlic bulb and put half the cloves through a press. Peel the shallots but keep them whole. Cut the carrots, mushrooms and egg plant into pieces of the appropriate size.
- Put the beef cubes into a zip loc bag with 2T(heaped) of flour. Shake the bag until all the surfaces are thoroughly coated.
- Heat up a pan with 3T of oil and lightly sear all the sides of the beef cubes. Do this a few pieces at a time.
- Place the seared beef into a large pyrex dish, followed by the cut vegetables around the meat. Sprinkle on 2T of oregano and 2T of thyme. If you really want to you can skewer everything on metal skewers first like real kebabs (except for the garlic).
- Deglaze the pan with 1 cup of white wine. Add the beef stock. Add 2T of pesto and the crushed garlic. Cook for a minute. Pour over the beef and then cover the pyrex baking dish snugly with foil.
- Poke 3 small holes in the foil with a toothpick. Place in the oven and bake for 1 hour 40 minutes.
- Remove the foil and bake for a further 20 minutes to dry up the liquid and give the beef a nice glaze.
Notes 
- You may have noticed I did not skewer the kebabs. I usually skip this as its tedious to do the skewering and the un-skewering.
- If you are having a real BBQ, you can throw your pre-cooked kebabs (skewered) over an open flame BBQ to get the charcoal flavour.
- If you have a Dutch oven like le Creuset you can use that instead of the pyrex dish.
Tags: BBQ, Beef, Egg Plant, French Cuisine, Garlic, Mushroom, Shallots
(serves 6 to 9)
This is a recipe for a cold semi-firm seafood terrine that is half red and half green. The use of canned lobster bisque and Nori (dried seaweed) sheets makes it much easier to get a full spectrum of seafood flavours while using just fish and prawn as you base ingredients. The lobster bisque is also used to make a lobster-shallot sauce that goes superbly with the terrine. Another nice touch is the use of brioche, which gives your terrine a nice buttery tone. The result, a juicy flavourful seafood terrine that everyone will enjoy.
Ingredients 
- Sole Fillet (500g)
- Prawns (150g)
- Scallops (150g)
- Brioche (cubed, 2 cups)
- Cream (200ml)
- Lobster Bisque (1×400 ml can)
- Nori = Dried Seaweed (2 large sheets)
- Eggs (2)
- Shallots (9)
- Mayonnaise
- Butter
- Brandy
- Liquid Smoke
- Basil
- Dill Weed
Knife Work
- Spoon one heaping T of mayonnaise into a bowl so that it will be at room temperature by the time you need it.
- Cut each of your 9 shallots in half, peel them, then slice finely.
- Cut as much brioche as you need into small cubes until you get 2 cups full.
- Cut with scissors 2 large (like A4 paper sized) Nori sheets into confetti.
- Shell your prawns and dice them together with the sole fillet into pieces about the size of half a finger. Dust your seafood with salt and pepper from a shaker as if you were going to pan fry them.
Blending the Terrine
- In a pan, stir fry one third of the shallots in a dash of oil till they begin to brown. With the pan sizzling hot, add half the can of lobster bisque, 2T brandy and 1t basil. Let the mixture boil for 30 seconds and turn off the heat. Mix in 1 cup of brioche cubes. Allow to cool in a bowl.
- In the same pan(after washing it), stir fry another third of the shallots in the same way. This time add 200ml of cream, the Nori confetti, 2T liquid smoke. Let the mixture boil for 30 seconds and turn off the heat. Mix in 1 cup of brioche. Allow to cool in a second bowl.
- Place half the fish, half the prawns and an egg in a blender, then add the contents of the first bowl. It must be cool enough such that the egg doesn’t start cooking. Don’t liquidize it completely, just blend till you get a lumpy paste. Spoon the paste back into the bowl.
- Blend the rest of the fish and prawns with a second egg with the contents of the second bowl, using the same procedure.
Cooking the Terrine
 Line the inside of 6 ramekins with oversized pieces of clear cling film. Spoon the seafood paste from the two bowls into 6 ramekins as shown. Poke with the small end of a spoon to compact the paste and get rid of air pockets.
- When you are done, cover each ramekin with a second piece of smaller cling film and tuck the loose bits under the ramekin to seal everything up. The terrine will expand while it is cooking (although it will shrink back after that) so do not fill the ramekins too close to the brim.
- Set up your steaming rack in a pot with an inch of water and set it to boil. When the water is boiling. Arrange 3 ramekins within (see the picture below) and steam for half an hour on a low simmer. You can stack the other 3 ramekins on in an overlapping fashion if your pot is tall enough. If not, repeat with the second 3 ramekins.
- Allow the ramekins to cool and then chill them in the fridge
 with the clear film still attached. You can leave them in the fridge overnight.
Sauce
- In the same pan(after washing it again), stir fry the remaining one third of the shallots in a few T of oil. This time you want to stir-fry on low heat until they are a nice deep brown.
- Pour in the remaining lobster bisque while the pan is sizzling, add 2T brandy, the warm mayonnaise, 1t dill weed and 1t sugar. Let it boil for 10 seconds and then set aside to cool. When it has cooled enough, spoon into a bowl and chill this in the fridge as well.
Scallops
- Cut each scallop into half from the flat side, then slice them into thin semi-circular pieces.
- Melt a large knob of butter in the same pan (after washing it yet again) and then allow the pan to cool. Arrange the scallop pieces in the pan and sprinkle lightly with salt and pepper.
- Turn the heat on and cook without touching the scallops at all. The moment you see the scallops get opaque, which is very fast, turn off the fire. They cook fast and this is the best way to ensure each piece is cooked the same and done just right.
Putting It Together
- Remove the chilled terrine blocks from the ramekins and clear film and pat dry with kitchen towels.
- Slice any uneven bits (like a rounded bottom) off the biggest blocks and mash them up (in their separate colours) so you can use them as fillers later.
- Slice each circular block into 2 thinner blocks.
- Arrange on plates with the clean cut surface facing up. Fill in any gaps with your mashed bits.
- Spoon the sauce onto the plate, around but not on the terrine.
- Finally, arrange the scallop petals on the plate on top of the sauce.
Tags: Fish, French Cuisine, lobster, Nori, Scallops, Shallots, Sole, Terrine
(serves 5 =10 mini cakes)
My friend Reiko made me some Maryland Crab Cakes a few years back and that’s when I discovered this is one of the best ways to eat crab. I’ve been struggling ever since to come up with a crab cake that tastes better than hers. By jove, I think I have finally done it, by flavouring the crab meat with chinese wine in a pan-fry and mixing in a tad of curry spices. Do try it.
Ingredients 
- Crab Meat (450g)
- Dill Mayonnaise (1 cup)
- Bread (5 slices)
- Garlic (1 bulb = 12 cloves)
- Shallots (6)
- Egg (1)
- Vegetable Oil
- Basil
- Dillweed
- Chinese Wine (or Cognac)
- Woustershire Sauce
- Djoin Mustard
- Coriander Seed Powder
- Cumin
Pre-Preparation
- You will first need to make some mayonnaise according to my Dill Mayonnaise recipe. You can do this just before the crab cakes, it doesn’t take long.
- You will also need to cut the crust off 5 slices of bread and leave them uncovered in the fridge for a few hours to dry it out.
- While fresh is best, in this case I think you can get away with using canned crab meat. If you plan to use fresh crab meat, you should boil or steam the crabs ahead of time, and then deshell them (450g of crab meat = 1 pound = 2 cups tightly packed = 3 cups loosely packed). Try to use bigger crabs as they have firmer meat and the crab meat will be in larger chunks.
Canned Crab Meat Bread Crumbs Muffin Tin


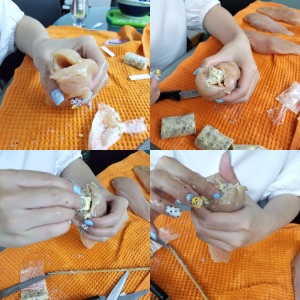
Preparation
- Peel and then halve the garlic and shallots. Use a food processor to mince them (together). Spread half of the minced mixture evenly onto the bottom of a large bowl and keep the other half for use later.
- Dice the dried bread into crouton sized pieces and then given them a two second pulse in the food proccessor to crumb them. Zoom in on the picture above to see the desired texture. Place the crumbs into the bowl with the garlic and shallots. Add 1T Dill weed, 1T of chopped basil and 1t salt and mix well.
- Brown the remaining minced garlic and shallot in a pan on low heat with 3T of vegetable oil. Next, add the crab meat and gently stir fry with the heat turned up. Do your best not to break up the chunks of crab meat.
- When the pan is sizzling hot, sprinkle on 1/4 cup of chinese wine (for cognac, see below). Gentrly stir fry again til the liquid has dried up and then turn the heat off. Season with 1t of white pepper.
- In a small bowl stir together 1 egg with 3T mayonnaise, 1T woustershire sauce, 1t mustard, 1t cumin and 1t coriander seed powder.
- Mix the crab meat into the bowl of bread crumbs. Next, spoon the egg mixture into the bowl, mix well to bind all the constituents.
- Preheat the oven to 175oC (350oF).
- Brush the muffin tin with vegetable oil. Spoon in the raw crab cake, filling each hole to the brim before moving on to the next one. Press down firmly with a tea spoon to make sure the crab-bread mixture is compact. Next push the raw crab cake away from the rim of each hole to give the crab cakes a rounded top.
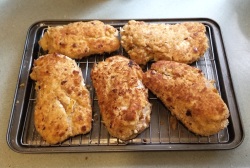
- Bake for 13-15 minutes depending on when your crab cakes reach a light golden brown. After you remove the muffin tin from the oven, allow it to cool for a bit so the crab cakes can firm up. The colour should continue to deepen.
- Serve with the rest of the mayonnaise and some mixed greens.
Notes
- What if you don’t have a food processor? You can mince the garlic and shallots manually easily enough. For the bread, toast lightly, dice and then smash in a zip lock with a meat mallet.
- Cognac has a high alcoholic concentration. If you are using cognac instead of chinese wine, start off with 3T of the brandy in the measuring cup and top this up to the 1/4 cup mark with water.
- Crab Cakes can also be served for breakfast, they go very well with fried or poached eggs. See =>
- Instead of 10 mini-cakes, you can also form you crab cakes into 5 mini-hamburger sized patties. Just shape the cakes by hand and use a regular baking tray.
- Don’t use butter or olive oil as they don’t cook well at high temperature.
Tags: American Cuisine, Basil, bread, Crab, Dill Weed, Garlic, Mayonnaise, Shallots


