(serves 5-6)
This is essentially a deconstructed Lobster Thermidor served chilled, containing all the key ingredients of the hot version – lobster, wine, mushrooms, onions, cream and cheese. Morel mushrooms make up for the flavour that comes from the grill while the whipped cream and Parmesan provide the structure to hold the dish together. It makes for a great lobster appetizer that is neither greasy nor filling like the original.
Ingredients
- Lobster Tails (500g)
- Dried Morel Mushrooms (1 cup)
- Grated Parmigiano Reggiano (1/3 cup)
- Onion (1)
- Whipping Cream (300 ml)
- White Wine (1/3 cup)
- Butter
- Paprika
- White Pepper
- Tarragon
- Chopped Parsley
Preparation
- Defrost and remove the shell of the lobsters. Brine the meat in a solution of 1T salt and 1t sugar in 2 cups of water for 20 minutes.
 Cut the lobster meat into bite sized morsels. drain off all the excess brine by leaving the lobster meat in a strainer.
- Soak 1 cup of dried morel mushrooms in 1 cup of water, until the mushrooms are soft. Squeeze the morels like a sponge to remove excess liquid, but keep all the soaking liquid for later use.
- Finely grate 1/3 cup of Parmigiano Reggiano.
- Dice one onion into 1/4 inch pieces.
- Add a large knob of butter to large pan, and pan fry the onions on low heat until they begin to soften.
- Add a second large knob of butter and the morels. Stir fry for a further minute.
- Turn up the heat and add the lobster followed by a light sprinkle of white pepper. Stir fry until the the lobster is no longer translucent, then add 1/3 cup of white wine together with 1t of chopped tarragon. Bring back to simmer and turn off the heat.
- Pour the contents of the pan into a strainer with a bowl below to catch the excess liquid.

- Return the liquid to the pan. Add the morel water, 1t sugar and bring to a boil. Then sprinkle on the grated parmesan and stir until all the sheese has melted. Simmer the liquid down to half a cup. Pour the liquid into a cup.
- Pour the cheese wine mixture into a cup and and allow to cool to room temperature. The lobster and mushrooms need to be cold, so place them into the fridge in a ziploc bag.
- Pour 300 ml of cream into a container and whip until it forms stiff peaks. Then pour in the (room temperature) cheese wine liquid, add 1 flat t of paprika and fold until they combine completely. If you are using a hand held blender, you can use a three second pulse on low speed.
- Pack the (cold) lobster and mushrooms snugly into wine glasses (or some other serving container) and top off with the mousse. Garnish each serving with a pinch of finely chopped parsley.
- Cover the mouth of each glass with cling film and leave in the fridge to chill until it is time to serve.
Notes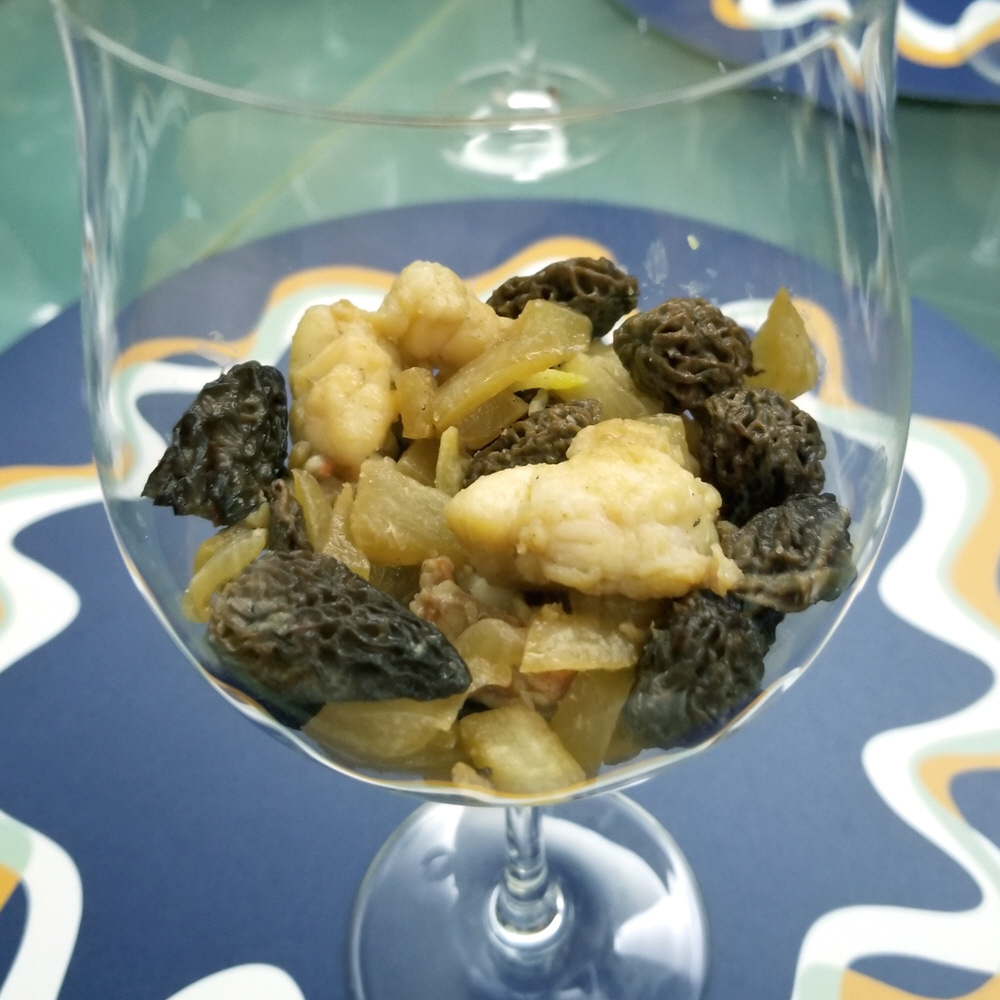
- Most recipes use gelatin powder as the solidifying agent for savoury mousse but parmesan cheese brings with it an additional level of umami flavour and tastes more natural.
- There’s no point in using the more expensive large lobster tails. FOr 500g, 4 small lobster tails will do the job nicely.
- If you are pressed for time, you can put the ziploc with the cooked lobster in the freezer for 15 minutes. For the liquid, you can put the cup in an ice bath.
- The best way to put the mousse into wine glasses is to push the mousse off a table spoon using a tea spoon. Let the mousse drop dead center into the glass without touching the sides of the glass. You can flatten the mousse using a tea spoon as you rotate the glass.
- If you don’t have any morel mushrooms, you can substitute with another kind of dried mushroom (like Porcini). Don’t use fresh mushrooms.
- Remember to wash the strainer before you reuse it in step 8 as it has previously held raw lobster meat.
Tags: Cream, lobster, Morel, Mousse, Parmigiano-Reggiano, Wine
(serves 8)
Gratin Dauphinois, or as the French call it Gratin de Pommes à la dauphinoise, is the fine dining version of scalloped potatoes. It is a dish of layers upon layers of thinly sliced potatoes bathed in creamy savoury goodness. Perhaps Gratin Dauphinois is the crème de la crème of potatoes precisely because of the amount of cream and milk it incorporates. This explains why it beats all other potato dishes hands down even though there is nothing special about it ingredients, and its method of preparation is unremarkable. It goes without saying Gratin Dauphinois is something every decent cook should have in his repertoire.
Ingredients
- Waxy Potatoes (750g)
- Cream (200ml)
- Milk (200ml)
- Garlic (2t minced)
- Shallots (2)
- Parmigiano-Reggiano (40g)
- Butter
- Sherry
- Cumin
- Tarragon
Preparation
- Slice the potatoes. Each slice should be about 1/8 of an inch or 3mm thick. As its the waxy type of potatoes you can leave the skin on.
- Mince a few garlic cloves until you get 2 heaped teaspoons of garlic. Finely chop 2 shallots.
- Put 200ml of whipping cream and 200ml of milk in a pot together with the garlic and shallots. Add 1t salt, 1t cumin, and 1t tarragon and bring to a boil.

- Arrange the potato slices into the pot, vertically as best you can. Add 1T of sherry and simmer for ten minutes, stirring gently occasionally to nudge apart any slices stuck together. Then allow the pot to cool.
- In the meanwhile butter a 2 quart sized (i.e. holds 8 cups) casserole, preferably one with a cover. Preheat your oven to 175oC (350oF).
- When the pot has cooled and the liquid within has visibly thickened, layer the potatoes a slice at a time into the casserole dish using a table spoon. Ensure each slice is coated in cream and take care to minimize any empty spaces. Spoon any remaining sauce, there shouldn’t really be much left over, over the top.
- Cover the casserole and cook in the oven for 25 minutes. If you don’t have a proper cover, just use foil snugly crimped over the top edges of your casserole dish.
- In the meanwhile grate 40g of parmigiano-reggiano.
- Take the casserole out of the oven, but leave the oven on. Using a spatula, press down on the potatoes firmly to compress them. Sprinkle the grated cheese evenly over the potatoes. Return the casserole to the oven uncovered and bake for a further 15 minutes, or until you see a nice golden cheese crust.
- You may serve your gratin dauphinois in the casserole or in square cake-like blocks on the plate with the main dish.
Notes 
- The boiling in the pot allows the cream and milk to interact with the starch of the potatoes, so it thickens before you begin layering. This is the only way the slices will be coated properly. If you are thinking to skip a step and arrange the raw potato slices in the casserole to do all the cooking in one shot in the oven, it won’t work. The potato slices will end up stacked together as if they weren’t sliced at all and all you end up with is boiled potatoes.
- Also you can’t just pour the potatoes and cream from the pot into the casserole in one go. There will be too many gaps and all the liquid will end up at the bottom.
- Gruyere is the other cheese commonly used to top off this dish. You can also try a combination of both gruyere and parmigiano.
- You can do most of the preparation of your Gratin Dauphinois ahead of time, up to the point you have baked the casserole the first time and compressed it. You can even keep the casserole in the fridge overnight. Continue with the cheese and final bake when it’s dinner time.
- Although I’ve suggested waxy-type potatoes because they hold their structure better, if you decide to use starchy-type potatoes, remember to peel the potatoes before slicing them.
- Pommes Dauphine is a deep fried cheese ball, a different thing altogether; just in case you got confused.
Tags: Cheese, Cream, French Cuisine, Parmigiano-Reggiano, potato, Sherry
(serves 6)
On a whim I decided to combine two of my favourite Chicken and Rice recipes, Chicken and Porcini Risotto and Chicken A La King. It turned out to be yet another match made in culinary heaven. The rich nutty flavour of porcini goes very well with the special brand of sweetness that comes with capsicum. The recipe also uses brined chicken breast to keep the chicken extra tender and separate from the rice.
Ingredients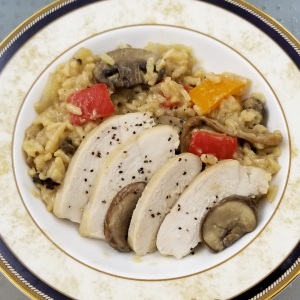
- Dried Porcini Mushrooms (30g)
- Arborio Rice (1.25 cups)
- Brown Mushrooms (150g)
- Chicken Wings (4)
- Chicken Breasts (2 halves)
- Capsicum a.k.a. Bell Pepper (2)
- Onion (1)
- Garlic (1T minced)
- Butter (50g)
- Grated Parmigianino-Reggiano (1/2 cup)
- Cream Cheese
- Rosemary
Early Preparation
- Brine and poach chicken breasts as per the procedure given in this post. You can do this ahead of time and then warm up the chicken breasts in the hot stock before slicing them.
- Simmer 4 chicken wings in 4 cups of water with half an onion and 1t salt. Continue simmering until the meat is practically falling off the bone, adding water is necessary. You can also use 8 mid joints. Start making the stock at the same time you begin the brining.
- You also need to soak your porcini in 2 cups of water. Use cold water, as hot water will give the porcini a slight rubbery texture after it rehydrates. Keep in the fridge.
Preparation
- Bring your chicken stock to a slow simmer. Add the juices from the poached chicken breast and the porcini water (but not the porcini itself) to the stock pot.
- Cut the capsicums in half and remove the stem, core and seeds. Cut the tops and bottoms off and add them into the stock. Cut the sides into 1/4 inch squares and set them aside.
- Cut the brown mushroom into thick slices.
- Mince the garlic and julienne the remaining half of the onion into1/8 inch pieces. In a large pan, fry the onion bits on low heat in 2T of oil until they become yellow and limp. Add the garlic and continue pan frying for a minute.
- Turn up the heat on the pan and add the rice into the pan, stirring well.
- After another minute, add a ladle of stock (liquid only) to the pan and reduce the heat to produce a low simmer. Add the capsicum pieces to the pan at this stage.
- Stir until the risotto begins to dry, then add another ladle of the hot chicken stock. Stir frequently to prevent sticking. The stock pot must be kept simmering to avoid shocking the rice. Continue doing this for about 20 minutes.
- In the meanwhile grate the Parmigianino finely. Cut ¼ of a block of butter into 1 cm cubes and mix it with the grated cheese. Allow the butter to soften out in the open. This forms the mantecatura.
- Dissolve 1T of cream cheese in the last ladle of hot stock before adding it to the pan. Add both the brown mushrooms and the porcini at this stage.
- When your risotto is al dente you can let it almost dry up, after which you turn off the heat. Total simmering time varies a bit with the type of grain you are using, so rely on taste and appearance to decide if the risotto is done and not a timer.
- Stir in the mantecatura and let the risotto rest with the cover on for five minutes. Slice the Chicken breasts.
- After tasting, you may add a bit of salt or more grated cheese to the risotto as a final adjustment if you deem necessary. Arrange the sliced chicken over your plated risotto. Garnish with black pepper.
Notes
- My first risotto recipe contains many of the finer points on making risotto, which I have opted not to repeat here. You should refer to that post if you don’ make risotto often.
- Capsicums comes in 4 different colours which have different tastes. Red is sweet and easiest on the taste buds, Green is an acquired taste as it is less ripe and bitter. Orange and yellow capsicums are in between the two. I would recommend you use red and orange for this dish.
- For reference these are my Chicken A La King and Porcini and Chicken Risotto recipes.
Tags: Capsicum, Chicken, Italian Cuisine, Mushroom, Parmigiano-Reggiano, Porcini, Recipe, Rice, Risotto
(serves 3-4)
If there is one salad that everybody likes, it’s Caesar’s Salad. The Caesar is the salad for people who are not into salads; it’s got the taste of bacon, the taste of fish and also cheese. At the same time the Romaine lettuce doesn’t have the bitter taste of the greener leafy vegetables while the dressing is beautifully creamy. Everything that can be done to make a salad less like a salad defines the Caesar. In my version I incorporate the super salty slivers of anchovy that often catch you by surprise into the salad dressing itself.
Ingredients
- Romaine Lettuce Hearts (2)
- Cherry Tomatoes (8)
- Bacon (4 rashes)
- Bread (2 Slices)
- Anchovy in Oil (10g)
- Parmigiano-Reggiano Cheese (40g)
- Mayonnaise
- Mustard
- Vinegar
- Minced Garlic
- Vegetable Oil
Preparation
- Slice 4 rashes of bacon into 1cm squares. Fry the bacon in a pan to render their oil. Turn off the fire when three quarters of the bits are hard and crispy, allowing the residual heat to brown the remainder. Spoon out the bacon, leaving the oil in the pan.
- Dice 2 slices of bread into 1cm squares. Stir the bread cubes in the pan to soak up the oil from the bacon. To make them into croutons, toast the bread pieces in the toaster oven for 15 min at 120oC to harden them and a further 3 min at 180oC to impart some colour.
- Mash 2 slivers of anchovy in their oil in a mixing bowl. You should end up 2t of anchovy oil suspension. You may need to heat the anchovy in the pan for them to disintegrate – see notes below.
- Peel and mince a few cloves of garlic.
- Add 1t mustard, 2t minced garlic, 2t vinegar and a pinch of sugar to the bowl and mix well.
- Add 4T of mayonnaise and mix well. Then add 3T of vegetable oil 1T at a time, stirring the oil in each time before the next spoon. This is your Caesar’s salad dressing.
- Cut each of the Romaine lettuce hearts into 5 equal sections. Open up the sections into individual pieces and place them in a large salad bowl. Cut each cherry tomato into half and add them to the salad. Spoon in the salad dressing and toss well.
- Separate the salad into plates at this stage if you are serving the salad individually.
- Top off the salad with the bacon bits and croutons.
- Grate your cheese and sprinkle over the salad.
- Finish with some black pepper.
Notes
- Anchovy from a can will fall apart easily. Anchovy from a bottle is of a higher quality and requires heating before it will disintegrate into a suspension. I typically just heat the contents of the whole bottle of anchovies in a pan, mash them and pour everything back into the bottle after its cooled. This makes it really convenient to spoon out the anchovy suspension whenever I need it.
- Add 1T of water to the salad dressing if you are not rinsing your lettuce.
- Do not use extra-virgin olive oil as you don’t want the taste of olives in your Caesar’s salad. Use any kind of vegetable oil, or a light olive oil is fine too.
- Follow the sequence given for making the dressing. If you add the oil before the mayonnaise, it will be impossible to get a smooth mixture.
Tags: Anchovy, Bacon, bread, Lettuce, Mayonnaise, Parmigiano-Reggiano
(serves 5)
My Lobster Thermidor recipe avoids the main pitfall of the traditional in-the-shell method; You can have your lobster meat nice and tender since you don’t have to cook it an extra time to first remove the meat from the shell. It is also simple and easy, you don’t have to worry about procuring whole fresh lobsters, halving them without breaking the shell, removing meat from the claw, serving an odd number of servings etc. In addition, you avoid the hassle of making a béchamel sauce. And it still tastes rich and creamy.
Ingredients
- Lobster Tails (2=300g)
- Mushrooms (100g)
- Onion (0.5)
- Mascarpone (200g)
- Emmental (100g)
- Parmesan (70g)
- White Wine (0.75 cups)
- Cooked Rice (2 cups)
- Garlic (3t)
- Butter
- Tarragon
Preparation
- Boil 3/4 cups of long grain rice, this will become 2 cups when it is cooked.
- Fully defrost your raw lobster tails if they come frozen. Separate the meat from the shell. Cut the meat into bite sized morsels.
- In a bowl mix 20g of warm butter, 3t of crushed garlic, 0.5t of salt and 0.5t of white pepper. Add the lobster and mix well. Leave it to marinate while you do the next steps.
- If your cheese did not come grated, grate it now. In any case leave the cheese out to warm.
- Julienne half an onion into small bits and slice the mushrooms into thin slices. Pan fry the onions on low heat with a large knob of butter, adding the mushrooms once the onion begins to brown.
- When the mushrooms become limp turn up the heat and add 3/4 cup of white wine. I tend to use chardonnay for its woody flavour. Let the mixture boil and reduce for 1 minute.
- Turn off the fire. Add the Mascarpone to the pan and stir till it has melted. Next, gradually sprinkle on and stir in the grated emmental as you bring the mixture back to a low simmer. Finally sprinkle on two thirds of the parmesan. Turn off the fire as soon as the cheese has melted. Season with 0.5t salt, 0.5t sugar, 1t black pepper and 1T of tarragon.
- Preheat your oven to 200oC (390oF).
- Divide your cooked rice into 5 ramekins. Press the rice down lightly till it is flat, but do not compact it. Arrange the lobster meat on top of the rice.
- Spoon the cheese sauce evenly into the ramekins and sprinkle the remaining parmesan over the top of each ramekin.
- Bake for 15 minutes or until brown spots begin to appear on the surface.
Notes
- Make sure you let the emmental warm to room temperature before using it or it will separate into oily rubbery clumps.
- You can use semi cooked orzo pasta if you are not used to cooking rice, but rice goes better with this dish. For more information on rice, refer to my White Rice Page.
- The easiest way to separate the meat from the shell is to cut the shell in two lengthwise with a pair of scissors along the ‘spine’.
- For alternative cheeses, refer to my Cheese Page.
- Butter is essential to the taste of lobster thermidor, do not substitute with olive oil.
Tags: Cheese, Emmental, lobster, Mascarpone, Mushroom, Parmigiano-Reggiano, Rice
(serves 5)
This is my take on the classic French dish, Coquilles Saint Jacques, with an Italian twist. I have devised a quick thrice-baked routine which makes the recipe extremely easy to execute. Scallops have a nice texture but it is hard to infuse flavour into them. One common way to given them additional layers of taste is to use a gratin. This is what I have done, using a simple breadcrumb mixture containing 3 complimentary flavours: garlic, pesto and parmesan.
Ingredients
- Large Scallops (500g)
- Bread (3 slices)
- Minced Garlic (3T)
- Pesto (3T)
- Parmesan (1T)
- Olive Oil (1/4 cup)
Preparation
- Leave 3 slices of bread in the open to dry overnight.
- Cut the crust off the bread and cube the bread into 1cm pieces. Cut the crust into small pieces as well, but separately.
- Prepare a brine of 1T salt, 1t sugar, the juice of a wedge of lemon in two cups of water. Place the scallops in the brine for twenty minutes.
 Do not go beyond twenty minutes or the scallop flesh will become too salty.
- Rinse the scallops and wrap them in a tea towel for a few minutes. Allow the scallops to dry on a few sheets of paper towel for another few minutes and then transfer them to a bowl.
- In a large mixing bowl mix 3T pesto, 3T minced garlic with 1/4 cup of olive oil. Spoon 2T of this mixture onto the scallops, mix well and leave to marinate.
- To the remainder of the mixture add a light sprinkle of salt and a heavier sprinkle of pepper and stir.
- Preheat the oven to 200oC.
- Place the bread pieces on a casserole dish and bake in the oven. When the bread is crispy and dry, this will take 5 minutes, take it out of the oven, but leave the oven on.
- Allow the bread to cool for a short while on a wire tray. Then crush the bread on a piece of foil using the spiked end of a meat mallet to turn them into fine crumbs. Add the crumbs into the mixing bowl with the pesto oil and sprinkle in 1T of powdered parmesan cheese. Mix well and then put the flavoured crumbs back into the casserole dish and back into the oven, this time for 8 minutes.
- When the gratin has formed, take the casserole dish out again, and immediately arrange the marinated scallops into the dish evenly spaced, and not touching each other. Spoon any left over marinade over the scallops. This goes back into the oven for a further six 6 minutes or so, depending on the size of your scallops.
- Serve immediately, from oven to table, while the gratin is still crispy.
Notes
- It’s fine to use frozen scallops as long as they are thoroughly thawed.
- There are two types of scallops on the market. The more common and cheaper ‘wet’ scallops are bloated from soaking in a STPP solution, making them bigger than they actually are. 20 minutes in brine draws the extra water out – they would otherwise keep exuding water as they cook, making them rubbery and impossible to sear.
- Personally I believe the higher quality dry scallops are well worth their higher price, since they don’t shrink. You can buy them fresh or when frozen they usually come in a paper box (as opposed to a plastic bag).
- ‘Wet’ scallops are very white while dry scallops are ivory in colour, so it’s easy to tell them apart.
- Although it is more work, you may alternatively sear your scallops in a very hot cast iron pan, turning them over once with a pair of tongs. You can serve these individually plated with the gratin crumble as shown in the top photo.
- Scallops should not be overdone. They are best when they have shrunk slightly. Look for the right moment and take them out of the oven immediately. If your scallops have shrunken noticeably, then they are overdone and will be tough and hard.
Tags: bread, French Cuisine, Garlic, Gratin, Parmigiano-Reggiano, Pesto, Scallops
(serves 6)
This is not a real soufflé as it uses what I call the french toast method, but it is permissible for a savoury dish and it certainly tastes as good as any traditional soufflé made from beaten egg-white. Within each ramekin, there’ll be that heavenly combination of crab meat and 3 different cheeses, melded into a fluffy body of bread and egg; sort of like crab gratin meets bread and butter pudding, only lighter.
Ingredients
- Canned Crab Meat (300g)
- Capsicum (1)
- Onion (1/2)
- Diced Bread (4 cups)
- Cream (1 cup)
- Milk (1 cup)
- Eggs (3)
- Parmigiano Reggiano (40g)
- Cheddar (80g)
- Brie (120g)
- Dillweed
- Cognac
Preparation
- Drain the crab meat and then soak it in a blend of 1/2 cup water and 2T brandy. Make sure you loosen the packed meat so the brandy can permeate faster.
- In the meanwhile, julienne half an onion and one capsicum (without the seeds). Dice slices of soft crustless bread until you end up with four cups of loosely packed cubes of bread.
- Grate the parmigiano and cheddar. You can mix them together. Dice the Brie but keep it in the fridge to maintain its hardness.
- Using a large pan, stir-fry the onion pieces on low heat with a knob of butter till they become limp. Turn up the heat, add a second knob of butter together with the capsicum bits. Stir-fry for one further minute.
- Drain the crab meat (the second time) and add this to the pan. Continue stir-frying for 3 minutes, and then turn off the heat.
- Add a blend of 1/4 cup warm water and 1T brandy, then mix well. Add the diced bread to the frying pan and mix until they sponge up all the liquid. Sprinkle on the grated cheese, 1T of dillweed and 1t of pepper.
- Distribute half the pan’s contents evenly into 6 ramekins. There is no need to brush the inside of the ramekins with butter, this soufflé does not stick. Add the brie piece by piece to ensure even distrubution; they have a tendency to clump together. Top up with the remaining contents of the pan.
- Mix half a cup of cream, 0.5t of sugar and three eggs in a large bowl.
- In a pot, heat to almost boiling another half cup of the cream and 2/3 cups of milk. Slowly pour this hot half & half into the bowl with the eggs, stirring all the time to make sure the egg doesn’t get cooked. Pour the hot egg mixture into the ramekins and leave to settle for at least half an hour.
- Preheat the oven to 180oC (350oF) and bake your soufflés for about 20 minutes. You can see them rise, so its not too dificult to know when they are done.
Notes
- I mostly use canned crab meat, as its most convenient. Raw frozen (but thawed) crab meat will also work. If you happen to be using boiled fresh crab meat you can skip the soaking in step 1.
- I typically add a can of crab roe paste in step 5 to amp up the crab flavour. This is canned by a Korean company called YDK. I didn’t mention this in the main recipe as some people may not be able to find it.
- I would use either red or orange capsicum (bell pepper). The yellow and green ones do go as well with the soufflé visually and they have a stronger taste.
- If this recipe turned out nicely for you, you may want to check out this similar dish, my earlier liver pate souffle recipe.
Tags: Brie, Cheddar, Cheese, Crab, Eggs, French Cuisine, Parmigiano-Reggiano, Recipe, Soufflé
(serves 3)
Here we have an unusual flavour for risotto, the trademark combination of pancetta, parmigiano and raw egg yolk known as Carbonara. Arborio rice is a good deal more starchy than pasta so its not as simple as making a carbonara sauce and pouring it over cooked rice. We also desire some bits of other crunchy morsels in the rice to give our risotto a bit more textural variety. Therefore I’ve had to improvise with some other additional ingredients….
Ingredients 
- Cubed Pancetta (300g)
- Luncheon Meat (200g)
- Bacon (3 slices)
- Arborio Rice (1 cup)
- Parmigiano-Reggiano (1/4 cup)
- Onion (1)
- Spring Onion (8 stalks)
- Mushrooms (100g)
- Butter (40g)
- Eggs (2)
- Cream (1/2 cup)
- Basil
- Brandy
- Turmeric
Preparation
- Start with the stock first. Cut the luncheon meat into 1cm cubes and boil them in 4 cups of water. When the water is boiling, add 3 slices of bacon, 4 stalks of spring onion and 1 flat t of turmeric. Simmer for 1 hour.
- While the simmering is going on, fry 300g of cubed pancetta on low heat in a pan. While the pancetta is being fried (you only need to move it occasionally), dice 1 onion finely.
- When the lard has been melted off the pancetta, remove the bits of meat, leaving the oil in the pan. Stir fry the onion bit over a low flame in this oil till they begin to caramelize.
- Next, add 1 cup of Arborio rice to the pan and continue to stir fry for 5 minutes and then turn off the heat.
- Cut the remaining spring onion into small bits, keeping the bits from the bottom half separate from the bits from the top half. Also, slice your mushrooms, and grate 1/4 cup of Parmigiano-Reggiano. Mix the cheese with 30g of diced butter.
- By this time, the 1 hour on the stock to be up. Keep the fire going under the stock. Reheat the pan on low heat and then ladle some of the boiling stock (liquid only, not the solids) into the rice. Keep the pan on a low simmer, stirring occasionally. Add more stock whenever the rice begins to dry. Add more water to the stock pot when that begins to dry up.
- After 20 minutes, add 1/4 cup cream, 3T of brandy and 1t of sugar. Then mix in the mushroom slices, 1T of chopped basil and the white portion of the chopped spring onions.
- Soon thereafter the rice will get to the al dente stage. At that time turn off the heat and add another 1/4 cup of cream, 2 egg yolks, the pancetta bits and the cheese-butter mixture. Give everything a thorough mixing and keep covered for 10 minutes while the rice fluffs up.
- You shouldn’t need to add any salt but taste for saltiness anyway, just in case. Plate and serve immediately after the 10 minutes is up. Sprinkle on some black pepper and use the remaining green part of the chopped spring onions as garnishing.
Notes
- If you are making risotto for the first time, refer to this earlier recipe for more details on risotto making.
- If you like Carbonara, you might be interested in my Lagsana Carbonara or Fettucine Carbonara recipes.
- I normally don’t add cream to my risotto, but this is a Cabonara after all.
- For this recipe both the smoked or sweetened pancetta varieties are suitable.
Tags: Italian Cuisine, Luncheon Meat, Pancetta, Parmigiano-Reggiano, Rice, Risotto
(serves 2)
This is a delightful main course which improves on your run-of-the-mill pan fried lamb chops by a mile. It solves the thousand year old lamb chop connundrum by cooking the tender eye seperately from the tougher bone portion, plus it uses the trimmings to create an incredibly intense sauce. If I must say so myself, the pesto crust works really well with lamb. This recipe does however require a tad more time and effort, but its ooh so worthwhile in the end.
Ingredients 
- Lamb Chops (8)
- Pesto (2T)
- Parmagiano Reggiano (1T)
- Bread (1 slice)
- Garlic (0.5 bulb = 6 cloves)
- Fennel Seeds (2T)
- Mint Leaves (1T)
- Rosemary (1T)
- Thyme (1T)
- Cognac (2T)
- Woustershire Sauce
- Dijon Mustard
- Misc Vegetables
Preparation – Earlier in the Day
Buy the type of lamb chop which has some meat clinging to the rib end of the bone. Cut each chop into three parts:
- The first part is the round meaty eye, which will become your medallions (chopping board, left). Make sure you trim away most of the white bits as you won’t be cooking the medallion too long.
- The second part is the flank, basically the fleshy portion around the long end of the bone (chopping board, right). You can leave the white bits on for these cuts.

- The third part will be the trimmings (on the plate), basically the bone and chunks of fat and connective tissue.
- Marinate the medallion and flank pieces in 2T olive oil, 1T cognac, 1T thyme, 1T fennel seeds, 0.5t salt, a pinch of sugar and a dash of woustershire sauce. Lamb is one of the more gamey meats and you should marinate it for a minimum of four hours.
- Boil the trimmings in a pot, with just enough water to cover everything. Add to the pot, 1T mint leaves, 1T fennel seeds, 1T rosemary, 1T Cognac and 6 garlic cloves. Simmer with the cover on for a minimum of half an hour. Follow up by microwaving the meat and stock on high power, covered, for 3×3 = 9 minutes, allowing the meat to cool between cycles.
- Leave a piece of bread uncovered in the fridge to dry out.
Preparation – Before the Meal
- Cut the piece of bread into little cubes. Toast the cubes into croutons and smash them in a zip-loc bag with the flat end of a meat mallet or rolling pin to produce some fine breadcrumbs.
- Mix 2T of these breadcrumbs, with 2T of pesto and 1T of finely grated Parmagiano Reggiano. This will form the pesto crust.
- Pick out the marinated flank portions and pan fry these on low heat with a spot of oil till they are nicley browned. These bits have to be fried as they take much longer to become tender.
- Set aside the flank pieces, leaving the pan unwashed. Pour the lamb stock
 through a strainer into the same pan. Boil the stock down until it becomes a thick sauce. Take the opportunity to cook any vegetables you would like to serve with your lamb medallions in the stock as it is thickened. Examples include baby corn, baby carrots or peeled shallots.
- When the sauce has thickend, remove the vegetables and stir in one t of dijon mustard. Taste and add salt as required – only at the end.
- In the meanwhile, spoon the pesto mixture onto the lamb medallions. Its alright for the crust to be thick so use up all of the mixture you made.
- Oil a baking tray and preheat it. Arrange the medallions in the middle (you should hear a slight sizzle) and then the pre-cooked flank pieces around the edges (as per photo on the right). Cook in a preheated toaster oven (heat on top and bottom) for about 7 minutes, or until the pesto crust begins to bubble and harden.
- Spoon the sauce onto the serving plate first, followed by the lamb and finally the vegetables.
Notes
- You have a couple of options regarding the bones. The lamb reduction sauce is very good as it contains all the tastes you normally associate with lamb but can’t apply because of the pesto crust: mint, garlic, rosemary, mustard etc. If you really can’t bother with the sauce, just throw the bones away and use the drippings from the medallions as ‘jus’. Alternatively, you can boil the stock as per above but serve it (still strained) as a mutton broth to go with the medallions.
- I used a toaster oven because it gives just the right heat to form the crust without overcooking the lamb. If you are making portions for more than 2, you can just use the grill in your oven.
- The microwaving helps melt the remaining fat and connective tissue. If you don’t own a microwave, then you’ll just have to simmer the lamb bones old style for a long time, until the gelatine is released.
- FYI. I grilled the tomatoes with cheese topping seperately. Those were not cooked in the sauce pan with the baby corn.
Tags: Italian Cuisine, Lamb, Lamb Chop, Parmigiano-Reggiano, Pesto
(serves 2 full portions)
This is an easy fast pasta, something that can be cooked from scratch in under 15 minutes, great for those times you suddenly find out you need to whip out something from the kitchen immediately, or if this is the first time you are making pasta. The key to its speed is pesto, a great alternative to cutting up and frying a proper mirepoix or sofritto. It contains herbs, so you also don’t need to worry about adding any yourself. The mushrooms do a good job of soaking up flavour to go with the pasta. To sum up: it may be fast but it still looks and tastes great.
Ingredients 
- Pesto Genevese (4t)
- White Mushrooms (140g)
- Garlic (6 cloves = 1/2 bulb)
- Parmigiano Reggiano (40g)
- Fettuccine (160g)
- Cream (100ml)
- Chicken stock cube (1/2)
- Cognac (1T)
Preparation
- Put a pot of water to boil for the pasta.
- Grate the Parmigiano. For decorative purposes before grating you can, if you like, make some shavings of the cheese with a potato peeler.
- Manually break off and discard the stems of your mushrooms. Slice them top down into 1/8 inch thick pieces.
- Peel the garlic and put it through a garlic press. You should end up with 2 heaped t of garlic.
- Add a dash of olive oil and 1t of salt to the pot of boiling water, followed by the fettuccine.
- Put 3T of olive oil, 4t (heaping) of pesto and the minced garlic in a pan on medium heat. When the mixture is bubbling, add the mushrooms. Reduce to low heat and sautee.
- Mash half a chicken stock cube in 1/4 cup of hot water.
- When the mushrooms begin to soften, add 100 ml cream, the chicken stock plus 1T of cognac. Stir fry till the liquid is boiling. Sprinkle on the grated cheese, turn the heat off and continue stirring as the cheese melts.
- After the pasta has been boiling for about 7 minutes, drain it. It will still be a bit hard. Add the pasta to the pan with the sauce and toss fry on low heat till the pasta is al dente. This pasta dish is meant to be dryish (see photo) but if the pan begins to dry too much, sprinkle on a bit of water or cream.
- Season with a touch of black pepper before serving.
Notes
- To my friends who protest my recipes are too ‘complicated’, well here you go. The preparation describes everything done in parallel to save on time. If you like you can cook in stages. Cut the vegetables first, then make the sauce, and finally boil the pasta.
- This recipe is very scalable. To make pasta for 4, just double the amounts, the cooking time remains unchanged.
- I keep a bottle of store bought minced garlic in oil in the fridge for recipes where minced garlic is cooked. A great time saver. The same goes with pesto, no need to make it fresh if you are not eating it raw.
- Pesto is slightly sour already, so don’t substitute the brandy with something sour like wine.
Tags: Fettucine, Garlic, Italian Cuisine, Mushroom, Parmigiano-Reggiano, Pesto


