(the dressing is for 6 portions)
This is one of the three great American salads (the others being the Waldorf and Caesar) and one of my favourites. It takes a bit of work but it is easily the best looking salad in the world. If you were looking for a salad to impress, look no further. The standard Cobb will have crumbled Blue Cheese sprinkled all over it but I’ve incorporated it into the dressing instead. This way, anyone who doesn’t have a taste for strong cheese can apply a different salad dressing.
 Ingredients
- Blue Cheese (70g)
- Sour Cream
- Mayonnaise
- Lemon
- Honey
- Chopped Parsley
- Lettuce (half a head)
- Ingredients of your choice
Preparation of Blue Cheese Dressing
- Chop the Blue Cheese roughly into little cubes. The smaller you cut them, the less mashing you’ll need to do later.
- Place the crumbled cheese into a bowl and add 4T of Sour Cream. Using a table spoon, mash the cheese into the bottom of the bowl in a circular motion until it is mostly incorporated into the Sour Cream. You’ll want to leave some small bits of cheese, so just mash enough to ensure are no clumps.
- Add 2T Mayonnaise, 1T water, 2t lemon juice, 1t honey, 0.5t pepper. Mix well until the dressing is homogeneous.
- Stir in 1T of chopped parsley. Depending on the type of blue cheese used, you may want to add a pinch or two of salt. Taste before you decide if it needs salt.
- As long as you keep the blue cheese dressing in the fridge covered with cling film, you can make the dressing ahead of time.
Preparation of the Salad Itself
- Slice the lettuce finely and arrange it to form a bed for the salad. You can use individual dishes as I did or just one big plate.
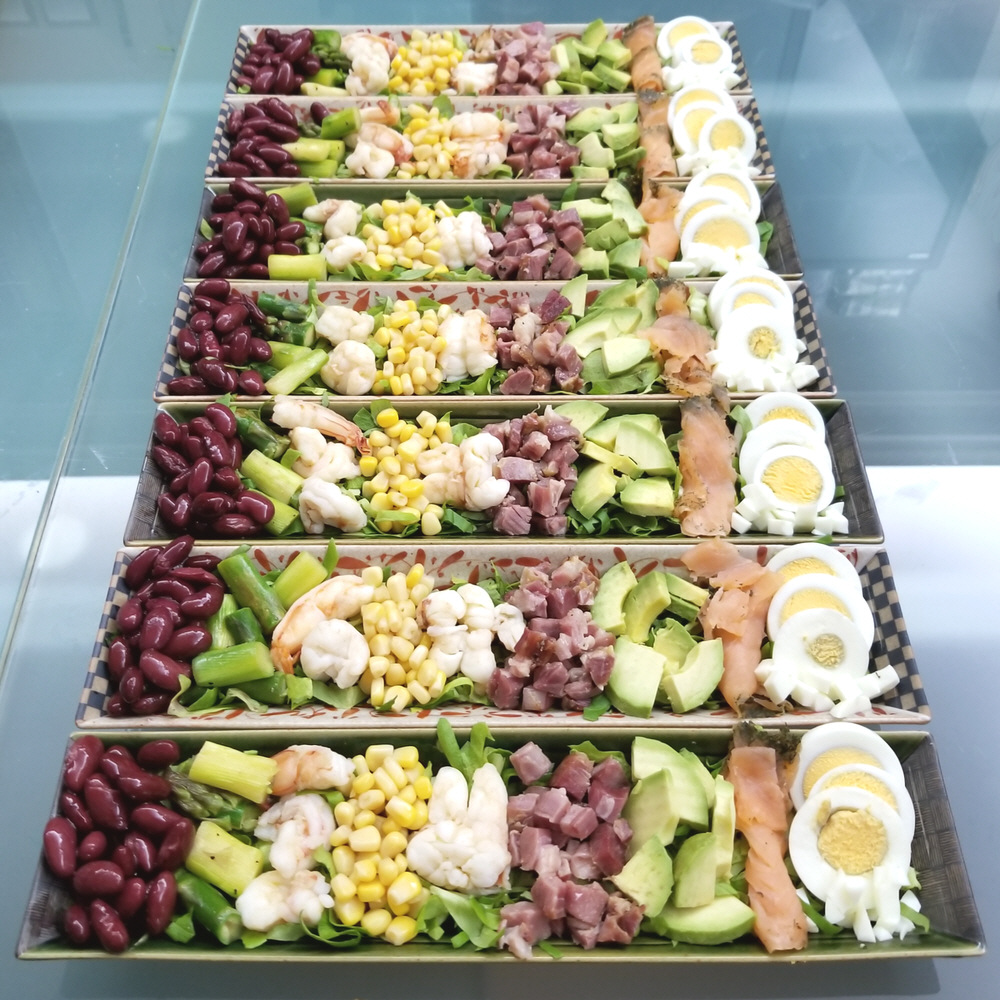
- I didn’t specify what to use in the ingredients section as there is no set rule as to what the signature foods of the Cobb Salad are (other than blue cheese). In the picture what I used was (from left to right) canned kidney beans, sauteed asparagus, prawns, canned corn, lobster, diced ham hock, avocado, smoked salmon and sliced boiled eggs.
- Other items commonly appearing in a Cobb Salad include roast chicken, tomatoes, bacon, purple onions and zucchini.
- The important thing is keep in mind is you need a variety of colours to get the visual rainbow effect. Plan your colour scheme ahead of time to keep similar colours separated; it will be a pain to change the positions of the ingredients later.
- Cook whatever ingredients you need to beforehand (for instance boiling the eggs) and cool them in the fridge, as hot food will wilt the lettuce. The idea is to have everything ready and then assemble the salad all at once to ensure freshness.
- If you are using avocado, which I highly recommend, you should make sure they are sufficiently ripe (skin almost black and the body no longer firm to the touch).
 Notes
Notes
- The trick to keeping your avocado slices from oxidizing (turning brown) is blanching. Put the whole avocado in boiling water for ten seconds and then transfer immediately into a bowl of iced water.
- Roquefort is the ‘normal’ cheese for Blue Cheese salad dressing, but my preference is for Stilton. It is creamy, it’s smell/taste is not as aggressive as Roquefort or Gorgonzola and it is less salty. Its no wonder the Brits call it the King of Cheeses.
- Blue Cheese normally comes in 300 gram wedges. If you do not intend to use/eat the remaining cheese anytime soon, you can freeze it, as long as you’ve wrapped it properly in cling film. You should first divide the remaining cheese into individual portions so you won’t need to defrost the cheese to cut it. The other thing blue cheese is great for is quattro formaggi pasta sauce or pizza.
Tags: Avocado, Blue Cheese, Corn, Egg, lobster, Salad, Smoked Salmon
(Makes 30)
A Madeleine is classic French Genoise-style sponge cake that is the size of a large cookie. Miniaturizing the cakes has the desirable effect of increasing the crust to internal volume ratio. At the same time Madeleines are characterized by a moist centre with a unique rich nutty-buttery taste, although my particular version has a strong citrus kick to it as well. You can recognize a Madeleine easily because of its iconic shape, an elongated scallop shell with a ‘hump’ below. Madeleines are best served any time you are drinking coffee or tea.
Ingredients 
- Eggs (3)
- Butter (130g)
- Flour (1 cup)
- Plain Sugar (1/2 cup)
- Icing Sugar
- Lemon (1)
- Orange Marmalade (3T)
- Bicarbonate of Soda
- Vanilla Essence
This recipe does not require, but is best made using special scallop shell pans.
Preparation
- Start by browning 130g of butter. Melt the butter in a small pan on low heat. After a while white particles will appear on the surface of the liquid butter. Next the butter will start to froth. At this point immediately pour the melted butter into a second pan to prevent it from going from browned to burnt. Allow to cool.
- Spoon 3T of marmalade into a bowl to allow it to warm to room temperature.
- Grate the skin of 1 lemon to get 1t of zest.
- Whisk 3 eggs with half a cup of sugar, the lemon zest, 1t vanilla essence and a pinch of salt. Keep whisking until the mixture thickens and is foamy. This should be about 5 minutes by hand or 1 minute with an electric hand blender.

- Mix half a flat t of bicarbonate of soda into 1 cup of plain flour. Sift the flour into the egg mixture, folding the flour regularly into the mixture to prevent lumping.
- Cut the zested lemon in half and squeeze it to obtain 3T of juice. Combine the juice with the marmalade and then stir the resulting citrus syrup into the batter.
- Reserve 3T of the melted butter and add the remaining butter to the batter 1T at a time, fold each time to incorporate the butter into the batter before adding more. Rest the batter in the fridge for a minimum of one hour, covered with cling film.
- Mix 1T flour into the reserved butter and brush your Madeleine pans with this. Place the pans into the fridge as well, for a minimum of ten minutes.
- Preheat your oven to 160oC (320oF).
- Take the batter and pans out of the fridge. The batter should be the consistency of a thick milkshake. Spoon 1T of batter into the centre of each mould in your pan. Do not fill the moulds all the way to the rim (see photo above) as you need room for the batter to expand without spilling
 out.
out.
- Place the pan in the oven for about 8 minutes. The time will vary slightly from oven to oven, and it will take more time for multiple pans and less time for incomplete pans, so you need to keep watch as they bake. The first sign to look out for is when the characteristic camel humps develop (see photo on right) on your madeleines. Soon after the edges will start to brown. Take them out one minute after this.
- Flip your madeleines onto a cooling rack and dust lightly with icing sugar while they are still hot. This icing (i.e. powdered) sugar will eventually dissolve in the butter of the madeleine to form a glaze so do not skip this step.
Notes
- The Madeleine was popularized to the world by the French writer Marcel Proust who wrote about eating it and the memories it triggered. Despite its simple look, this little cake is one of the quintessential petit fours, of equal standing with the Canele and the Macaron.
- The ribbed side (facing down in the pan) will tend to darken faster than the hump side, which is the biggest challenge in Madeleine making. This is why the pans must be chilled beforehand, to help counteract this. Supplementary techniques you can try would be using the top rack of your oven or placing a (metal) baking sheet below the Madeleine pan. All this will alter the baking time, so rely on your eyes and not the clock.
- If you don’t get the camel hump, then your oven is not hot enough – or you didn’t chill your batter. If there is no hump, its not a real Madeleine.
- You probably cannot make all 30 Madeleines in one go so plan ahead to split the baking into 2 or more equal batches.
- The bicarbonate of soda is a raising agent. If you are using self raising flour, skip the bicarbonate of soda and use only half the lemon juice.
- You can stack 2 buttered madeleine trays by turning one of them ninety degrees.
- Replace the Marmalade with soft brown sugar to make ‘regular’ Madeleines.
- If you don’t have Madeleine pans, you can use mini-muffin trays, though you will end up with round cakes. Do not spoon more than 1T of batter into each depression even though they are deeper.
Tags: Butter, Cake, Egg, French Cuisine, Lemon, Marmalade, Orange
(serves 2-3)
Cold Ramen or Hiyashi Chuka was traditionally served in summer as a refreshing chilled alternative to hot Ramen in the days before air-conditioning became commonplace and is still served seasonally in some places. Thus all the ingredients of Hiyashi Chuka, cucumber, ham, omelette and imitation crab sticks and even the Ramen itself are served cold. This Goma variety is served in a creamy sesame sauce and is great for lunch on a hot day. If you love the taste of peanut butter, you are definitely a fan of Goma Hiyashi Chuka, even if you don’t know it yet.
Ingredients
- Ramen (2 servings)
- Tahini
- Ham (100g)
- Imitation Crab Sticks (100g)
- Cucumber (1/2)
- Eggs (2)
- Sesame Oil
- Sesame Seeds (black or white)
- Soya Sauce
- Rice Vinegar
- Mirin
- Hon Dashi Granules
Early Preparation
- If you keep your Tahini in the fridge, take it out ahead of time so it has a chance to warm up.
- Dissolve 1t of Hon Dashi granules in 1/3 cup of warm water to make some stock.
- Beat 2 eggs with 1/3 of the stock, 1T of Mirin and 1 heaped t of sugar. Cook an omelette with the egg mixture, using low heat to make sure it doesn’t get burnt. Cut the omelette into strips that are about 1/8 of an inch wide and place the egg strips in the fridge, covered in cling film.
- Cut the ham into long strips matching the egg. Do the same with the crab sticks. Also put them in the fridge in cling film.
- Julienne half a cucumber into long thin pieces. They must be as thin as the noodles so they don’t remain rigid. Ideally you’d use a mandolin slicer for the cucumber as it is difficult to cut the cucumber sufficiently thin by hand. Keep the julienned cucumber in the fridge as well.
- If you intend to make your Hiyashi Chuka presentable keep all the toppings separate in the fridge. They should also all be of the same length.
- Now for the sauce. Mix 3 heaped t of Tahini with 2T sesame oil, 1T rice vinegar, 1T Mirin, 1t soya sauce in a bowl. Use the back of a tea spoon in a circular motion to integrate the tahini into an emulsion.
- Dissolve 1t sugar in the remaining stock. Stir the stock slowly into the emulsion to thin it down into a sauce and then place the sauce in the fridge. It should thicken again once it becomes cold.
When You Are Ready To Serve
- Boil the ramen. When the noodles are done (it’s best to judge by tasting) rinse them immediately with running cold tap water in a colander. You’ll need to move the ramen around with your hands as the bottom portion will tend to stay warm. Use iced water if it is a warm day and your tap water is not cold.
- Leave the colander to drain for a short while and then divide the ramen onto plates. Pour the sauce evenly into the noodles and then arrange the toppings over the noodles.
- Finally sprinkle each plate with some sesame seeds and serve.
Notes
- Gomadare means Sesame Paste Sauce, which is where the ‘Goma’ in Goma Hiyashi Chuka comes from. Plain Hiyashi Chuka refers to original cold ramen that is served in a vinegary soya sauce.
- Hiyashi means chilled, which makes sense but Chuka means Chinese Style, which is strange since this dish was invented in Japan. My guess is that the closest thing Cold Ramen resembled when it first came out was Chinese tossed noodles (i.e. Lo Mein) and that’s how Chuka came into the picture.
- The egg and cucumber are standard ingredients for Hiyashi Chuka, but the strips of meat are allowed to vary. You can also have more than 4 toppings. Some common alternatives/additions are roast chicken, Chashu pork, fish cake, corn and tomato.
- The sweet omelette is essentially made according my Tamagoyaki Recipe. You can check it out if your are interested in the finer details.
- The Ramen that you use should be of the yellow wavy type. If you can’t find ramen pasta is a viable alternative. In Japanese-western buffets you sometimes see a cold pasta version of Goma Hiyashi Chuka in the appetizer section. And of course you could try making ramen from spaghetti. Whatever noodle you end up using, make sure its a type of noodle that doesn’t get mushy easily – i.e. no instant noodles.
- If you have no Hon Dashi, you can substitute in 1/3 cup of any kind of stock you fancy, but it should be salted.
- If you have no Mirin you can boil 4T Sake with a dab of maple syrup down to 2T to make your own substitute.
- If you have no rice vinegar, any kind of white vinegar should do.
Tags: Cucumber, Egg, Ham, Japanese Cuisine, Mirin, Ramen, Sesame
(serves 4)
Tamagoyaki is the sweet omelette in the shape of a brick that you find on a Sushi platter. At home you can serve it as an amuse-bouche or a side dish. Tamagoyaki only requires a few simple ingredients but the typical method of making them can be technically demanding, requiring the rolling of multiple omelettes into a square Swiss roll on a hot pan before they fully cook. This takes lots of practice to get right as you have to work deftly. Fortunately there is an easier way for the novice that results in a perfect Tamagoyaki the first time and every time, the Stacking Method.
Ingredients 
- Eggs (4)
- Mirin
- Hon Dashi
- Sugar
- Nori (Dried Seaweed Sheet) – optional
see notes below for alternatives to
Hon Dashi and Mirin
Preparation
- In a large bowl, dissolve 1T of sugar and 1 flat t of Hon Dashi granules in 1/4 cup of warm water.
- Add 4 eggs and 2T of Mirin to the bowl and beat the mixture until it becomes a fairly uniform yellow colour.
- Use a small pan, a pan that has a flat bottom. Place it on very low heat. Add a few drops of oil and spread it around the pan.
- Ladle into the pan enough egg mixture to cover the whole pan without you having to tilt it. If the egg bubbles, splutters or gets cooked instantly, then pan is too hot. When the egg is almost cooked, flip the slice over to cook the other side. Next, flip the omelette sheet onto a plate and leave the pan off the fire for the time being. The omelette should be of the same thickness throughout, which is why the pan needs to be flat.
- Add a new ladle of egg mixture to the pan and put it back atop the flame. When the egg is almost fully cooked and only a thin film of raw egg is left on top, remove the pan from the fire. Using the back of a spoon spread the remaining raw egg evenly over the entire surface of the omelette sheet.

- Stack the first omelette sheet onto the one in the pan and return the pan to the fire. Press down with a flat spatula to ensure the raw egg is evenly distributed and after about ten seconds when the two sheets have fused into one, flip them back onto the plate.
- Repeat steps 5 and 6 adding more layers until almost all the raw egg mixture is used up and you end up with a block of Tamagoyaki as shown here. During the whole process add oil as required.
- Cut the block exactly into two halves. Smear a thin film of the remaining raw egg mixture on the top of one half-block and place the other half-block back in the pan, again on low heat. Next, position the hot block onto the other block with the cut ends on the same side and press down firmly. The idea is to let the hot egg cook the film of raw egg to cement the two blocks together.
- Allow the new tall block to cool and then wrap it in cling film. Sandwich it between two plates in the fridge. When the Tamagoyaki is cold, pad it dry with some kitchen towels, trim away the uneven bits at the edges and then cut the block into mini-bricks.
- Wrap each brick with a strip of dried Nori seaweed. The Nori should overlap at the bottom and a dab of water will suffice to join the two ends. This allows your guests to eat their Tamagoyaki with their bare hands if they wish.
Notes
- Ideally you should use a Makiyakinabe pan. This is a pan that has three vertical sides and is rectangular in shape, as shown here. Modern ones are now made of non-stick material. Your next best alternative is one of those small pans for frying one egg at a time.
- You definitely want to avoid burning the egg. A slightly browned patches are ok, but no more than that. You can notice in the top picture there is a brown line running along my Tamagoyaki, which is what will happen if your fire is too strong. Using a low flame may not be enough. Move the pan away from the fire often and make frequent use of the residual heat to cook the egg. Also, only pour in the raw egg mixture after removing the pan from the fire. Patience wins the day.
- You also want to cook the egg evenly. To do this move the pan around so the fire is not concentrated on one spot for too long. This also prevents the egg from getting burnt.
- You can skip step 8 depending on how big your pan is, how many Tamagoyaki bricks you want to end up with and how tall you’d like them to be.
- If you have no Hon Dashi, you can substitute in 1/4 cup of any kind of (salted) stock you fancy.
- If you have no Mirin you can boil 4T Sake with a dab of maple syrup down to 2T to make your own substitute.
- If you are into Japanese egg recipes, two others I have on this site are: Steamed Chawanmushi and Runny Yolk Eggs for Ramen.
Tags: Egg, Hon Dashi, Japanese Cuisine, Mirin, Nori, Sushi
(serves 8-10)
The Russian Potato Salad (some people say Ukrainian) is the king is potato salads, so much so it is more of a cold appetizer than a side dish. It has great texture, being the perfect blend of starchy vegetables, crunchy vegetables and meat. It also looks great, its a kaleidoscope of colours bathed in a milky white dressing. Most importantly Russian Potato Salad tastes great. A perfect dish to make ahead of time so there is less time-pressure when you are cooking and serving your meal.
Ingredients
- Potatoes (6 = 3 cups)
- Carrots (3 = 1.5 cups)
- Frozen Peas (1.5 cups)
- Red Onion (1/4)
- Eggs (4)
- Ham (200g)
- Heinz Sandwich Spread (1/3 cup)
- Sour Cream (1/3 cup)
- Mayonnaise (1/3 cup)
- Liquid Smoke
- Dill Weed
Preparation
- Boil 4 eggs in a pot, starting with cold water. Simmer for 10 minutes once it is boiling and then place the eggs in cold water.
- Peel the carrots and potatoes and cube them into 1cm blocks. Place the cubed potato and carrot in a large sauce pan and add boiling water from a kettle. Add just enough water to cover everything and bring to a boil.
- Simmer for 8 minutes once it is boiling. Strain

better to cube first, then boil
through a colander and after a minute pour into a large salad bowl lined with some paper towels.
- Rinse the peas in water to remove any ice and then place those into the same pan. Again add just enough water to cover everything and bring to a boil. Simmer for 3 minutes once it is boiling. As with before strain through a colander and then add to the salad bowl.
- Julienne 1/4 of a red onion and cube 200g of ham.
- Mix 1/3 cup Heinz Sandwich Spread, 1/3 cup sour cream, 1/3 cup mayonnaise, 1T of dill weed, 1T of liquid smoke in a bowl. Add also 0.5t each of sugar, pepper and salt.
- Remove the paper towels from the vegetables.
- Peel the eggs and put them through an egg slicer a few times. The whites should end up cubed while the yolk should fall apart. Add the egg bits to the bowl together with the chopped onion and ham. Mix everything up gently and then add the dressing and do a second mixing.
- Refrigerate at least for a few hours before serving.

everything the same size
Notes
- Some people call this the Olivier Salad, after a Chef Olivier who served a similar style salad in the Moscow Hermitage Restaurant. That may well have been the original inspiration for this salad but its quite different, containing more exotic ingredients like grouse, crayfish and capers.
- One important feature of the Russian Potato Salad is all (except the onion) the pieces should be of the same size. Since you can’t change the size of the peas, that becomes your standard.
- Do not use canned peas, they are too soft and mushy and will get mashed.
- Heinz Sandwich Spread provides the taste of pickles and additional layers of flavour. It is the ‘secret ingredient’ of my recipe. If you can’t find some you can chop up some pickled gherkins with 1/3 cup of Crosse and Blackwell Salad Cream as an alternative, that’s how I used to do it.
- Everybody has their own version so feel free to experiment. You can use roast chicken or bologna instead of ham, these are the common alternatives for meat. Swap in beetroot if raw onion is not to your liking. You can also choose to leave the egg yolk out.
Tags: Carrots, Egg, Ham, Mayonnaise, Peas, potato, Salad, Sour Cream
(serves 5)
Chawanmushi is a steamed egg custard commonly served in Japanese Cuisine. Unlike its Western counterparts, it is a savoury custard. A variety of bite sized food items are burried within the custard, given it a subtle meaty flavour that lingers in the mouth. Chawanmushi contains no milk or cream, giving it a light and delicate texture that is as smooth as tofu. It can be served as an appetizer in any meal, formal or casual, making it a very versatile dish.
Main Ingredients 
- Eggs (3)
- Mirin
- Sake
- Hon Dashi
- Soya Sauce
Other (Optional) Ingredients
- Chicken
- Shrimp
- Kamaboko (fish cake)
- Shiitake (mushroom)
- Carrot
- Ginko Nuts
Preparation Dobinmushi
- First we start by making the dobin mushi, which is a stock with bits of meat and vegetables in it. You can basically use any kind of ingredients but I’ll assume you are using the ingredients listed in the photo.
- Marinate 5 finger tip sized pieces of chicken and 5 small shrimp in 2T mirin and 1t soya sauce.
- Slice a large fresh (i.e. not dried) shiitake mushroom into 5 segments. Cut 5 thin slices of carrot and 5 slices of fish cake.
- Bring to a strong boil 1.75 cups of water with 1 heaped T of hon dashi pellets.
- Add all the cut and marinated ingredients into the pot, including the marinade. Give it a quick stir and immediately turn off the fire. Leave covered for five minutes.
You may do everything in part I ahead of time
Preparation Chawanmushi
- Beat 3 eggs in a pitcher with 2T sake.
- When the dashi stock has cooled, fish out all the boiled ingredients and distribute them equally into the tea cups.
- Pour the dashi into the pitcher, mixing it well with the egg.
- From the pitcher, pour the custard mixture through a strainer into the cups. Don’t fill the cups beyond 85% of their capacity.
- Add a cup of water into a large pot with a steaming rack. In any case, ensure that the water does not reach up the rack.
- Arrange the cups onto the rack with their covers on. Bring the water to a boil with the (pot) cover off. This serves to warm up the custard a bit.
- When the water is boiling, cover the pot and leave on a low simmer for 10 minutes. Leave the pot covered with heat off for a further 5 minutes for custard to firm up.
- Serve hot in the original cups, covers still on and with a tea spoon. It is normal for a small amount of dashi(soup) to remain after the chawanmushi is cooked.
Notes
- ‘Chawan’ means tea cup while ‘Mushi’ means steamed, so chawanmushi translates as ‘steamed cup (of egg)’. Similarly, ‘Dobin’ means teapot and dobinmushi transalates as ‘steamed teapot (of soup)’. It is not an intermediate ingredient but a distinct soup in itself; note the version here is not the way to make a proper dobinmushi.
- If you don’t have tea cups with covers, you can just use a double sheet of foil which you crumple snugly over the top of each cup seperately. The cups should however be the oriental type made of thick porcelain.
- Do not leave the cups uncovered; condensate will mar the custard surface while the chawanmushi will get cooked unevenly.
- It is very important to strain the custard mixture. Do not skip this step or there will be bubbles in the chawanmushi. There will also be sediment from the stock and also bits of egg white which do not steam well.
- If you like, you can put various decorative or fragrant items on the chawanmushi surface immediately after it is steamed, like a perilla leaf or a slice of kamaboko.
- If you can’t get some of the other ingredients listed at the beginning that’s ok; you can substitute anything you like as long as you follow these guidelines:
- it is small (like a ginko nut)
- it doesn’t bleed colour (portobello for example stains the custard)
- it doesn’t have too strong a taste (fisk ok, lamb not so much)
Tags: Chicken, Egg, Japanese Cuisine, Mirin, Mushroom, Recipe, Shrimp
(serves 3)
Oyakodon a.k.a. Oyako Donburi a.ka.a Oyako Rice Bowl is a scrumptious mixture of tender simmered chicken pieces with scrambled eggs served on piping hot rice. The chicken is marinated in a semi-sweet sauce which when combined with the flavour from shiitake mushrooms and dashi broth results in the perfect sauce to go with rice. It’s no wonder Oyakodon is one of the most popular rice dishes in Japan. As it is an all-in-one complete meal, Oyakodon is quite a convenient dish to serve, it can be made in under an hour.
Ingredients 
- Chicken Thigh & Leg (2, boneless)
- Onion (1)
- Eggs (4)
- Dried Shiitake Mushrooms (4)
- Cooked Japanese White Rice (3 bowls)
- Scallion (3 shoots)
- Ginger (1t)
- Dark Soya Sauce
- Mirin
- Hon Dashi
- Sesame Oil
- Dried Seaweed (optional)
Preparation Part I
- Julienne the scallion into small 1/8 inch slices, keeping the white bits seperate from the green bits.
- If you didn’t buy your chicken legs deboned, you’ll need to debone them yourself. Seperate the skin from the meat as well. Trim off any large bits of fat from the meat and then cut the meat into bite sized chunks.
- In a bowl mix 4T soya sauce, 2T mirin, 1T sesame oil, 1t sugar, 1t pureed ginger and the white part of the scallion. Marinate the chicken pieces in this.
- Fry the skin in 1T of vegetable oil in a pan on low heat until the skin gets crispy. There is no need to move the skin save to flip it once.
- In the meanwhile dissolve 1t hon dashi pellets and 1t sugar into 1 cup of room temperature water. Soak your shiitake mushrooms in this.
- Peel and slice the onion into half rings.
- Rinse your rice and set it to cook in a rice cooker.
- At this stage the mushrooms would have softened a bit. Snip the stems and discard them. Slice the mushrooms into 1/4 inch strips and continue to soak them in the same liquid.
- Remove the skin from the pan, leaving the oil in the pan.
- Let the chicken marinate while the rice gets cooked, for about thirty minutes.
You may do everything in part I ahead of time
Preparation Part II
- Beat 4 eggs in a bowl with 1T mirin. Leave them in the open to warm up.
- Pan fry the onion pieces in the pan with the chicken oil until they begin to soften.
- Turn up the heat. When the pan is hot, drain any remaining chicken marinade into the bowl with the mushroom.
- Add the chicken pieces to the pan and stir fry the chicken, ensuring all surfaces are browned. Turn the heat down when the meat begins to shrink. Next, add the mushroom slices, including all the liquid. Sprinkle liberally with pepper and continue cooking until the liquid has been reduced by half in volume.
- Push the chicken pieces to the side of the pan and pour the egg mix into the middle (which will still contain sauce). Turn off the heat after 30 seconds or until just half of the egg mixture begins to solidify. Mix everything in the pan one last time without smashing up the soft egg too much.
- Scoop your cooked rice straight from the rice cooker into 3 large bowls, filling them 3/4 of the way up. Top off each bowl with the contents of the pan, including all the sauce. The egg should continue to cook til it is slightly runny.
- Sprinkle on the green bits of the scallion immediately while everything is still steaming hot. You may also add some thin strips of dried seaweed (Nori) if you like.
Notes
- Oyako means Parent and Child, a reference to main ingredients being Chicken and Egg .
- If you are going out to buy mirin for the first time, check out my What is Mirin? page first. If you really cannot get your hands on some mirin, you can also find out how to make a substitute there.
- What if I can’t find any shiitake mushrooms? The flavour from the shiitake (She-tar-kay) mushrooms is important too. If you really need to, try substituting with dried Porcini or Morel. Don’t use fresh mushrooms as they will impart an unwanted bitter gamey taste.
- What if I don’t know how to cook rice? Refer to my White Rice Page. It goes without sayinh, it’s best to use Japanese rice for this dish.
- If you like, you can cut the chicken skin that has been fried crispy into little pieces and sprinkle it on with the scallion at the end. You should not however leave the skin on the chicken. Together, there is no way to cook the skin properly and yet leave the chicken meat tender.
- Please note – the egg in the photo is a bit over cooked, it should be a bit runnier. My bad. If you want your egg to have a nicer colour and texture, use 4 yolks with 3 egg whites instead.
Tags: Chicken, Egg, Japanese Cuisine, Mirin, Mushroom, Recipe, Rice


