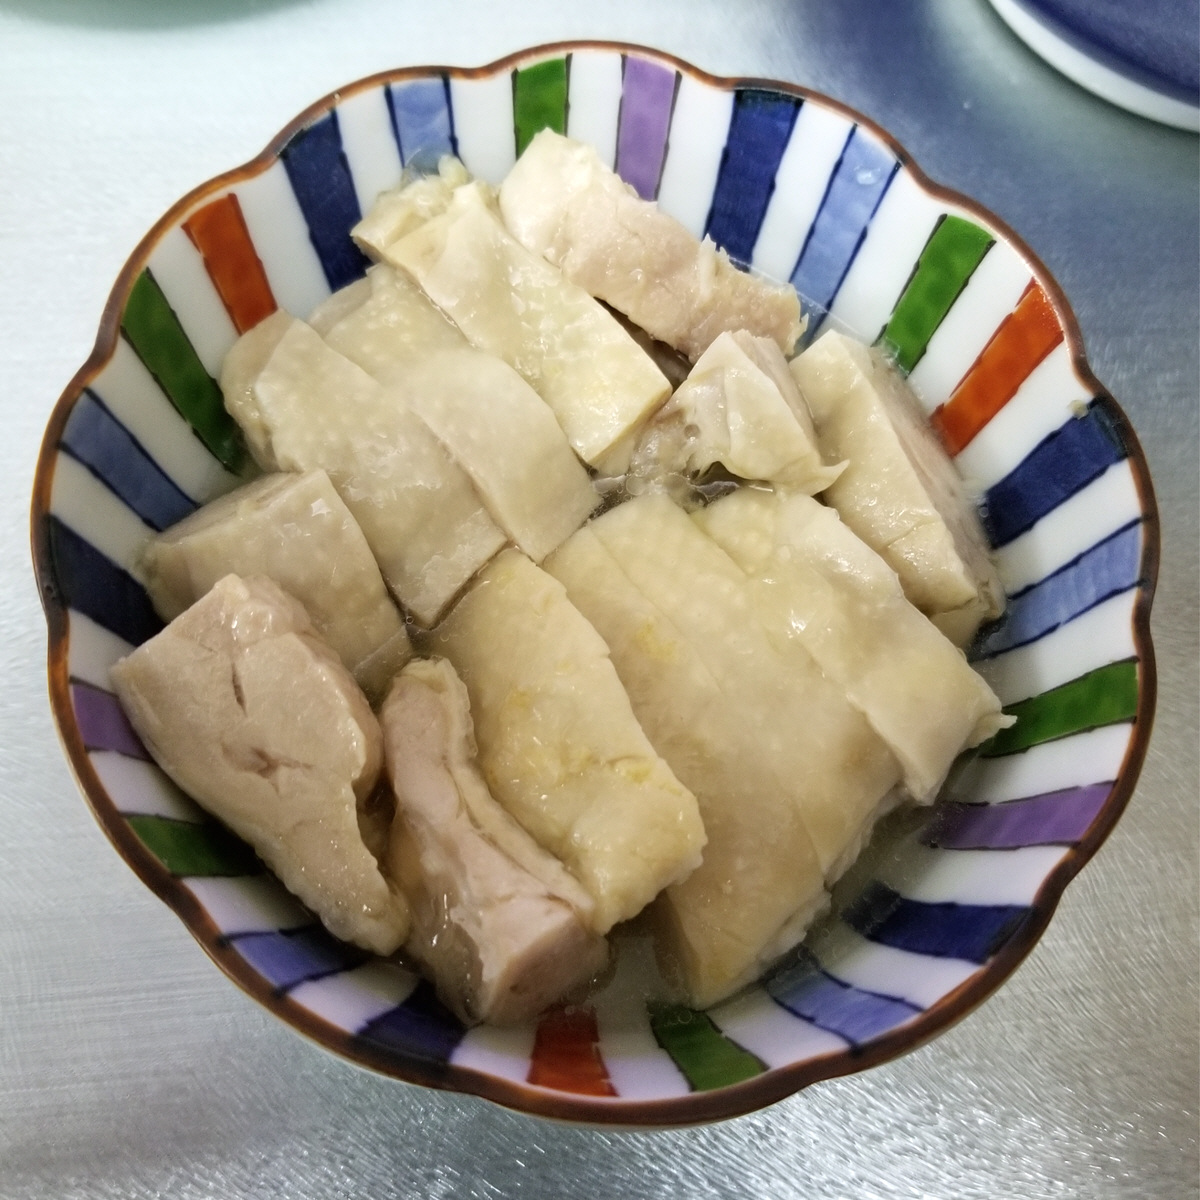
(6 portions) Drunken Chicken is a Chinese classic, the equivalent of a cold cut, similar in concept to jellied ox tongue. It is essentially succulent bite sized chunks of chicken that are infused with flavour, perfect as a cold starter or a one piece amuse bouche. Making it takes quite a bit of time but requires next to no effort or skill, since my recipe doesn’t involve steaming and uses very few ingredients. As an added plus, you can make your Drunken Chicken well ahead of time and keep in the fridge until its needed.
Brine 2 boneless chicken legs in 1.5 cups of cold water containing 1 heaped T of salt and 1t sugar for 4 hours. If its a hot day, add a few ice cubes to the water every hour or keep the chicken in the fridge for the four hours.
Drain the chicken and trim off any visible clumps of fat with kitchen shears. Marinate in a mixture of 6T of Chinese wine and 2t of liquid smoke for an hour.
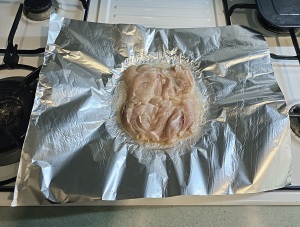
Place a large sheet of foil (refer to the photo for size) on a plate and press the foil to the plate to capture the depressed centre of the plate. Spoon 1T perilla oil into the middle of the foil and then place one chicken leg with the skin side down on the foil. Rotate the chicken 360 degrees to spread out the oil. Spoon half of the marinade over the chicken.
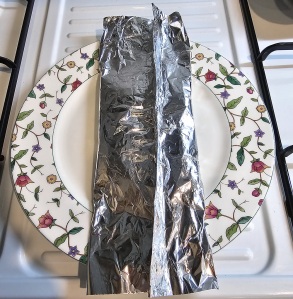
Wrap the chicken in the foil. The first step is the bring the 2 long edges together and fold/roll the edge until you get a flat tube. Next you roll up the other two edges until you get a parcel. As you do the folding, take care to flatten all the rolls neatly to make the parcel as water tight as possible. Also, try to trap as little air as possible inside the parcel as this air will expand in the oven.
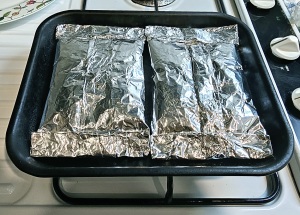
Repeat the process for the second chicken leg; both parcels should be able to fit onto the toaster oven tray.
Preheat the oven to 180oC (360oF). Set the timer for 20 minutes and place the tray in the oven.
After the toaster oven turns itself off, leave the parcels undisturbed in the toaster oven until they reach room temperature. I usually leave them in the toaster for 2 hours or more.
Put the parcels into the fridge. They should be in the fridge for several hours at minimum and in fact you can keep them in the fridge for several days as the meat is nicely sealed up.
Preparation
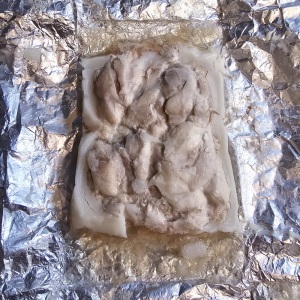
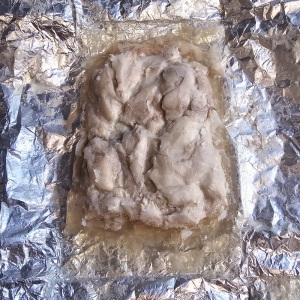
When its time to serve your Drunken Chicken, unwrap the foil and remove the white solidified fat with a fork. You must do this quickly as it softens very soon after it leaves the fridge.
The chicken will be encased in a jelly created from chicken essence and what is left of the wine after all the alcohol has evapourated. This is the all important gravy of Drunken Chicken. Scrape off as much of the jelly as you can into a bowl. Add 2T of boiling water to the jelly and leave the bowl in a bath of hot water to warm up.
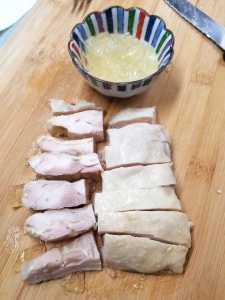
Meanwhile, cut the meat into bite sized pieces and arrange then on to a serving plate or bowl. You may choose to put them into multiple pieces of smaller crockery if you intend to serve individual portions.
When the jelly has fully liquefied, spoon the resulting liquid over the meat. The general idea is for the meat to be still cold while the gravy is at room temperature.
Notes
If find certain ingredients hard to come by, you can use substitutes. Sherry is the standard western alternate to Chinese wine, and oil infused with any flavour, say walnut or rosemary will work just fine. In this sense what I have described is a cooking style in addition to a recipe for a specific dish.
If you are a purist and love the taste of wine in your food, you may choose to add 2T of Chinese Wine instead of 2T of water in step 2 above.
It will be perfectly fine if you use frozen chicken, because of the brining. You can also use other parts of the chicken.
When the parcels are put into the fridge I suggest you place them on a plate as they very often leak very slightly, until the jelly has formed.
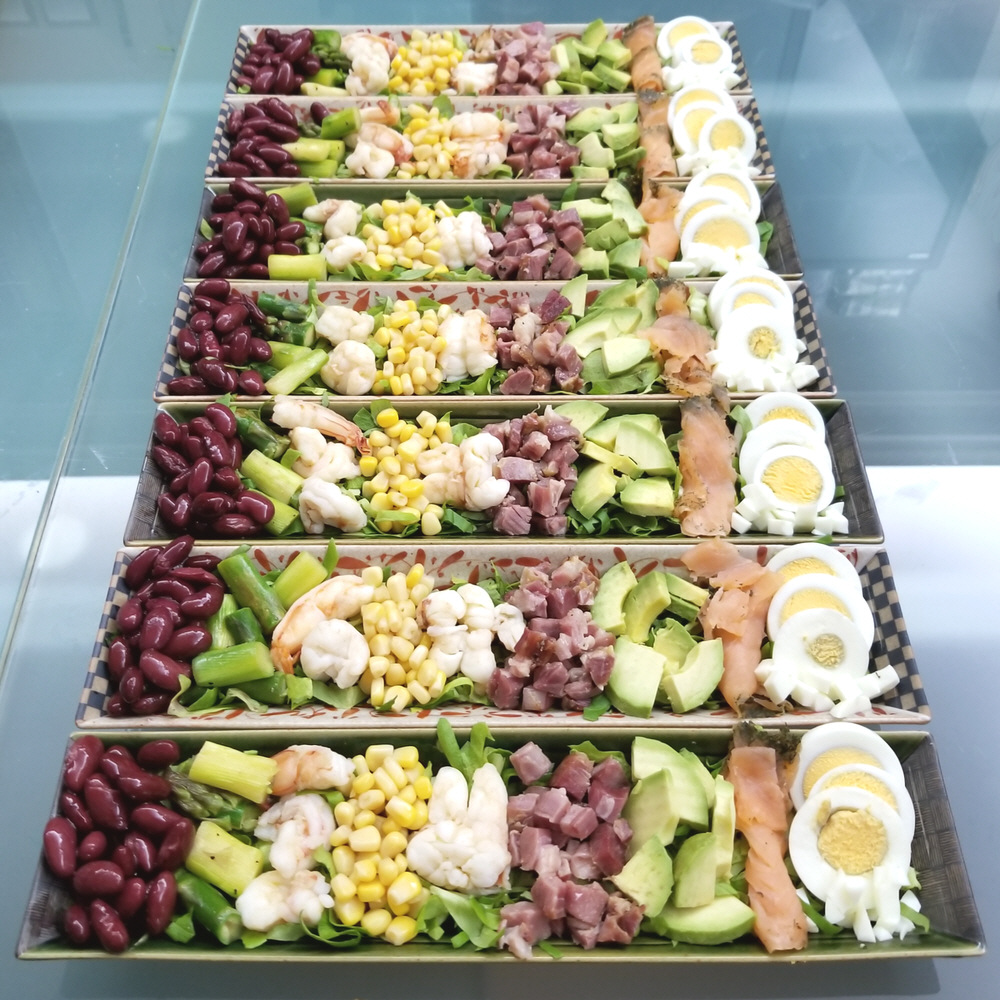
(the dressing is for 6 portions) This is one of the three great American salads (the others being the Waldorf and Caesar) and one of my favourites. It takes a bit of work but it is easily the best looking salad in the world. If you were looking for a salad to impress, look no further. The standard Cobb will have crumbled Blue Cheese sprinkled all over it but I’ve incorporated it into the dressing instead. This way, anyone who doesn’t have a taste for strong cheese can apply a different salad dressing.
Ingredients
Blue Cheese (70g)
Sour Cream
Mayonnaise
Lemon
Honey
Chopped Parsley
Lettuce (half a head)
Ingredients of your choice
Preparation of Blue Cheese Dressing
Chop the Blue Cheese roughly into little cubes. The smaller you cut them, the less mashing you’ll need to do later.
Place the crumbled cheese into a bowl and add 4T of Sour Cream. Using a table spoon, mash the cheese into the bottom of the bowl in a circular motion until it is mostly incorporated into the Sour Cream. You’ll want to leave some small bits of cheese, so just mash enough to ensure are no clumps.
Add 2T Mayonnaise, 1T water, 2t lemon juice, 1t honey, 0.5t pepper. Mix well until the dressing is homogeneous.
Stir in 1T of chopped parsley. Depending on the type of blue cheese used, you may want to add a pinch or two of salt. Taste before you decide if it needs salt.
As long as you keep the blue cheese dressing in the fridge covered with cling film, you can make the dressing ahead of time.
Preparation of the Salad Itself
Slice the lettuce finely and arrange it to form a bed for the salad. You can use individual dishes as I did or just one big plate.
I didn’t specify what to use in the ingredients section as there is no set rule as to what the signature foods of the Cobb Salad are (other than blue cheese). In the picture what I used was (from left to right) canned kidney beans, sauteed asparagus, prawns, canned corn, lobster, diced ham hock, avocado, smoked salmon and sliced boiled eggs.
Other items commonly appearing in a Cobb Salad include roast chicken, tomatoes, bacon, purple onions and zucchini.
The important thing is keep in mind is you need a variety of colours to get the visual rainbow effect. Plan your colour scheme ahead of time to keep similar colours separated; it will be a pain to change the positions of the ingredients later.
Cook whatever ingredients you need to beforehand (for instance boiling the eggs) and cool them in the fridge, as hot food will wilt the lettuce. The idea is to have everything ready and then assemble the salad all at once to ensure freshness.
If you are using avocado, which I highly recommend, you should make sure they are sufficiently ripe (skin almost black and the body no longer firm to the touch).
Notes
The trick to keeping your avocado slices from oxidizing (turning brown) is blanching. Put the whole avocado in boiling water for ten seconds and then transfer immediately into a bowl of iced water.
Roquefort is the ‘normal’ cheese for Blue Cheese salad dressing, but my preference is for Stilton. It is creamy, it’s smell/taste is not as aggressive as Roquefort or Gorgonzola and it is less salty. Its no wonder the Brits call it the King of Cheeses.
Blue Cheese normally comes in 300 gram wedges. If you do not intend to use/eat the remaining cheese anytime soon, you can freeze it, as long as you’ve wrapped it properly in cling film. You should first divide the remaining cheese into individual portions so you won’t need to defrost the cheese to cut it. The other thing blue cheese is great for is quattro formaggi pasta sauce or pizza.
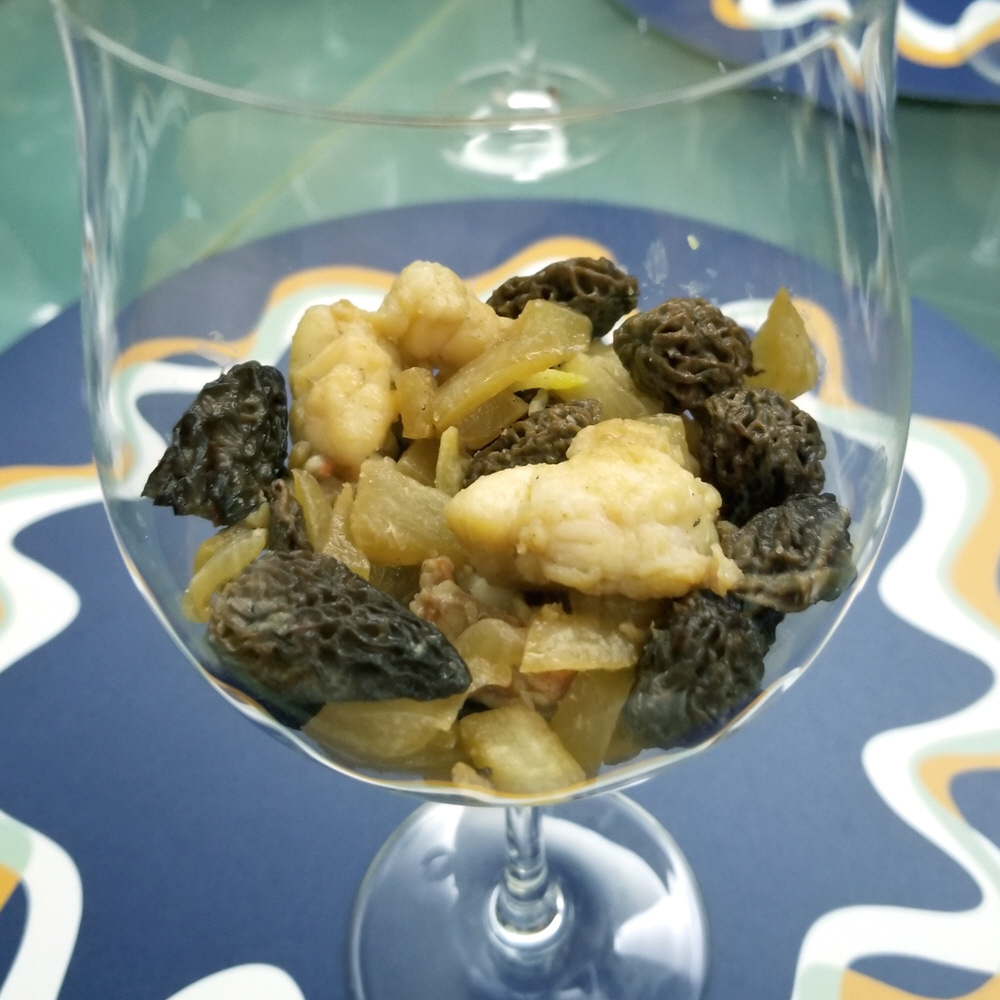
(serves 5-6) This is essentially a deconstructed Lobster Thermidor served chilled, containing all the key ingredients of the hot version – lobster, wine, mushrooms, onions, cream and cheese. Morel mushrooms make up for the flavour that comes from the grill while the whipped cream and Parmesan provide the structure to hold the dish together. It makes for a great lobster appetizer that is neither greasy nor filling like the original.
Ingredients
Lobster Tails (500g)
Dried Morel Mushrooms (1 cup)
Grated Parmigiano Reggiano (1/3 cup)
Onion (1)
Whipping Cream (300 ml)
White Wine (1/3 cup)
Butter
Paprika
White Pepper
Tarragon
Chopped Parsley
Preparation
Defrost and remove the shell of the lobsters. Brine the meat in a solution of 1T salt and 1t sugar in 2 cups of water for 20 minutes. Cut the lobster meat into bite sized morsels. drain off all the excess brine by leaving the lobster meat in a strainer.
Soak 1 cup of dried morel mushrooms in 1 cup of water, until the mushrooms are soft. Squeeze the morels like a sponge to remove excess liquid, but keep all the soaking liquid for later use.
Finely grate 1/3 cup of Parmigiano Reggiano.
Dice one onion into 1/4 inch pieces.
Add a large knob of butter to large pan, and pan fry the onions on low heat until they begin to soften.
Add a second large knob of butter and the morels. Stir fry for a further minute.
Turn up the heat and add the lobster followed by a light sprinkle of white pepper. Stir fry until the the lobster is no longer translucent, then add 1/3 cup of white wine together with 1t of chopped tarragon. Bring back to simmer and turn off the heat.
Pour the contents of the pan into a strainer with a bowl below to catch the excess liquid.
Return the liquid to the pan. Add the morel water, 1t sugar and bring to a boil. Then sprinkle on the grated parmesan and stir until all the sheese has melted. Simmer the liquid down to half a cup. Pour the liquid into a cup.
Pour the cheese wine mixture into a cup and and allow to cool to room temperature. The lobster and mushrooms need to be cold, so place them into the fridge in a ziploc bag.
Pour 300 ml of cream into a container and whip until it forms stiff peaks. Then pour in the (room temperature) cheese wine liquid, add 1 flat t of paprika and fold until they combine completely. If you are using a hand held blender, you can use a three second pulse on low speed.
Pack the (cold) lobster and mushrooms snugly into wine glasses (or some other serving container) and top off with the mousse. Garnish each serving with a pinch of finely chopped parsley.
Cover the mouth of each glass with cling film and leave in the fridge to chill until it is time to serve.
Notes
Most recipes use gelatin powder as the solidifying agent for savoury mousse but parmesan cheese brings with it an additional level of umami flavour and tastes more natural.
There’s no point in using the more expensive large lobster tails. FOr 500g, 4 small lobster tails will do the job nicely.
If you are pressed for time, you can put the ziploc with the cooked lobster in the freezer for 15 minutes. For the liquid, you can put the cup in an ice bath.
The best way to put the mousse into wine glasses is to push the mousse off a table spoon using a tea spoon. Let the mousse drop dead center into the glass without touching the sides of the glass. You can flatten the mousse using a tea spoon as you rotate the glass.
If you don’t have any morel mushrooms, you can substitute with another kind of dried mushroom (like Porcini). Don’t use fresh mushrooms.
Remember to wash the strainer before you reuse it in step 8 as it has previously held raw lobster meat.
(serves 6) Making a fresh savoury cold appetizer is not easy, but this recipe does the trick. This Mango Shrimp cocktail uses a ‘cocktail sauce’ that contains no tomato or vinegar, even though it looks exactly like the usual shrimp cocktail. The secret comes from using prawn heads and paprika to make the cocktail sauce red instead of tomato sauce. I guarantee your guests will be pleasantly surprised when they taste the first spoonful and find the cocktail is neither sour nor tangy.
Ingredients
Mid-sized Prawns (400g)
Avocado (2)
Asparagus (8 spears)
Mango (1 large)
Minced Garlic
Mayonnaise
Milk
Mustard
Brandy
Paprika
Preparation
Place 2 Avocados into the fridge.
Cut off the heads of your prawns and snip off the whiskers. Using kitchen scissors, cut the shell of each prawn down the back and pull out the intestines.
Fry 2t of minced garlic with 1T of oil in a pan on hig heat. When the garlic begins to brown, add the prawn heads and stir fry till they are fully red, then add a cup of water and 1T brandy. Turn the heat down to a simmer. Crush each prawn head with a wooden spatula to release their flavour.
Add the prawn bodies to the pan and fish them out again when they are curled up and red on both sides. Pour the pan’s contents through a sieve into a bowl.
Return the reddish prawn stock to the pan. Add 2T mayonnaise, 2T milk, 1t mustard and 1t paprika to the pan. Simmer until the liquid thickens into a thin orange sauce. Put the ‘cocktail sauce’ into the fridge to thicken and cool.
Peel and dice the prawns. Wrap in cling film and place into the fridge.
Cut off the bottom quarter of each spear of asparagus and then use a peeler to remove any fibrous skin at the bottom end. Par boil the Asparagus for 2 minutes, you can use the same pan. Cut the asparagus into pieces and place them in the fridge.
Cut the mango on both sides of the seed. Using a knife, carve a crisscross grid on each of the ‘halves’. With a large spoon, spoon out the mango cubes, one row at a time. Put the mango cubes in the fridge.
When it is time to serve the shrimp cocktail, halve the avocados and extract the seed using the blade corner (the part next to the handle) of a large knife. Delicately spoon out the flesh and dice. Try not to do this ahead of time as avocado darkens fast when exposed to air.
Toss the 4 components of your cocktail together in a salad bowl and assemble the mixture on individual soup dishes. Drizzle the ‘cocktail sauce’ over the mixture and serve immediately.
Notes
To make the cocktail more substantial, you can serve it as a salad by adding a bed of shredded lettuce.
Try to dice everything to similar dimensions. Form a picture mentally of the final result before you start slicing and dicing. For the asparagus consider only the length of each bit as you can’t adjust the diameter.
One option is to add a flat t of cumin along with the paprika, to add some more heat and give your cocktail a kick. This is the way the French would do it, but its not for everyone.
Choose your uncooked ingredients carefully. The avocado should be just becoming black for the flesh to be soft. If the avocado is still crunchy to the bite, it is too raw. If it is mushy, then it is too ripe. The mango should be ripe enough that its not sour. Taste both of these before putting them in the fridge, to give yourself the opportunity to procure replacements if necessary.
Prawns have to be of a minimum size before their heads develop flavour. In spite of the name, you should not use shrimp (i.e. small prawns). For this recipe, individual prawns should weigh no less than 50g (i.e. 8 or less prawns that add up to 400g).
Going the extra mile: If you want the cocktail to have a nice clean look, you cannot toss the avocado together with the rest of the components as they will ‘grease’ up everything else. The best way to avoid this is to arrange the components separately in stripes like a Cobb salad or like a pie chart. Layering in a wine glass will work as well. Another thing you can do is shock the asparagus in ice water after blanching, to make them a brilliant green.
(makes 12) Korokke, the Japanese version of the croquette, are big in Japan. Unlike the original French version they contain meat and vegetables and come in all kinds of flavours. The other special thing about Japanese Korokke is they are rarely used as side dishes and are typically eaten as a street food type snack, or even as a meal. Beef curry is probably one of the more unique flavours and well worth trying.
Ingredients
Minced Beef (200g)
Sweet Potatoes (500g)
Onion (1)
Cream Cheese (125g)
Eggs (3)
Bread (3 slices)
Curry Powder
Corn Starch
Worcestershire Sauce
Mirin
Nutmeg
Paprika
Preparation
Leave three slices of bread without any wrapping in the fridge overnight.
Boil 500g of sweet potatoes for 25 minutes. Use just enough water to cover the sweet potatoes and reserve the flavoured water after boiling.
Drain away the water into a container for later use and allow the sweet potatoes to cool in the pot. Then peel, dice and finally mash the sweet potatoes with a fork. There is no need to completely pulverize the sweet potato, you want a bit of texture.
Pour 1/4 cup of the reserved water into a bowl. Stir in 2T curry powder, 1T mirin, 1t worcestershire sauce, 1t nutmeg, 1t salt. Marinate 200g of minced beef in the mixture for 15 minutes.
Peel and dice one onion into 1cm sized pieces. In a few T of oil, pan fry the onion bits until they are limp, but before they brown too much. Add the beef and stir fry until the beef is cooked.
With the fire still going, make a hole in the middle of the pan and add 125g (about 4T) of cream cheese. Spoon in a few T of the reserved water and move a spatula over the cream cheese in a circular motion until it has liquified (see picture).
Add the mashed sweet potato and mix everything together well. Turn off the heat and allow to cool. Keep the ‘filling’ in the fridge for a minimum of several hours.
Cut the dried bread into croutons and desiccate further in a toaster oven at 120oC for 15 minutes. If you don’t have a toaster oven, toast before dicing the bread.
Place the croutons on a piece of foil and methodically crush with the jagged face of a meat mallet. There is no need to hammer; simply press down firmly on the smooth face of the mallet head (see picture). Again, there is no need to completely pulverize the bread, you want some variety in crumb size.
Prepare three shallow dishes, one with the bread crumbs, one with 1/4 cup of corn starch and in the third one beat 3 eggs with 1/2t of salt.
Warm up oil in a pot for deep frying. The temperature is right when a bread crumb thrown in creates bubbles.
Spoon an amount of filling equal in size to an XL egg into your hand. Shape this into a log. Roll the log first in the cornstarch to get a thick coating of starch, then quickly in the egg. Finally roll the log in the bread crumbs. Immediately deep fry. Repeat until all the mashed sweet potato is used up. As the insides are already cooked, you can adjust the heat as you like to produce a nice deep orange finish for your Korokke.
Roll the croquettes while cooking occasionally to ensure even cooking. When a croquette is done, place it on a bed of paper towels to absorb excess oil.
Serve your croquettes with a mayonnaise flavoured with paprika.
Notes
If you leave your bread to dry in the fridge for several days, you can skip the toasting part and crush right after cutting into croutons.
Cumin is not curry powder, it is not even the biggest component of curry powder. If you wish to mix your own, you can use the labelling on this package curry powder as a guide to the proportions of each ingredient.
When coating the croquettes you can cover the ends by pushing the material up against the top and bottom of the log. This will reduce the handling of the croquettes and help them keep their shape.
Yes I used sweet potato instead of potato. It is not uncommon to use something other than potato for Korokke in Japan, for instance yam, pumpkin or taro.
If you want your Korokke to look exactly like the real McCoy you have to buy something called Panko Crumbs instead of crushing your own breadcrumbs. They are leafy crumbs which allows them to be bigger than regular crumbs.
Steps 12-13 are best done by a two person team.
The croquettes will continue to brown a bit after you remove them from the oil, so don’t over brown them.
If want to make the shape perfect, you can roll your filling in cling film into (4?) long sausages. Place the sausages in the freezer for 15 minutes to harden them further before frying, but don’t completely freeze them solid. If you want it fast and easy, you can also make your croquettes in the shape of mini hamburgers.
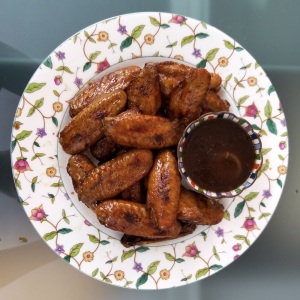
(serves 2-3) This is a recipe for BBQ wings, the type you’d find in a sports bar. For years I tried to cook these wings at home in the same style with limited success. Then one day I discovered the secret to marinating chicken wings. Most recipes use the method of brushing the wings with sauce as you cook them, because its very difficult for flavours to penetrate chicken skin and reach the meat within, but this recipe doesn’t. The secret is counter-intuitive: you have to cook the wings before marinating them.
Ingredients
Chicken Wings (20 mid joint, 700g)
Shallots (4)
Garlic (1 bulb)
BBQ Sauce (1/3 cup)
Cumin
Mustard
Liquid Smoke
Whiskey
Preparation
In a medium sized pot, mix 1/3 cup of BBQ sauce with 1.5 cups water, 1t mustard, 1t cumin and 1t salt.
Peel the garlic and shallots and put them whole into the pot.
Rinse your chicken wings and add them to the pot.
Bring the pot to a boil. After 5 minutes of boiling, carefully fish out the chicken wings without damaging the skin. Put the wings in a Tupperware-like of container.
Continue to simmer the sauce until it has halved in volume. This should take perhaps fifteen minutes. Turn off the heat and stir in 1t liquid smoke and 1T whiskey.
After the sauce has cooled sufficiently, pour it into the container with the wings. Cover and leave the wings to marinate in the fridge overnight, or in any case for at least six hours. Shake once or twice to allow the marinade to reach between the wings.
Preheat your toaster oven to 200oC (390oF) degrees.
Arrange the wings on a wire rack in the toaster oven tray and bake for 25 minutes. You’ll need to do this in two batches as the wings should not touch each other.
Warm up the leftover marinade in the microwave or in a saucepan. You can serve the wings either with the BBQ sauce separate or coated with the BBQ sauce.
Notes
The most important thing you can do is cover your toaster oven tray with foil, so you don’t have to wash off the carbonized BBQ sauce.
Do not boil the wings for more than 5 minutes. You want the wings to be cooked, but not the skin to soften too much.
If you are cooking the wings in a full sized oven, it will probably take less than 25 minutes. They are done when you notice dark splotches develop. You can of course also simply cook the wings over a actual BBQ.
The same method works for all kinds of sauces you might want to flavour wings with, like teriyaki or oyster sauce. Just boil for five minutes and marinate overnight in the fridge.
(serves 4-6) This is a hearty dish where the flavour of a concentrated stock boiled from prawn heads is infused into glass vermicelli. I believe it originates from Thailand, though versions of it are also found in Chinese seafood restaurants in parts of Asia. Besides prawn, the dish uniquely also blends in the flavour of black pepper and the aroma of coriander. It’s actually quite a rustic dish and is not hard to make at all, even if don’t usually cook Asian food.
Ingredients
Tiger Prawns (500g)
Glass Vermicelli (160g)
Garlic (10 cloves)
Scallion (3)
Coriander (2 sprigs)
Coriander Seed
Ginger (4 slices)
Black Pepper
Fish Sauce
Soy Sauce
Chinese Wine
note: Claypot is part of the name of this dish but you can easily cook this in any deep or large frying pan, and a claypot is not actually required.
Preparation
Separate the heads of the prawns and set them aside. Peel and de-vein the bodies and cut each prawn in half lengthwise. Marinate the prawn meat in 1t soya sauce and 0.5t salt.
Peel 10 cloves of garlic.
Cut the scallion in half. Cut the bottom half in half again. Julienne the top portion and set aside.
Prepare 4 thumb sized slices of ginger.
Cut off the roots and a bit of the tip of the coriander sprigs.
Soak the vermicelli in some cold water, for 10 minutes, 15 minutes at the most. If you are doing this step a bit ahead of time you can simply drain away the water.
Place the garlic, ginger and scallion in a large claypot. Stir fry with 4T of oil on high heat until some browning is visible.
Add the prawn heads and continue stir frying until the heads are red, then pour in 1/2 cup of water.
When the water comes to a boil, add 1T black pepper, 1t sugar, 1t salt, 1t fish sauce, 1t coriander seed powder, 2T Chinese wine. Simmer until the volume of water is reduced by half.
Add the prawn meat and coriander sprigs. One minute later add the vermicelli. When the vermicelli blocks separate into individual stands give the pot one last stir and place the lid on the clay pot. Continue to simmer for a minute.
Remove the lid, add 3T of oil and 1T of Chinese wine, stir fry until the clay pot is almost dry. Turn off the fire.
Sprinkle on the julienned scallion and a pinch of black pepper. Replace the clay pot lid and bring the vermicelli to the dining table in the pot.
Notes
It is important to use the right kind of vermicelli; these are the type made from mung beans. Examine the packaging properly (look for the words 粉絲 or 冬粉), so you don’t buy the wrong type made from rice which look a bit similar. They come in stiff white bundles (as shown) and become transparent (hence the glass in the name) when cooked. 2 bundles would typically weight 160g, the amount required for this recipe.
The thing about glass vermicelli is it can absorb a lot of water, but this will make it very soft and mushy, which you want to avoid. At the same time you can’t boil them separately and pour away the water when they are just right like for pasta, since you want the prawn stock to infuse into the noodles. Therefore make sure there isn’t too much liquid left in the pot in step 9. Even when you turn off the heat they will continue to absorb water until there is no more left.
You can use prawns bigger than Tiger prawns, but not the smaller varieties. That’s because the flavour of prawn heads diminishes greatly as the prawns get smaller.
Its best to use coarse ground black pepper, or if you have whole pepper corns (of any colour), that is even better.
(serves 4-5) I just made this duck salad on Christmas eve and it is one of my favourite appetizers for the festive season; it’s got just the right amount of red, and green. Duck breast is surprisingly easy to prepare once you know the essential steps, perhaps easier than chicken breast even. Another thing I like about this recipe is the use of cranberry. We are used to having orange or red wine as the primary flavour that goes with duck and cranberry makes for a refreshing change. It is also a great ingredient for a salad dressing.
Ingredients
Duck Breasts (2, frozen)
Baby Spinach (150g)
Leek (1 cup, chopped)
Cranberry Sauce
Marmalade
Mustard
Balsamic Vinegar
Liquid Smoke
Salt
Brown Sugar (soft)
Brown Mushrooms (10)
Cherry Tomatoes (10)
Preparation
Defrost the duck breasts and brine in a solution of of 4 cups of water, 3T salt, 1T muscovado sugar for about 4 hours.
After rinsing the duck breasts, Rub them with 2t of liquid smoke.
Julienne the white portion of a stalk of leek until you have 1 cup.
Using a sharp knife, scour the duck skin as shown. Do not cut all the way through the fat; if you can see the meat below, it’s too deep. Also, you should space the cuts in accordance with how you intend to slice the duck later. Here I’ve made my cuts two slices apart.
Heat up a pan with a dash of oil and on low heat pan fry the duck breasts for 2 minutes. Only pan fry with the skin side down and move the breasts occasionally to make sure they don’t stick to the pan. The purpose here is to render as much duck fat as you can from the skin.
Place the breasts on a lightly oiled baking pan with the skin facing up. Place the pan in an oven preheated to 175oC (350oF), for 12 minutes. I prefer to use the toaster oven which takes a bit longer, 15 min. If the breasts begin to shrink, this means they are done.
Allow the meat to rest on the pan outside the oven.
Saute the leeks in the duck fat in the pan until they become limp.
Add 5 heaped t of cranberry sauce (ocean spray), 1 heaped t of marmalade, 1T balsamic vinegar, 2t mustard, 1 flat t of salt and 1/4 cup of water to the pan. Stir fry until the mixture comes to a boil. Then transfer it to a bowl. Pour the drippings from the pan into the bowl and mix well.
Cut the duck breasts into slices, making sure some cuts are coincident with the cuts in the skin. The meat should be pink or you’ve over cooked the duck.
Slice the mushrooms and cut each cherry tomato into 2. Arrange the baby spinach, tomatoes and mushroom slices into a bed on each plate.
Arrange the duck slices on the salad and drench with the cranberry and leek sauce. Sprinkle with black pepper.
Notes
Frozen duck breasts sometimes are already brined. Please check and if they are already brined, you can skip the relevant part. The same goes for the smoked.
The choice of salad components was made with Christmas colours in mind. You can really make the salad with whatever you like. A white plate would really complete the festive look.
I’ve found the safest way to score the skin properly is to use a sawing motion with a knife with small teeth, applying no downward pressure.
You can precook the duck breasts and leave them around for a few hours, but only slice the meat and and plate the salad at the last moment.
(serves 8) Otak-otak is a terrine-like grilled fish delicacy from South-east Asia, an exotic spicy dish that works as a western appetizer. There are many varieties of Otak-otak from Thailand all the way down to Indonesia; this version is of the Straits Chinese style featuring coconut milk, popular in Singapore and Penang. Otak-otak is usually grilled in banana leaves and contains other ingredients uncommon in the Western kitchen, but I have worked out a modified recipe that resolves these issues.
Ingredients
White Fish Fillets (500g)
Yeo’s Minced Prawns in Spices (2x160g tins)
Coconut Milk (160 ml)
Onion (0.5)
Egg (1)
White Sandwich Bread
Lemon
Cucumber
Sherry
Lemongrass
Tarragon
Preparation
Dice half an onion and pan fry the pieces on low heat in a pan with a dash of oil. When the onion begins to get limp turn up the heat and add the two cans of minced prawn to the pan and continue frying until you see bubbling. Sprinkle on 2t lemongrass and 1t tarragon and transfer the contents of the pan to a large mixing bowl when it has cooled down.
Make a brine out of 1T salt, 1t sugar, 1T of lemon juice and 2 cups of water. Cut the fish into chunks and put them in the brine them for 20 minutes (and no more). Rinse and place the fish pieces on a tea towel to dry. You can do this concurrently with step 1.
Cut 2 slices of plain bread into small cubes. If the bread is fresh and the crust is still soft you can keep the crust, otherwise trim the crust off. Pour in 160 ml of coconut milk over the diced bread followed by 1 egg, 1T of sherry and 1t of sugar. Mix well, then add the fish.
Place a quarter of the fish and bread mixture in a food processor and give it a 2 second pulse (and no more) on low power. Transfer the resulting fish paste to the mixing bowl with the shrimp and onion. You want the fish paste to be coarse but even, so you cannot blend too much at a time. Repeat another three times to use up all the fish and bread. Stir everything in the mixing bowl until you get an even colour.
Preheat your oven to 150oC (300oF).
Pour the seafood mixture into a medium sized casserole dish. The casserole dish should be big enough such that the thickness of the seafood is no more than one inch. Cover the casserole dish, if it doesn’t have a cover you can use aluminium foil snugly crimped over the top.
Place the casserole in the oven. The idea is not so much to bake the fish but to steam it. After 40 minutes, remove from the oven and allow to cool. There will be bulge in the centre initially but this will flatten over time. What you have now is a seafood terrine of sorts.
When the terrine is cold, and this can be several hours later or even overnight (in the fridge), put it back in the oven, this time uncovered, for twenty minutes at 200oC (390oF). This will boil off most of the free liquid, refine the aroma and give the Otak-otak a nice crust – as shown here.
While still hot, cut the Otak-otak into slices and serve on untoasted plain white bread with some thin cucumber slices.
Notes
Yeo’s Minced Prawns in Spices
As the fish is cooked for an extended time, there is no point in using fresh fish. I typically use frozen pangasius fillets myself , they are cheap and readily available, but really any kind of white fish is fine. The important thing is to dry the fish (draining on a colander is insufficient) properly after brining as the Otak will end up too wet if you don’t.
Yeo’s Minced Prawn in Spices a.k.a. Prawn Sambal is a key ingredient that contains in a single tin every ingredient you need for cooking Otak you won’t find in your kitchen larder. Last time I checked, you can order it from Amazon. Its not the perfect solution, but its better than looking for weird ingredients like candlenut and galangal.
If you don’t like your food spicy, you can use just one tin of the minced prawn instead of two (the child’s version I call this), but you’ll need to add salt and sugar to compensate.
To bring your Otak-otak to the next level, you can add chunks of whole seafood. For example you could brine a few scallops along with the fish, dice them and add them in step 6. Canned or bottled clams would work well also. If you bake cakes and have pandan essence around, a few drops will also do wonders.
Instead of on bread, you can also serve Otak-otak with some white rice cooked with coconut milk.
The Thai version of Otak-otak has a different name, which is Hor Mok Pla.
(serves 4 – 6) This recipe pairs Scallops with its traditional complimentary ingredients, such as mushrooms, wine and cream, a combination that is sure to be a crowd pleaser. Searing on a flavoursome crust is a great enhancement to pleasant but somewhat monotonous scallop flesh, but somehow when you sear scallops at home it never turns out quite right. To make seared scallops to restaurant standard there is no complicated technique involved. All you need is the right ingredients and the proper procedure ….
Ingredients
Large Scallops (18)
Onion (1)
Mushrooms (200g)
Garlic (1T minced)
Mustard
Coriander Seed Powder
White Wine (0.33 cup)
Cream (0.5 cup)
Tarragon
Butter
Lemon
Preparation
Defrost your scallops ahead of time.
Prepare a brine of 1T salt, 1t sugar, the juice of a wedge of lemon in two cups of water. Place the scallops in the brine for twenty minutes. Do not go beyond twenty minutes or the scallop flesh will become too salty.
Rinse the scallops and wrap them in a tea towel to dry them as much as possible. Leave them there until step 7.
Julienne the onion and dice the mushrooms into 1cm pieces. Mince a few cloves of garlic.
Fry the onion pieces in a pan on a low fire with a dash of oil until they are limp, but not caramelized. Add 1T of minced garlic and stir fry for 1 minute further.
Turn the heat up and add the wine, followed by the cream and 1t mustard, 1t coriander seed powder and 0.5t sugar. Stir till the mustard melts away and then add the mushrooms. Simmer until the liquid dries off enough to produce a thick sauce. Sprinkle on black pepper and salt to taste to complete your duxelles sauce.
In a different pan melt a large knob of butter on high heat. When the pan is really hot and the butter darkens a bit, place half the scallops in the pan, and keep them cooking on the same side. Move the scallops around in a circular motion one at a time with tongs but do not flip them. Add more butter if the pan begins to dry. When you notice the searing along the bottom edges flip each scallop over and repeat the procedure until the other side gets seared too, then remove the scallops onto a plate temporarily.
Sprinkle a pinch of tarragon on to the mushroom duxelles and begin reheating it.
Do the same as step 7 for the second batch of scallops after adding a new knob of butter. When this lot is done, turn the fire off and add the first batch of scallops back into the pan. Stir fry for a short while with the fire off to coat the sides of the scallops. This will also serve to warm up the first batch.
Spoon some of the duxelles sauce on each plate to form a bed for the scallops and then arrange three (or four for four servings) scallops on each bed. Serve immediately.
Notes
There is no point in buying fresh scallops, the frozen ones will do nicely. You should however buy the more expensive ‘dry’ (not to be confused with dried) variety that are frozen without additional processing. You can identify these by their colour, which is ivory white. ‘Wet’ scallops are those that have been soaked in sodium tripolyphosphate to bloat their size. Thus type of scallop is toothpaste white because of the bleaching effect of the phosphates, and they shrink when cooked anyway. If you are unsure, you can’t go wrong with scallops from japan that come in a paper box.
Do not skip the brining. This is essential for two reasons. Firstly, it is the only way to put taste inside the scallop instead of on its surface; this is very important for big scallops. Secondly this removes extra water from scallops; if there is too much internal water, the scallops will get fully cooked and rubbery before they even start searing.
You cannot use vegetable oil to sear the scallops. Butter contains impurities which starts the browning process.
I did not specify a cooking time because this will vary with the thickness of the scallops and how well you like them cooked. I like to cook my scallops medium like steak so they don’t shrivel up, but its up to you. Use a lower fire and pan fry for longer if you like your scallops more cooked.
I made the diced potatoes in the photo separately, and they are not part of the recipe per se.

 Ingredients
 Notes
Notes 
 Cut the lobster meat into bite sized morsels. drain off all the excess brine by leaving the lobster meat in a strainer.


 and methodically crush with the jagged face of a meat mallet. There is no need to hammer; simply press down firmly on the smooth face of the mallet head (see picture). Again, there is no need to completely pulverize the bread, you want some variety in crumb size.