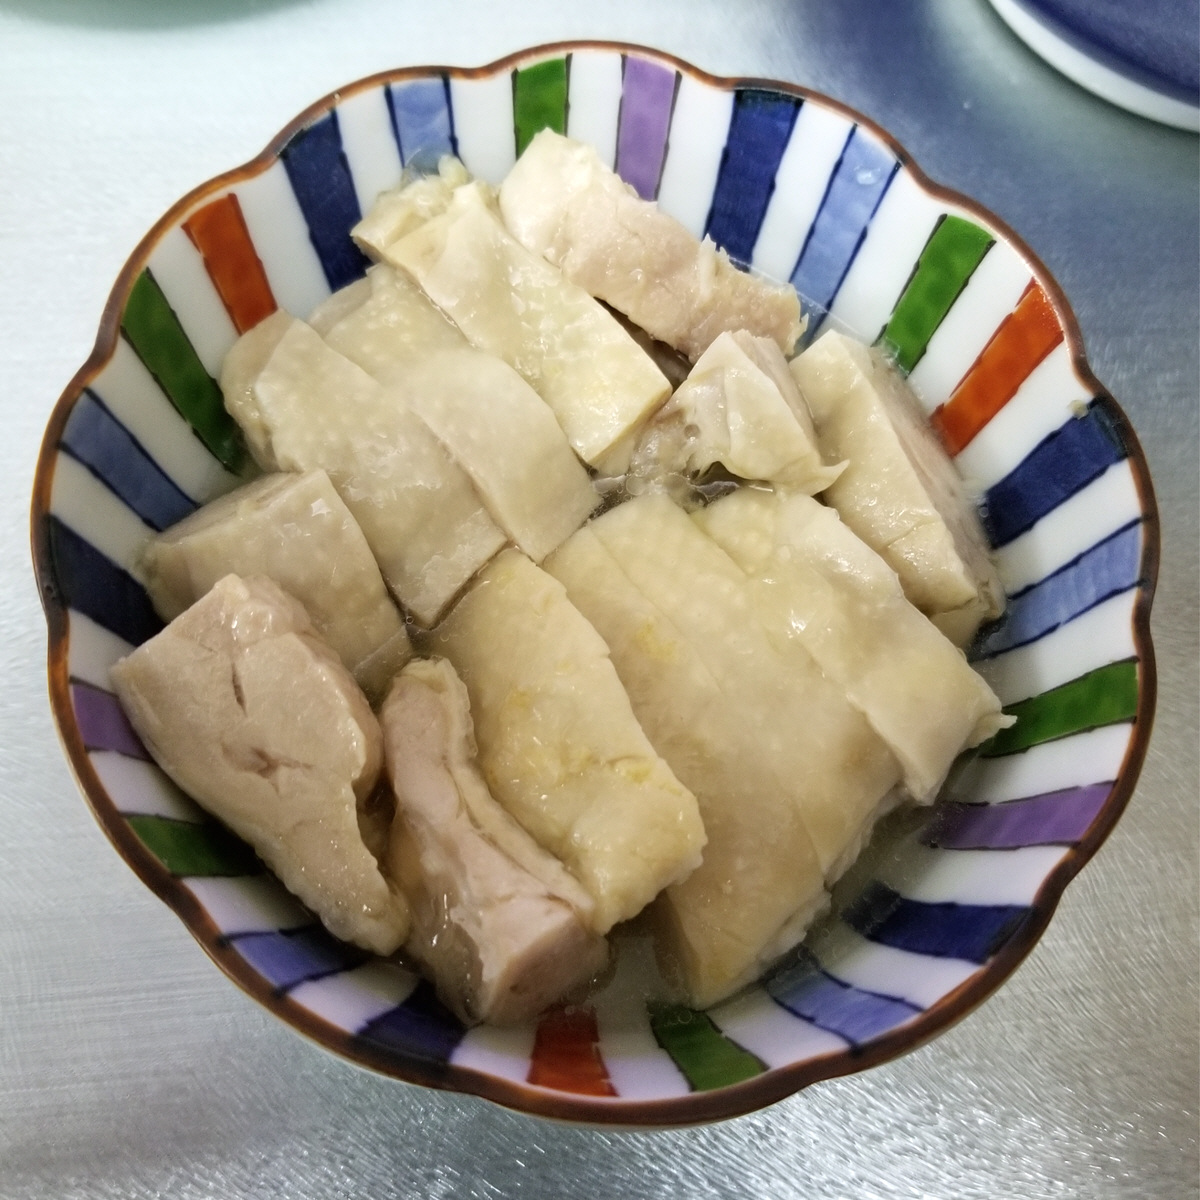
(6 portions) Drunken Chicken is a Chinese classic, the equivalent of a cold cut, similar in concept to jellied ox tongue. It is essentially succulent bite sized chunks of chicken that are infused with flavour, perfect as a cold starter or a one piece amuse bouche. Making it takes quite a bit of time but requires next to no effort or skill, since my recipe doesn’t involve steaming and uses very few ingredients. As an added plus, you can make your Drunken Chicken well ahead of time and keep in the fridge until its needed.
Brine 2 boneless chicken legs in 1.5 cups of cold water containing 1 heaped T of salt and 1t sugar for 4 hours. If its a hot day, add a few ice cubes to the water every hour or keep the chicken in the fridge for the four hours.
Drain the chicken and trim off any visible clumps of fat with kitchen shears. Marinate in a mixture of 6T of Chinese wine and 2t of liquid smoke for an hour.
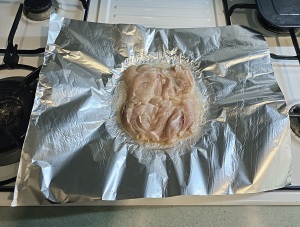
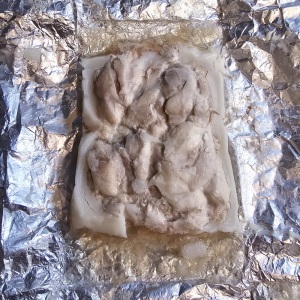
Place a large sheet of foil (refer to the photo for size) on a plate and press the foil to the plate to capture the depressed centre of the plate. Spoon 1T perilla oil into the middle of the foil and then place one chicken leg with the skin side down on the foil. Rotate the chicken 360 degrees to spread out the oil. Spoon half of the marinade over the chicken.
Wrap the chicken in the foil. The first step is the bring the 2 long edges together and fold/roll the edge until you get a flat tube. Next you roll up the other two edges until you get a parcel. As you do the folding, take care to flatten all the rolls neatly to make the parcel as water tight as possible. Also, try to trap as little air as possible inside the parcel as this air will expand in the oven.
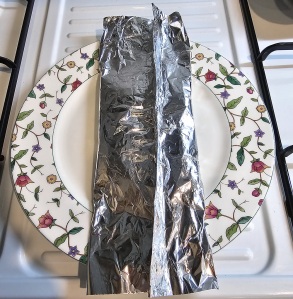
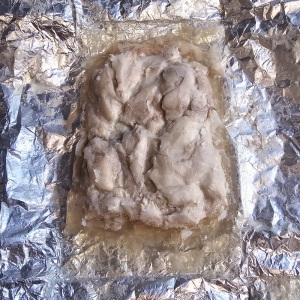
Repeat the process for the second chicken leg; both parcels should be able to fit onto the toaster oven tray.
Preheat the oven to 180oC (360oF). Set the timer for 20 minutes and place the tray in the oven.
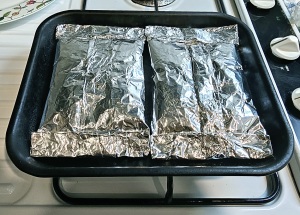
After the toaster oven turns itself off, leave the parcels undisturbed in the toaster oven until they reach room temperature. I usually leave them in the toaster for 2 hours or more.
Put the parcels into the fridge. They should be in the fridge for several hours at minimum and in fact you can keep them in the fridge for several days as the meat is nicely sealed up.
Preparation
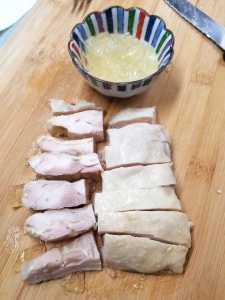
When its time to serve your Drunken Chicken, unwrap the foil and remove the white solidified fat with a fork. You must do this quickly as it softens very soon after it leaves the fridge.
The chicken will be encased in a jelly created from chicken essence and what is left of the wine after all the alcohol has evapourated. This is the all important gravy of Drunken Chicken. Scrape off as much of the jelly as you can into a bowl. Add 2T of boiling water to the jelly and leave the bowl in a bath of hot water to warm up.
Meanwhile, cut the meat into bite sized pieces and arrange then on to a serving plate or bowl. You may choose to put them into multiple pieces of smaller crockery if you intend to serve individual portions.
When the jelly has fully liquefied, spoon the resulting liquid over the meat. The general idea is for the meat to be still cold while the gravy is at room temperature.
Notes
If find certain ingredients hard to come by, you can use substitutes. Sherry is the standard western alternate to Chinese wine, and oil infused with any flavour, say walnut or rosemary will work just fine. In this sense what I have described is a cooking style in addition to a recipe for a specific dish.
If you are a purist and love the taste of wine in your food, you may choose to add 2T of Chinese Wine instead of 2T of water in step 2 above.
It will be perfectly fine if you use frozen chicken, because of the brining. You can also use other parts of the chicken.
When the parcels are put into the fridge I suggest you place them on a plate as they very often leak very slightly, until the jelly has formed.
(serves 2) Spaghetti Aglio e Olio is practically the most basic of the Italian pasta dishes, a pasta made from a few simple ingredients, something that anyone can cook to perfection. This version of Spaghetti Aglio e Olio is made a little less unremarkable with the addition of some seared scallops. Scallops are an ideal enhancement as they are have a mild and delicate taste which will not diminish the core taste of garlic and olive oil.
Ingredients
Scallops (Frozen, 250g)
Spaghetti (200g)
Garlic (2 bulbs)
Parmigiano Reggiano (grated, 2T)
Pesto
Dried Chili Flakes
Extra Virgin Olive Oil
Light Olive Oil
Salt
Preparation
Defrost your scallops. Large Yesso Scallops would be preferred.
Peel the two bulbs of garlic. Slice the cloves into very thin slices as shown. You should end up with a small mountain (as shown). Don’t worry, it’s looks like its a lot, but it isn’t.
Brine the scallops in a solution of 1T salt, 1t sugar and one and a half cups of water for 15 minutes. After draining, leave the scallops in a colander to dry (as shown). Finish off the drying by wrapping the scallops in a few sheets of kitchen towel.
Grate some parmigiano reggiano until you end up with 2T of grated cheese.
Place the garlic in a pan. Add 6T of light olive oil and turn the heat to low. Stir occasionally until the garlic turns a light brown.
In the meanwhile bring a pot of water to boil. Add a splash of oil and a pinch of salt followed by the pasta. Boil until al dente and drain (but keep some of the water).
Using a strainer, remove the garlic but leave the oil in the pan.
Turn the heat up and place the scallops in the pan. Cook for about 3 minutes on the first side and 2 minutes on the other. Confirm that they are seared before flipping, the actual time will depend on the size of your scallops.
With the fire still going, push the scallops to one side of the pan and add 4T of extra virgin olive oil and 4T of the pasta water, followed by 1t of pesto, 1t of chilli flakes, 1t of salt and 2T of grated parmigiano reggiano. Stir and mix well to create the olio sauce.
Turn off the heat. Add the garlic and then the pasta to the pan. Toss until everything is nicely mixed.
Check if you need to add more salt, and then plate.
Notes
In case you were wondering, Aglio means garlic, Olio means oil.
Plain Spaghetti Aglio e Olio is exactly the same recipe but without the scallops. It’s a really fast and convenient dish to cook, you won’t even need to take the garlic out of the pan.
If you are an experienced cook you can pan fry the garlic and scallops at the same time (as shown). Give the garlic a head start of about 2 minutes before adding the scallops. The garlic will not be as crispy this way (which I like) but it saves time and effort.
Don’t use extra virgin olive oil for frying the garlic as it will carbonize under the extended heating. If you don’t have light olive oil, you can use any kind of frying oil, such as canola oil.
Don’t brine the scallops for more than 15 minutes as they absorb salt really fast as compared to meat. Don’t skip the brining either, even if you are not using ‘wet’ scallops.
The chili flakes are optional, but I really recommend you use them as depth is needed in this simple pasta sauce. You can double the amount to 2t if you are not averse to spicy foods.
(serves 4, or more depending on size of bird) Spatchcock is a fancy word for butterflying the whole chicken. It sounds hard, but its quite the opposite. There are many advantages to spatchcocking. First and foremost a flattened chicken roasts more evenly, resolving a major issue with roasting chickens for those without a rotisserie; the thighs take longer to cook than the breast, but ironically when you roast a whole bird it is the breast that is more exposed to heat. Spatchcocking exposes the legs more and brings the breast down, saving the day. In addition, a spatchcocked chicken cooks in half the time and is in a more convenient shape for fitting on a fridge shelf.
Ingredients
Chicken, whole (1)
Onion (1)
Potatoes (2)
Yam (1)
Carrot (1)
Salt
Brown Sugar
Butter
Rosemary
Fennel Seeds
Preparation Part I
You have to begin preparation the night before.
Starting on either side of the bishop’s nose, cut towards the corresponding side of the chicken’s neck (as per the picture below). This is best accomplished using a pair of kitchen shears. You will need to cut through the ribs, but not to worry, these are pretty flimsy in a chicken.
From the inside of the chicken, snip an incision along the cartilage of the breast bone (it is white) top to bottom to weaken it. Be careful not to pierce the skin on the other side.
Flip the bird over and press down on the breast with both hands to flatten it. You should end up with the iconic cartoon heart shape chicken breast.
Prepare a brining solution using 1T salt, 1t brown sugar for every two cups of water. Make enough brine to ensure the entire chicken is submerged. Brine the chicken for 8 hours. If the weather is warm, either add a some ice every once in a while or leave the brining bird in the fridge.
Preparation Part II
When the brining is done (presumably the next day), place the bird on a wire tray to dry (as shown below). This will take several hours and again is best done in the fridge. Alternatively you can use a portable fan.
You must dry the bird properly for it is the key prerequisite to a properly roasted chicken. The chicken is considered sufficiently dry when you put a piece of kitchen towel on it and the paper remains dry but sticks to the skin like a second skin.
In a small pan, heat 1 heaped t of dried rosemary, 1 heaped t of fennel seeds in 4T of oil until you can smell a strong aroma. Turn off the heat before the herbs get burnt. Leave the pan on the stove while the chicken is drying; more herb flavour will be infused into the oil.
Preparation Part III
Cut the potatoes and the yam into chunks. Depending on the variety you may want to peel them first. The yams should be double the size of the potatoes as they cook faster.
Cut the carrot into discs and the onion into small wedges. Place all the vegetables on a baking tray.
Preheat the oven to 205oC (400oF).
Reheat the infused oil. When the oil becomes less viscous, strain the oil into a container. Add a large knob of butter to the oil. Next dissolve half a t of salt in the butter-oil mixture. Drizzle half of this mixture over the vegetables using a spoon.
Position the chicken over the vegetables on the tray. Make sure all the vegetables end up under the chicken as any piece left exposed will become burnt beyond recognition.
Paint the remainder of the oil-butter mixture on the chicken with a brush.
Place the chicken in the oven for 45 minutes, 50 minutes if it is a bigger bird.
When the chicken is golden brown, remove the pan from the oven without turning it off. Place the chicken on a large serving plate to rest after giving it a light dusting of pepper.
Roll the vegetables about in the tray to cover them with drippings, space them evenly and place the tray back in the oven for around 10 minutes. When the vegetables have caramelized sufficiently, arrange them around the chicken on the plate. Pour any remaining drippings over the chicken and serve.
Notes
As you can see from the pictures, the legs were open at an angle while drying but became parallel to each other after cooking as the meat contracted. Purists will secure the chicken with 2 long metal skewers in an X pattern, from the left thigh through to the right breast and vice versa to keep the chicken completely flat. This also helps all the skin brown more evenly. I think its a bit of an overkill, but skewers are definitely a good idea when BBQing.
My brining mixture is a relatively weak one as we are brining the whole chicken and not just the breast. If you like your roast chicken on the salty side, you can double the salt in the butter-oil mixture to a full teaspoon.
The back and spine that is cut out is good for boiling stock. If you don’t need it concurrently, you can wrap it in cling film and freeze if for later.
(4 servings) I recently confirmed that one can make Smoked Salmon without a smoker. The is a simple no fuss method of making smooth and luscious Smoked Salmon at home, and there is no need for brining either. It is essentially a variation of cured salmon fortified with a combination of dark muscovado sugar and a dash of liquid smoke. With its rich smoky flavour and deep colour, nobody will be able to tell that your smoked salmon isn’t smoked at all.
Ingredients
Salmon Fillet (300g)
Coarse Sea Salt (1/2 cup)
Dark Muscovado Sugar (1/4 cup)
Dill Weed
Whiskey
Liquid Smoke
Preparation
Your salmon should be of the Supreme cut (thick boneless fillet) as opposed to a Darne (cross section with back bone and belly flaps). Don’t use fronzen salmon. Leave the skin on. Rinse the fillet and then pad it dry with kitchen towels. Next, marinate in a mixture of 1T whiskey, 1t liquid smoke and 1t chopped dill weed.
While the fish is marinating, combine half a cup of coarse salt and a quarter cup of dark muscovado sugar. The muscavado is clumpy, so make sure they are thoroughly mixed.
Open a square sheet of cling film on a cutting board and spoon half the salt/sugar mixture on to the middle in the shape of your fish, only slightly bigger.
If your fillet is thin at one end cut it off and stack it on top to get as close to a rectangular block as possible. Place the salmon on the bed of salt and sugar skin side down and spoon any remaining marinade over the salmon. Top off with the remainder of the curing mixture.
Wrap up the salmon and place in a glass, ceramic or plastic container (concentrated salt corrodes metal).
Put the container in the fridge. Flip once after an hour and again every 6 to 12 hours. Some brine will seep out, which is desirable. Drain away any liquid (without unwrapping) each time you are flipping the wrapped package.
For a relatively thinner slice of salmon (like the one I’ve used) allow the salmon to cure for 24 hours. If you are using a thicker slab of fish (which is preferable) leave the salmon to cure for 36 hours.
After the curing is complete, unwrap and rinse the salmon thoroughly. The surface will appear rough and dry, don’t worry, after slicing this will not be noticeable. Pad the salmon dry with kitchen towels and leave uncovered in the fridge for an hour or so to dry before you slice it.
To slice, place the block of ‘smoked’ salmon with skin down on the cutting board. Make a thin slice not quite to the skin and then a second slice all the way down and then carve the knife outward. If done right you should end up with something with a nice V shaped pattern. If there is a bulge at the joint slice lightly to flatten the slice. Repeat until all the salmon is butterflied so. Salt is a preservative but you should still keep the sliced salmon in the fridge wrapped in or covered with cling film until you intend to serve them.
Notes
Smoked Salmon is best served with capers, slices of red onion and creamed horseradish.
What is the difference between Smoked Salmon and Gravlax? Gravlax hails from Scandinavia and besides salt and sugar it is also cured with crushed pepper, juniper berries and a lot more dill and alcohol than this recipe uses. The salmon will usually be put under a weight to squeeze the water out, to compensate for the reduced salt in the curing mixture. Gravlax is normally marinated a further day in mixture of oil and dill whereas smoked salmon is smoked instead.
What is the difference between Smoked Salmon and Lox? Lox is a Jewish-American delicacy that brines salmon for an extended period of time which gives it a very intense and saltier taste, hence the need for cream cheese and bagels to go with it. Lox is also not smoked. Its long brining period means Lox can only be made from the fat belly parts of the salmon. Most of the Lox served in American delis is actually Smoked Salmon.
Remember to wash your hands before touching the fish after it is cured to extend the longevity of your smoked salmon. You might also wish to rinse the curing mixture off with cold boiled water instead of running tap water for the same reason.
Muscovado sugar has an intense smoky molasses taste which complements the effect of the liquid smoke well. For best results don’t use any other type of sugar even if it is brown. Muscovado is moist and clumpy and comes in light and dark varieties. Look for it in the baking section of supermarkets and make sure you get the dark variety.
The dill is to help more marinade cling to the fish since it is quite watery, so if you don’t like the taste of dill use another herb instead of just leaving it out altogether.
(?servings, intermediate ingredient) This is a time tested way of turning an otherwise hard and dry chicken breast into succulent tasty chicken. All you need is salt, sugar, water and time. While brining is normally used to prepare chicken or turkey for roasting, I will use dry poaching as the method of cooking in this recipe. You can use this poached chicken in a potato salad, as a meat supplement to a Caesar’s or other green salad, or as sliced meat on Ramen.
Ingredients
Large skinless chicken breast (2)
Salt
Brown sugar
Butter
Rosemary
Coriander Seed Powder
Quart sized ziploc bag (4)
Brining
Fill a large glass (salad bowl) or ceramic container (soup tureen) with 5 cups of room temperature water. A round bottomed container is best, and if you are using a container with a flat bottom, you will probably need additional brine to cover the meat unless it is tall and narrow, adjust the recipe accordingly.
Add 2T of salt and 0.5T of soft brown sugar. Stir to ensure everything melts.
Your chicken breast should come skinless, and be cut into halves. For the avoidance of doubt, the picture shows one chicken breast, with one half sliced and the other half whole.
Rinse the breasts and place them in the brine, making sure the pieces are completely submerged. Cover with a plate or clear wrap. If it is a hot summer day you should keep the chicken in the fridge during the brining, or adding a few cubes of ice every 2 hours. If its winter you can just leave it alone in the open.
After 8 hours discard the brine which would have become cloudy. Rinse the chicken breasts thoroughly in running water or leave it to soak in a bowl of plain water for a while. If you are not cooking the chicken immediately, place it in the fridge.
Poaching (optional)
A few hours ahead of time, gently heat 1T of rosemary in 3T of Butter without burning the rosemary. Allow the oil to cool to room temperature. Rosmary is a woody herb and you may want to strain out the rosemary at this stage.
Pad the brined chicken breasts dry and move them around in the rosemary butter. Sprinkle 1t of coriander seed powder and some pepper on the chicken and allow to marinate for an hour.
Boil a large pot of water.
When the water is boiling, put each half breast of chicken into an individual quart sized zip loc bag. Spoon any left over oil into the bags as well. Squeeze out all the air and seal.
Put the bags in the boiling water. Cover and boil for 2 minutes. Leave in the pot, without opening the lid, for a further 20 minutes (less time if you are only cooking 1 chicken breast, more time if your pot is not large enough).
When you finally remove the chicken from the bags, you should notice that the breasts have shrunk a bit but not too much. The meat has a slight pinkish hue from the brining, this is normal, the chicken is not undercooked.
There will be a small quantity of concentrated chicken stock left in each bag from the brine that was in the chicken. Reserve this and drench the chicken in it after you have sliced/diced it. You can also use this stock for making a sauce.
Notes
The ratio of salt to water is easy to remember as 4T salt and 1T sugar for every 10 cups of water.
Brining depends on the scientific phenomenon known as osmosis where dissolved substances in two liquids separated by a membrane will want to equalize concentrations. Salt ions are very small and they will travel into the chicken through the cell membranes. However, the molecules of other substances dissolved in the chicken are too big to escape into the brine and water is drawn into the chicken to equalize concentrations instead. The result is that both salt and water are drawn into the chicken, plumping it up and making it juicy.
Sometimes people prefer to brine their Chicken for longer. You can double the brining time to 16 hours; The 16 hour brined chicken is noticeably more tender than the 8 hour version but the resulting chicken will taste salty and any further marinade or seasoning should not contain anything salty. At 24 hours you will get chicken that is as salty as bacon.
Feel free to experiment with all kinds of additional things in your brine, like liquid smoke, apple slices, honey etc. Do not use any powdery substance that is insoluble like coriander seed or cinnamon, these will clump onto certain areas of the chicken.
You can of course choose to roast your chickenbreast instead of poaching it, the brining procedure is the same.


 should end up with a small mountain (as shown). Don’t worry, it’s looks like its a lot, but it isn’t.
 Boil until al dente and drain (but keep some of the water).


