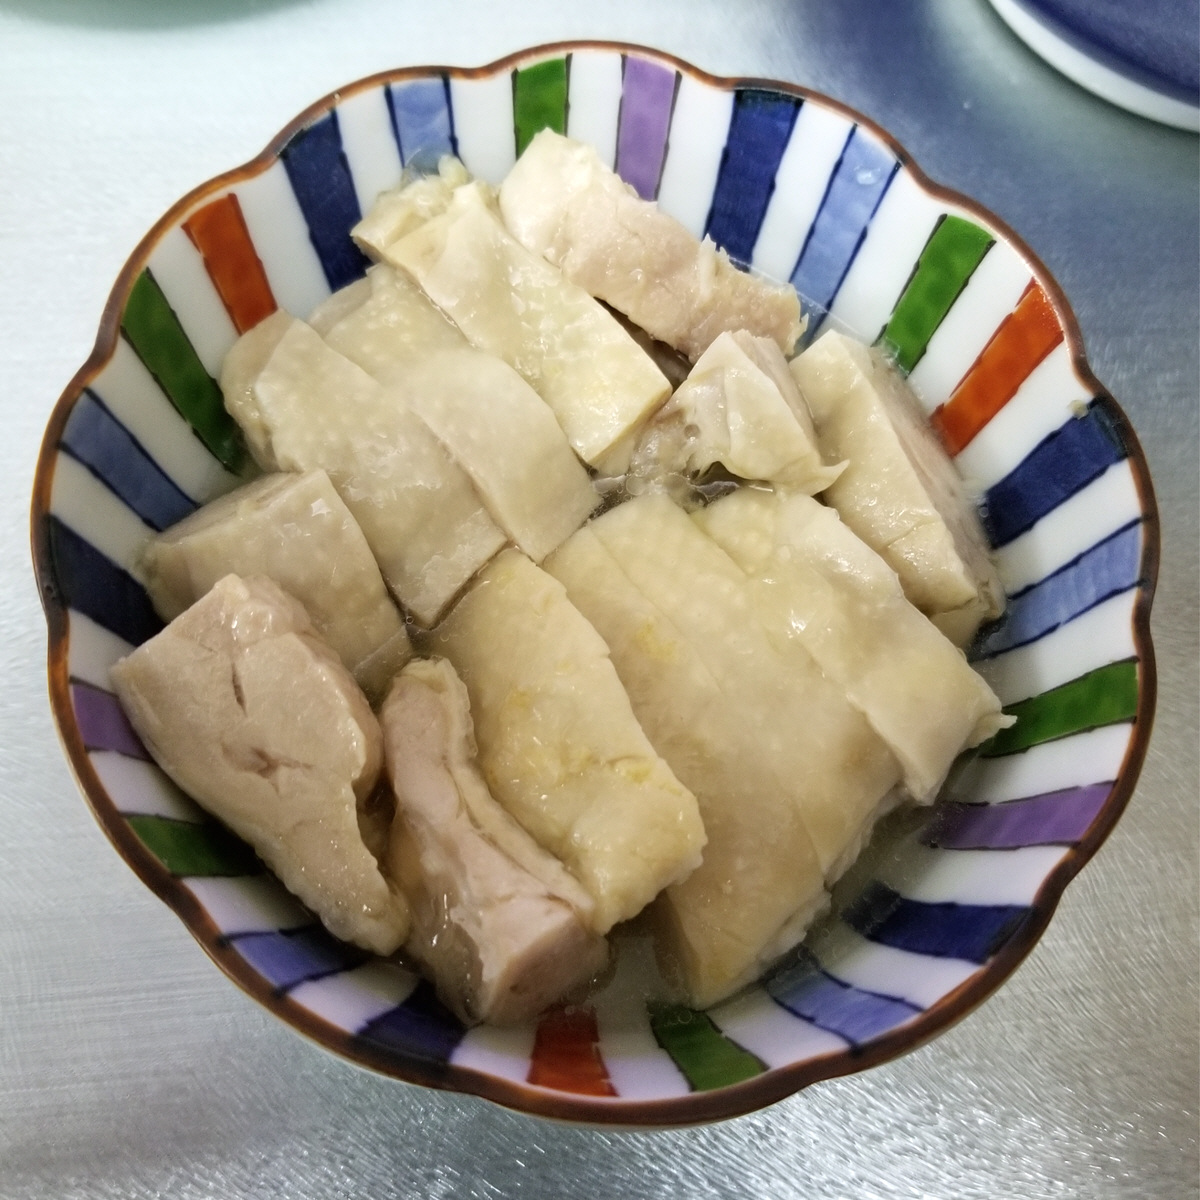
(6 portions) Drunken Chicken is a Chinese classic, the equivalent of a cold cut, similar in concept to jellied ox tongue. It is essentially succulent bite sized chunks of chicken that are infused with flavour, perfect as a cold starter or a one piece amuse bouche. Making it takes quite a bit of time but requires next to no effort or skill, since my recipe doesn’t involve steaming and uses very few ingredients. As an added plus, you can make your Drunken Chicken well ahead of time and keep in the fridge until its needed.
Brine 2 boneless chicken legs in 1.5 cups of cold water containing 1 heaped T of salt and 1t sugar for 4 hours. If its a hot day, add a few ice cubes to the water every hour or keep the chicken in the fridge for the four hours.
Drain the chicken and trim off any visible clumps of fat with kitchen shears. Marinate in a mixture of 6T of Chinese wine and 2t of liquid smoke for an hour.
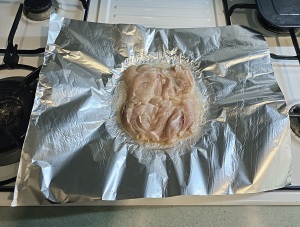
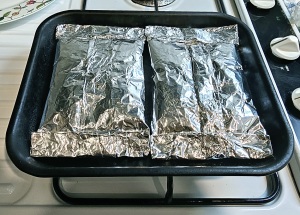
Place a large sheet of foil (refer to the photo for size) on a plate and press the foil to the plate to capture the depressed centre of the plate. Spoon 1T perilla oil into the middle of the foil and then place one chicken leg with the skin side down on the foil. Rotate the chicken 360 degrees to spread out the oil. Spoon half of the marinade over the chicken.
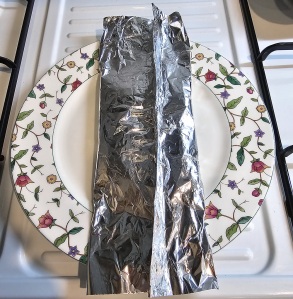
Wrap the chicken in the foil. The first step is the bring the 2 long edges together and fold/roll the edge until you get a flat tube. Next you roll up the other two edges until you get a parcel. As you do the folding, take care to flatten all the rolls neatly to make the parcel as water tight as possible. Also, try to trap as little air as possible inside the parcel as this air will expand in the oven.
Repeat the process for the second chicken leg; both parcels should be able to fit onto the toaster oven tray.
Preheat the oven to 180oC (360oF). Set the timer for 20 minutes and place the tray in the oven.
After the toaster oven turns itself off, leave the parcels undisturbed in the toaster oven until they reach room temperature. I usually leave them in the toaster for 2 hours or more.
Put the parcels into the fridge. They should be in the fridge for several hours at minimum and in fact you can keep them in the fridge for several days as the meat is nicely sealed up.
Preparation
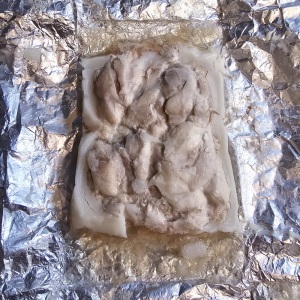
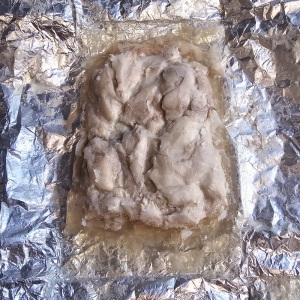
When its time to serve your Drunken Chicken, unwrap the foil and remove the white solidified fat with a fork. You must do this quickly as it softens very soon after it leaves the fridge.
The chicken will be encased in a jelly created from chicken essence and what is left of the wine after all the alcohol has evapourated. This is the all important gravy of Drunken Chicken. Scrape off as much of the jelly as you can into a bowl. Add 2T of boiling water to the jelly and leave the bowl in a bath of hot water to warm up.
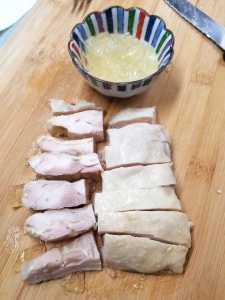
Meanwhile, cut the meat into bite sized pieces and arrange then on to a serving plate or bowl. You may choose to put them into multiple pieces of smaller crockery if you intend to serve individual portions.
When the jelly has fully liquefied, spoon the resulting liquid over the meat. The general idea is for the meat to be still cold while the gravy is at room temperature.
Notes
If find certain ingredients hard to come by, you can use substitutes. Sherry is the standard western alternate to Chinese wine, and oil infused with any flavour, say walnut or rosemary will work just fine. In this sense what I have described is a cooking style in addition to a recipe for a specific dish.
If you are a purist and love the taste of wine in your food, you may choose to add 2T of Chinese Wine instead of 2T of water in step 2 above.
It will be perfectly fine if you use frozen chicken, because of the brining. You can also use other parts of the chicken.
When the parcels are put into the fridge I suggest you place them on a plate as they very often leak very slightly, until the jelly has formed.
(serves 3) Every place has its own way to prepare Korma but its features are universal. The curry is always cooked using almonds and/or cashew nuts as its base flavour, it is always light couloured and it is always mild. This last characteristic makes Korma the go to curry for anyone who are not into spicy food, and children. The Singapore method uses evaporated milk instead of yogurt or coconut milk to marinate the meat and this creates a distinct texture and taste unique to this method of preparation.
Ingredients
Chicken Thighs (4, deboned)
Shallots (4)
Ginger (1 thumb)
Evaporated Milk (100 ml)
Coconut Milk (150 ml)
Almond Flour
Curry Powder
Cumin
Chicken Cube (1)
Cashew Nuts (50g)
Preparation (4-6 hours ahead)
Place the chicken into a bowl or plastic container and sprinkle in 2 heaped T of curry powder. Evenly coat each piece of chicken. Add 100 ml of evaporated milk, and mix well. Cover and leave in the fridge for a minimum of four hours.
Preparation
Peel and cut each shallot in half. Julienne the shallots.
Peel the ginger and cut first into slices 2mm thick. Next slice into strips and then finally cubes.
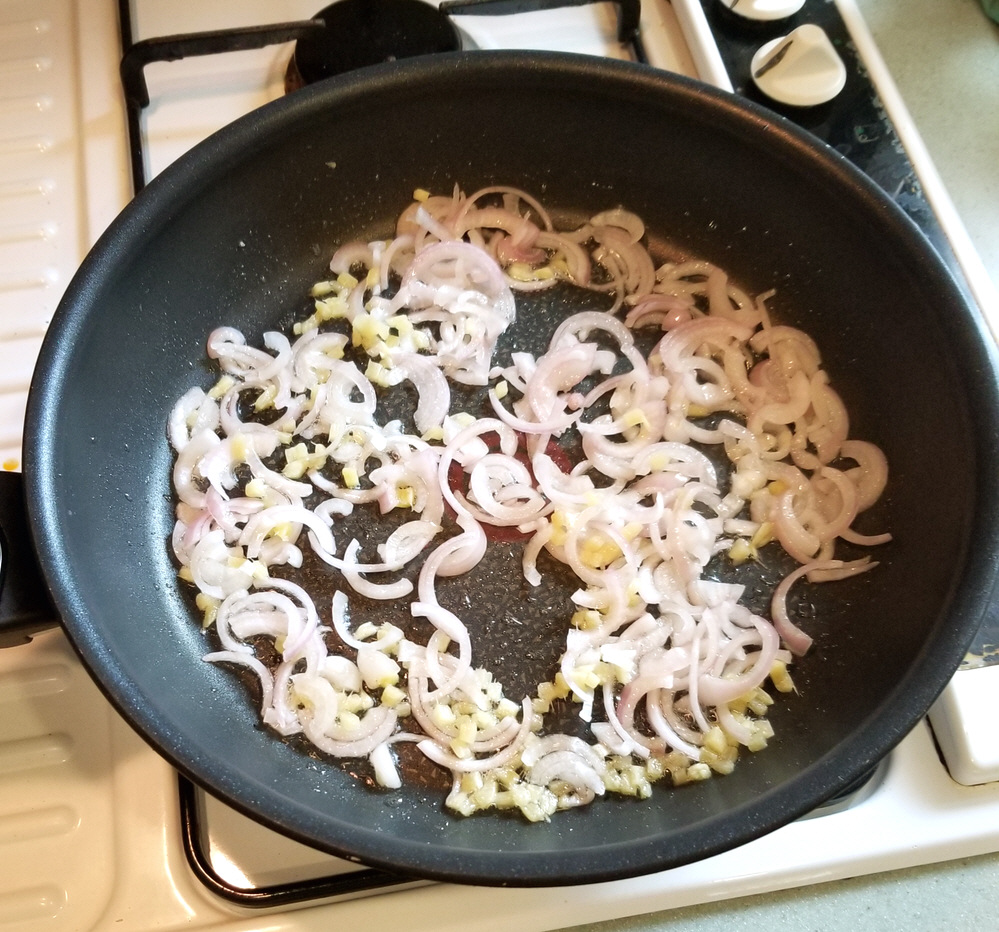
Put 3T of oil in a large pan and add the sliced shallots and diced ginger. Pan fry until the shallots start to brown. Transfer the contents to a plate temporarily.
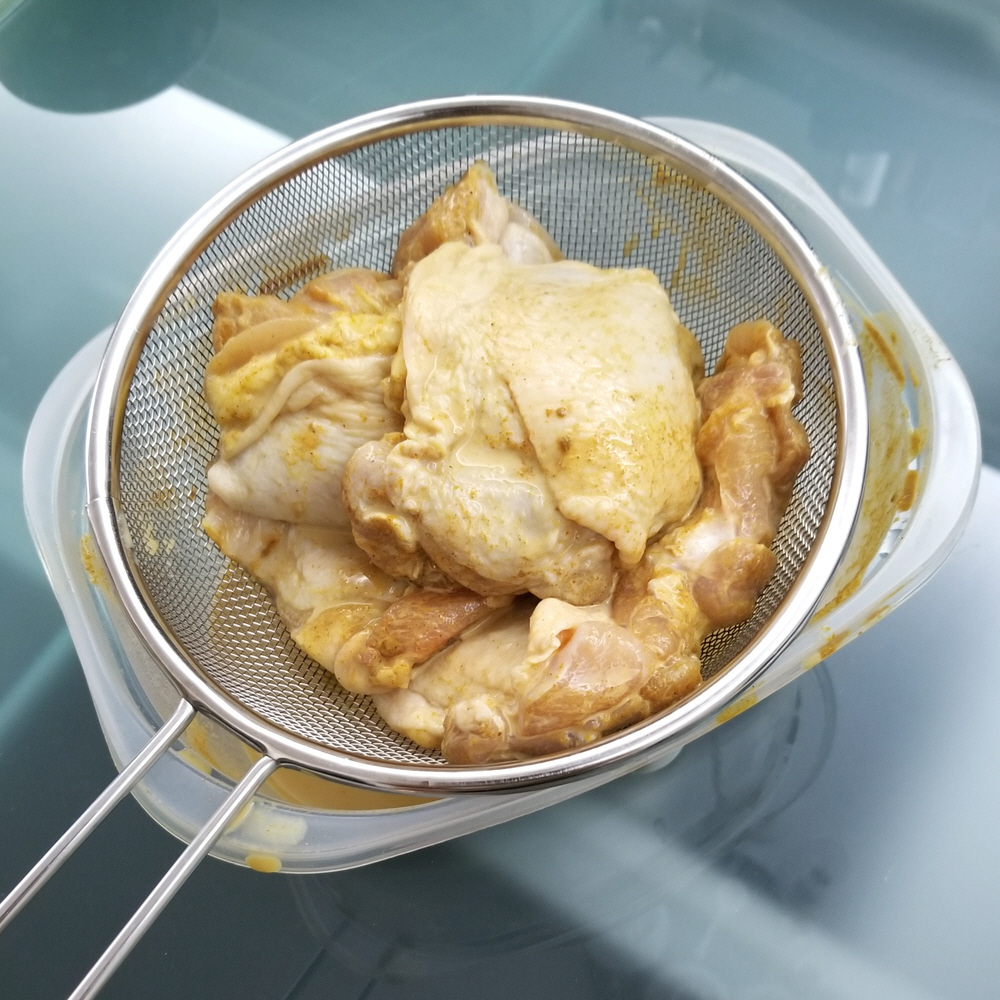
Dissolve 1 chicken cube in 1 cup of water. Add the resulting chicken stock to the chicken and move the chicken about to wash off the marinade. Drain the chicken in a strainer over the container as shown above.
Using the same pan, heat up 1 T of oil and pan fry the chicken. Start with a sizzling hot pan and fry the chicken skin side down for 2 minutes. Flip the chicken, turn the heat down and pan fry for a further 2 minutes.
Transfer the chicken to a cutting board to cool.
Pour the diluted marinade into the pan and return the shallots and ginger to the pan.
Bring the pan to a simmer and sprinkle in 4T almond flour and 1T cumin. Stir until there are no clumps and leave on a simmer.
By now the chicken should have cooled enough to touch. Cut each chicken thigh into about six pieces. Return the chicken together with any drippings back into the pan.
Add 150 ml coconut milk, 50 g (1/4 cup) of roasted cashew nuts and 1t of sugar. Cover and simmer for an additional 10 minutes.
Check if you wish to add salt before serving. Chop up 1 sprig of coriander and use it as a garnish.
Notes
In case you are wondering what is curry powder, you can refer to the ingredients listed on the package of curry powder on the right. Curry powder is the base for making curries. It is not the same as Garam Masala, which is just a seasoning.
If you’ll be making other dishes, you can prepare your korma ahead of time and just reheat to serve. It doesn’t taste any better if freshly made.
The thicker parts of a chicken thigh will not be cooked from 4 minutes of pan frying, especially without a drop lid. That’s fine, simmering in the curry will finish the job. The idea is to caramelize the chicken and extract the oil and flavour from the skin.
I find cutting the chicken using a pair of kitchen scissors easier than using a knife.
Though its not part of the recipe, you should serve your korma with steamed rice or some kind of Indian bread.
(serves 3 to 4) Miso Stew or Miso Nabe is a winter dish that is popular in Hokkaido. The concentration of protein and carbohydrates in miso and soya milk creates a stew that is hearty and robust, giving it the power to keep the cold at bay. Every region has its own unique way of cooking their miso stew and there is no definitive cooking method or set of ingredients, though the meat is usually fish, pork or chicken. If you’ve never tired a Miso Stew don’t worry, my particular way of cooking Miso Stew is suitable to Western tastes.
Ingredients
Chicken Legs (2, with thigh)
Red Miso (4T)
Carrot (1)
Onion (1)
Mushroom (1.5 cups)
Yam (1)
Garlic (1T, minced)
Mirin
Sake
Soy Sauce
Soya Milk (unsweetened, 3/4 Cup)
Maple Syrup
Preparation (the day before)
Debone the chicken and cut the meat into bite sized chunks. Keep the bones in the freezer for use the next day.
Mix in a large bowl 2T Red Miso, 2T Sake, 1T Mirin and 1T Maple Syrup until you get a paste. Stir in 1T of minced garlic.
Place the chicken meat in the bowl and toss well until each piece is coated with the marinade. Cover the bowl with cling film and keep it in the fridge overnight.
Preparation
Peel a yam and cut it into bit sized chunks. Place the yam pieces on a sheet of aluminium foil and drizzle them with 2T oil and 2T mirin. Wrap the yam up in the foil and place in a toaster oven set at 180oC (360oF) for twenty five minutes.
Put 3T of oil in a large pan (or clay pot) and heat the pan until the oil is searing hot. Keeping the fire on high, pour in the chicken together with all the marinade. Stir fry.
When the chicken begins to shrink, add 3/4 cup of soy milk and 3/4 of water. After a quick stir, pick out the chicken pieces and set them aside on a plate.
When the contents of the pan come to a boil again, put the chicken bones in the pan, as well as 1T sugar, 1T Soy Sauce and 2T of Red Miso. Turn the fire down to bring the liquid in the pan to a low simmer.
Peel a carrot and slice it into 1/8 inch thick oval pieces. Put the carrot slices in the pan.
Peel an onion and cut it into 6 equal wedges. Place the onion in the pan. Cover the pan and simmer for about 15 minutes.
Cut your mushrooms into appropriate size if you have chosen to use a big variety. I used Shimeji in the picture above and used them whole.
When the carrot is no longer crunchy, add the mushrooms, chicken and yam to the pan. Cover and simmer for a further five minutes. Remove the chicken bones before serving.
Notes
You’ll notice I specified Red Miso above. You can also use Hatcho Miso, but preferable not any of the white, yellow or golden varieties of Miso, for the unique flavour of miso dissipates into plain saltiness with cooking. For more information on Miso, you can refer to this post about Miso.
Nabe (pronounced nar-bay) is not the Japanese word for stew. It refers to a shared hot pot, sort of like a fondue using soup.
If don’t have any unsweetened soya milk, you can use plain milk instead.
The reason you put in the carrots before the onion is carrot takes longer to soften. Don’t reverse the order of steps 5 and 6.
One key element of this recipe is cooking the yam and chicken separately from the stew. Both chicken and yam taste better when cooked at high temperatures. You can of course choose to just boil everything in the stew, but the result will not be as good.
Miso stew is best eaten with steamed rice as a staple, although you can use another type of staple, like noodles or bread. This stew is not meant to be eaten on its own.
Instead of putting the bones in the freezer, you could also keep them in the bowl with the marinated chicken if it is big enough. A third option would be to boil the bones to create 3/4 cup of stock which you then put in the fridge.
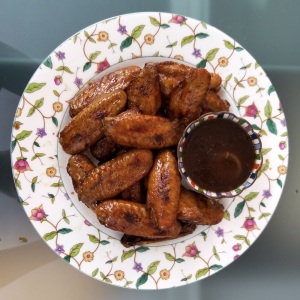
(serves 2-3) This is a recipe for BBQ wings, the type you’d find in a sports bar. For years I tried to cook these wings at home in the same style with limited success. Then one day I discovered the secret to marinating chicken wings. Most recipes use the method of brushing the wings with sauce as you cook them, because its very difficult for flavours to penetrate chicken skin and reach the meat within, but this recipe doesn’t. The secret is counter-intuitive: you have to cook the wings before marinating them.
Ingredients
Chicken Wings (20 mid joint, 700g)
Shallots (4)
Garlic (1 bulb)
BBQ Sauce (1/3 cup)
Cumin
Mustard
Liquid Smoke
Whiskey
Preparation
In a medium sized pot, mix 1/3 cup of BBQ sauce with 1.5 cups water, 1t mustard, 1t cumin and 1t salt.
Peel the garlic and shallots and put them whole into the pot.
Rinse your chicken wings and add them to the pot.
Bring the pot to a boil. After 5 minutes of boiling, carefully fish out the chicken wings without damaging the skin. Put the wings in a Tupperware-like of container.
Continue to simmer the sauce until it has halved in volume. This should take perhaps fifteen minutes. Turn off the heat and stir in 1t liquid smoke and 1T whiskey.
After the sauce has cooled sufficiently, pour it into the container with the wings. Cover and leave the wings to marinate in the fridge overnight, or in any case for at least six hours. Shake once or twice to allow the marinade to reach between the wings.
Preheat your toaster oven to 200oC (390oF) degrees.
Arrange the wings on a wire rack in the toaster oven tray and bake for 25 minutes. You’ll need to do this in two batches as the wings should not touch each other.
Warm up the leftover marinade in the microwave or in a saucepan. You can serve the wings either with the BBQ sauce separate or coated with the BBQ sauce.
Notes
The most important thing you can do is cover your toaster oven tray with foil, so you don’t have to wash off the carbonized BBQ sauce.
Do not boil the wings for more than 5 minutes. You want the wings to be cooked, but not the skin to soften too much.
If you are cooking the wings in a full sized oven, it will probably take less than 25 minutes. They are done when you notice dark splotches develop. You can of course also simply cook the wings over a actual BBQ.
The same method works for all kinds of sauces you might want to flavour wings with, like teriyaki or oyster sauce. Just boil for five minutes and marinate overnight in the fridge.
(serves 6) Chicken Kiev is the king of chicken breast dishes, the perfect fool proof way of preventing a chicken breast from getting dry. The breast meat is kept moist and juicy because it is stuffed with butter. And when the breast is cut open, the butter serves as a sauce for the dish. No one knows for sure where Chicken Kiev comes from except that it’s not from Kiev. The Russian restaurants seemed to have claimed ownership of this dish while others insist that it was originally a French dish called Cotelettes de Volaille. No matter, it tastes just as good.
Ingredients
Big Chicken Breasts (6 halves)
Butter (140g)
Shallots (4)
Bread (4 slices)
Garlic (3t minced)
Flour
Eggs (2)
Basil
Mint Leaves
Salt
Brown Sugar
Toothpicks
Preparation
Begin by brining your chicken breasts overnight, for about 10 hours, in a solution of 3T Salt, 1T Brown Sugar and 4 cups of water. For details you can refer to this post.
Place 4 slices of bread exposed in the fridge overnight to dry out.
When the 10 hours are up, give the chicken breasts a quick rinse to end the brining process and keep them in the fridge until needed.
Finely chop 4 shallots. Pan fry the shallot bits in 2T of oil on a low flame until you notice a few pieces have turned brown. Turn off the heat and allow to cool. In the meanwhile mince a few garlic cloves until you get 3 semi-heaped teaspoons of garlic.
Put 140g of butter, that’s about two thirds of a block, in a bowl and cut the butter roughly into cubes. A pair of scissors is the best implement for this. Allow the butter to warm until it is soft, then fold in the minced garlic, shallots, 1T chopped mint and 1T of chopped basil. The butter should stay opaque and not be allowed to melt at any time. Spoon the herb butter onto a large sheet of cling film and roll it into a long rod. Keep the butter sausage in the fridge until it is needed.
Toast the bread under very low heat so it doesn’t brown, until it is dry and crisp. Place the bread into a plastic bag and smash it into crumbs using a mallet.
The next step is to cut a cavity into each breast. Start by drying the chicken with a tea towel. Plunge a pointed knife about two thirds of the way into a breast from the bigger end. Carefully scrape the tip of the knife along one side of the cavity a few times in a circular motion to enlarge it. Flip the knife over and do the same to the other side of the cavity. While you are doing this, take extra care at all times not to let the knife pierce out through the surface. At the same time you should do your best not to enlarge the opening.
Cut the butter sausage into six cylinders. Do this while it is still in the cling film. Unwrap one cylinder of butter, halve it lengthwise and push both pieces into the cavity one after another, as far as they’ll go. Repeat the same procedure for the remaining breasts.
Beat two eggs. Cut a one inch piece off the tip off each chicken breast. Dip these trimmings in the egg and after folding or rolling each piece, use them to plug up the openings. Secure each plug with a wooden toothpick. If you inadvertently punctured any of the breasts earlier, you can attempt to ‘repair’ the damage with toothpicks as well.
Coat each breast in flour, taking care to cover every part of the breast, especially the area around the plug.
Heat up a frying pan with some oil. Roll a breast in egg and then the breadcrumbs until it is nicely coated. Put the breast straight into frying pan. Pan fry for about a minute, making sure the entire surface is cooked. A pair of kitchen tongs will be helpful in achieving this. Control the fire to make sure the bread doesn’t get burnt. Leave the breast to rest on a wire tray inside a baking tray. Do the same for the remaining breasts, adding more oil to the pan for each new breast.
Preheat your oven to 175oC (350oF). Place the tray of chicken into the hot over for 20 minutes, or until you notice the chicken begin to shrink.
It’s best to serve the Chicken Kiev straight out of the oven. Sprinkle lightly with white pepper while the chicken is still on the baking tray. Remember to remove the toothpicks after plating.
Notes
Purists will no doubt point out that the proper way to make Chicken Kiev would be to pulverize a butterflied chicken breast into a very thin schnitzel which is then rolled around a slab of butter. This method has its merits but is quite labour intensive. Should you ever choose to try it, you should season the chicken instead of brining it.
Chicken breasts can be plump and roundish or elongated and you should buy the former. I find those from Denmark and Holland are very suitable for stuffing. If the breast is of the elongated type, it will be too flat, making the carving a proper cavity for the butter doubly difficult.
Don’t expect a large amount of melted butter to gush out when you cut the chicken as some of the butter will be infused into the surrounding meat. If you desire more flowing butter, you can increase the amount of butter to a full block. But in order to do this the cavity has to large; maybe you can wait until you have had some practice at cutting cavities into chicken breast before attempting to use more butter.
There is no ‘standard’ herb to use for the butter. You can substitute other herbs of your liking, or even add things like sautéed mushrooms to the butter. I even used a bacon onion dip once instead of butter and it tasted great.
If you have a large number of diners, it may be easier to just deep fry your Chicken Kiev in one go instead.
(serves 4, or more depending on size of bird) Spatchcock is a fancy word for butterflying the whole chicken. It sounds hard, but its quite the opposite. There are many advantages to spatchcocking. First and foremost a flattened chicken roasts more evenly, resolving a major issue with roasting chickens for those without a rotisserie; the thighs take longer to cook than the breast, but ironically when you roast a whole bird it is the breast that is more exposed to heat. Spatchcocking exposes the legs more and brings the breast down, saving the day. In addition, a spatchcocked chicken cooks in half the time and is in a more convenient shape for fitting on a fridge shelf.
Ingredients
Chicken, whole (1)
Onion (1)
Potatoes (2)
Yam (1)
Carrot (1)
Salt
Brown Sugar
Butter
Rosemary
Fennel Seeds
Preparation Part I
You have to begin preparation the night before.
Starting on either side of the bishop’s nose, cut towards the corresponding side of the chicken’s neck (as per the picture below). This is best accomplished using a pair of kitchen shears. You will need to cut through the ribs, but not to worry, these are pretty flimsy in a chicken.
From the inside of the chicken, snip an incision along the cartilage of the breast bone (it is white) top to bottom to weaken it. Be careful not to pierce the skin on the other side.
Flip the bird over and press down on the breast with both hands to flatten it. You should end up with the iconic cartoon heart shape chicken breast.
Prepare a brining solution using 1T salt, 1t brown sugar for every two cups of water. Make enough brine to ensure the entire chicken is submerged. Brine the chicken for 8 hours. If the weather is warm, either add a some ice every once in a while or leave the brining bird in the fridge.
Preparation Part II
When the brining is done (presumably the next day), place the bird on a wire tray to dry (as shown below). This will take several hours and again is best done in the fridge. Alternatively you can use a portable fan.
You must dry the bird properly for it is the key prerequisite to a properly roasted chicken. The chicken is considered sufficiently dry when you put a piece of kitchen towel on it and the paper remains dry but sticks to the skin like a second skin.
In a small pan, heat 1 heaped t of dried rosemary, 1 heaped t of fennel seeds in 4T of oil until you can smell a strong aroma. Turn off the heat before the herbs get burnt. Leave the pan on the stove while the chicken is drying; more herb flavour will be infused into the oil.
Preparation Part III
Cut the potatoes and the yam into chunks. Depending on the variety you may want to peel them first. The yams should be double the size of the potatoes as they cook faster.
Cut the carrot into discs and the onion into small wedges. Place all the vegetables on a baking tray.
Preheat the oven to 205oC (400oF).
Reheat the infused oil. When the oil becomes less viscous, strain the oil into a container. Add a large knob of butter to the oil. Next dissolve half a t of salt in the butter-oil mixture. Drizzle half of this mixture over the vegetables using a spoon.
Position the chicken over the vegetables on the tray. Make sure all the vegetables end up under the chicken as any piece left exposed will become burnt beyond recognition.
Paint the remainder of the oil-butter mixture on the chicken with a brush.
Place the chicken in the oven for 45 minutes, 50 minutes if it is a bigger bird.
When the chicken is golden brown, remove the pan from the oven without turning it off. Place the chicken on a large serving plate to rest after giving it a light dusting of pepper.
Roll the vegetables about in the tray to cover them with drippings, space them evenly and place the tray back in the oven for around 10 minutes. When the vegetables have caramelized sufficiently, arrange them around the chicken on the plate. Pour any remaining drippings over the chicken and serve.
Notes
As you can see from the pictures, the legs were open at an angle while drying but became parallel to each other after cooking as the meat contracted. Purists will secure the chicken with 2 long metal skewers in an X pattern, from the left thigh through to the right breast and vice versa to keep the chicken completely flat. This also helps all the skin brown more evenly. I think its a bit of an overkill, but skewers are definitely a good idea when BBQing.
My brining mixture is a relatively weak one as we are brining the whole chicken and not just the breast. If you like your roast chicken on the salty side, you can double the salt in the butter-oil mixture to a full teaspoon.
The back and spine that is cut out is good for boiling stock. If you don’t need it concurrently, you can wrap it in cling film and freeze if for later.
(makes 2 dozen wings) Chicken wings are a party staple and a favourite among children, and the unique blend of Miso and honey will make your wings all the more popular. I have yet to meet a person who didn’t like my Miso-cured wings. The vast majority of Miso-flavoured wing recipes make you cook the wings twice, the second time after painting on a miso glaze. My method does away with this troublesome glazing procedure and cooks the wings in one go. Furthermore, curing allows the flavour of miso to penetrates all the way into the meat.
You need to begin the day before. Defrost and rinse your wings.
Leave the wings to drain in a colander or strainer for at least 5 minutes.
Arrange the wings on half of a large dish cloth. Fold the empty portion over and press down gently to dry the wings as best you can. Unfold and allow the chicken to dry further while you make the marinade. You can place a sheet of paper towel between the chicken and the cloth to make the cloth easier to wash, but don’t try using paper towels alone or you end up using half a roll.
In a ceramic bowl mix the following: 2T red miso, 2T honey, 1T mirin, 1T tahini, 1T sesame oil, 1t soya sauce and 1t turmeric. You can also add 1t of liquid smoke if that is your preference. (nb. the T’s for the pastes are heaped ones)
As many of these ingredients are from the fridge you will need to microwave the mixture for about 15 seconds before they will can mix well. Alternatively, put the bowl in a larger bowl of hot water for a while. Stir and mash down with the bottom of a table spoon until all the lumps are gone and you end up with a smooth paste.
Place the wings in a gallon zip lock and add the marinade. Squeeze out most of the air and then massage the bag and roll it around to get the marinade evenly over all the wings.
Place the bag flat in the fridge overnight. Some water will be drawn out from the wings making the marinade a bit more watery, that is normal. Flip the bag over once every 6 hours or so to ensure the curing is even.
The next day the wings will be cured. Arrange them on a wire rack in a tray(s) and allow the wings to warm to room temperature. The wings should not be touching each other. Don’t leave any splotches of marinade on the wings as these will become black patches of burnt skin as the excess sugar carbonizes in the oven.
Preheat your oven to 180oC (350oF). Place the tray(s) in the oven for 20 minutes. The time may vary a bit from oven to oven, so decide when the wings are ready by visual inspection.
Notes
The issue with most marinades is they are too watery and they drip off when they heat up in the oven, hence the need to paint on a layer of glaze at the end. That’s why this recipe emphasizes keeping the wings dry, so do not skip steps for 2 and 3. The tahini and turmeric play an important role in keeping the marinade thick so do not substitute them for something else. Also do not add any additional liquid to the marinade.
You can also use a toaster oven. Set it to 200oC (390oF) and bake each batch for 25 minutes – the toaster oven is weaker than a regular oven, but can do the job – 8 wings at a time as shown in the photo.
You can also skewer the wings and cook them over a BBQ.
You can also use white miso, but you will need 3T instead of 2T as it is less salty. The white miso version is milder and sweeter. I typically use 2T white and 1T red when I make my wings.
(serves 6) On a whim I decided to combine two of my favourite Chicken and Rice recipes, Chicken and Porcini Risotto and Chicken A La King. It turned out to be yet another match made in culinary heaven. The rich nutty flavour of porcini goes very well with the special brand of sweetness that comes with capsicum. The recipe also uses brined chicken breast to keep the chicken extra tender and separate from the rice.
Ingredients
Dried Porcini Mushrooms (30g)
Arborio Rice (1.25 cups)
Brown Mushrooms (150g)
Chicken Wings (4)
Chicken Breasts (2 halves)
Capsicum a.k.a. Bell Pepper (2)
Onion (1)
Garlic (1T minced)
Butter (50g)
Grated Parmigianino-Reggiano (1/2 cup)
Cream Cheese
Rosemary
Early Preparation
Brine and poach chicken breasts as per the procedure given in this post. You can do this ahead of time and then warm up the chicken breasts in the hot stock before slicing them.
Simmer 4 chicken wings in 4 cups of water with half an onion and 1t salt. Continue simmering until the meat is practically falling off the bone, adding water is necessary. You can also use 8 mid joints. Start making the stock at the same time you begin the brining.
You also need to soak your porcini in 2 cups of water. Use cold water, as hot water will give the porcini a slight rubbery texture after it rehydrates. Keep in the fridge.
Preparation
Bring your chicken stock to a slow simmer. Add the juices from the poached chicken breast and the porcini water (but not the porcini itself) to the stock pot.
Cut the capsicums in half and remove the stem, core and seeds. Cut the tops and bottoms off and add them into the stock. Cut the sides into 1/4 inch squares and set them aside.
Cut the brown mushroom into thick slices.
Mince the garlic and julienne the remaining half of the onion into1/8 inch pieces. In a large pan, fry the onion bits on low heat in 2T of oil until they become yellow and limp. Add the garlic and continue pan frying for a minute.
Turn up the heat on the pan and add the rice into the pan, stirring well.
After another minute, add a ladle of stock (liquid only) to the pan and reduce the heat to produce a low simmer. Add the capsicum pieces to the pan at this stage.
Stir until the risotto begins to dry, then add another ladle of the hot chicken stock. Stir frequently to prevent sticking. The stock pot must be kept simmering to avoid shocking the rice. Continue doing this for about 20 minutes.
In the meanwhile grate the Parmigianino finely. Cut ¼ of a block of butter into 1 cm cubes and mix it with the grated cheese. Allow the butter to soften out in the open. This forms the mantecatura.
Dissolve 1T of cream cheese in the last ladle of hot stock before adding it to the pan. Add both the brown mushrooms and the porcini at this stage.
When your risotto is al dente you can let it almost dry up, after which you turn off the heat. Total simmering time varies a bit with the type of grain you are using, so rely on taste and appearance to decide if the risotto is done and not a timer.
Stir in the mantecatura and let the risotto rest with the cover on for five minutes. Slice the Chicken breasts.
After tasting, you may add a bit of salt or more grated cheese to the risotto as a final adjustment if you deem necessary. Arrange the sliced chicken over your plated risotto. Garnish with black pepper.
Notes
Myfirst risotto recipecontains many of the finer points on making risotto, which I have opted not to repeat here. You should refer to that post if you don’ make risotto often.
Capsicums comes in 4 different colours which have different tastes. Red is sweet and easiest on the taste buds, Green is an acquired taste as it is less ripe and bitter. Orange and yellow capsicums are in between the two. I would recommend you use red and orange for this dish.
(serves 3) Chicken A La King is simple conceptually, but it is one of the most difficult dishes to perfect. My mom taught me how to make this the standard way when I was young and over the decades I’ve developed my own improved method of preparing Chicken A La King, one that has superior flavour and at the same time avoids all your typical A La King problems (see notes). I have yet to taste a better version in any restaurants I’ve tried – something I can’t say about any of my other recipes.
Ingredients
Chicken Legs with Thigh (2)
Capsicum a.k.a. Bell Pepper (1)
Brown Mushrooms (150g)
Leek (1)
Milk (1 cup)
Butter (100g)
Flour (3T)
Anchovy in Oil (10g)
Chicken Stock Cube (1/2)
Cream Cheese (1T)
Worcestershire Sauce
Sherry
Coriander Seed Powder
Cooked Rice (4 cups)
Preparation
Pour 1 cup of milk in a cup and spoon 1T of cream cheese into a bowl, to let them warm up.
Fry 2 slivers of anchovy in its oil in a pot until you can mash the anchovy into a fine suspension. Add 3 cups of water and half a chicken cube and bring to a low simmer.
Cut the leek in two and put the top (green) part into the stock pot. Slice the bottom portion lengthwise into half, then cut into 1/8 inch thick half rings. Cut the mushroom into 1/4 inch thick slices. Cut the capsicum into 1/2 inch squares; making sure you discard all the seeds and white pulp.
Debone the chicken legs and add the bones to the stock pot. Cut the meat into bite sized chunks – its more important that the pieces of chicken are of the same thickness than of the same volume. Place any excess flaps of skin into the stock pot.
Mix 1T of oil, 1T Worcestershire sauce, 1t coriander seed powder, 0.5t salt in a large bowl. Put the chicken chunks into the bowl and mix well.
Stir fry the leek pieces in a large pan with some oil on low heat until they begin to go limp. Turn up the fire and push the leek to one side of the pan.
Add the chicken when the pan is really hot and stir fry until no visible part of the chicken is raw. Then combine with the leek and continue to stir fry until the chicken is cooked (i.e. shrunk a bit like the first photo). Move the chicken to a temp container.
Melt 70g (1/3 of a standard block) of butter in the same pan on low heat. Spoon in 3T of flour and stir fry until the flour begins to darken. Very slowly add the cup of milk a bit at a time while stirring continuously with a flat spatula to combine all three ingredients. When all the milk is used up, continue the process by adding the hot chicken stock instead. Finally, stir the cream cheese into the sauce. When you are done you should have a smooth velvety white sauce.
Add the diced capsicum to the sauce and continue to simmer, until the capsicum is no longer rigid. This will take a while, perhaps 10 minutes, add hot water as needed. Next add the mushrooms and 1T of sherry. When the mushrooms begin to shrink, add the chicken and simmer for 1 more minute. Sprinkle on black pepper and taste the sauce to see if salt is required.
Serve with steamed white rice, topped with a knob of butter.
Notes
Capsicums comes in 4 different colours which have different tastes. Red is sweet and easiest on the taste buds, Green is an acquired taste as it is less ripe and bitter. Orange and yellow capsicums are in between the two. A mixture of two types would be visually pleasing if you are cooking a double portion.
If you are using chicken breasts instead of legs, you should brine them first. There will be no need to marinate the brined chicken pieces as they are already salty.
Chicken A La King is supposed to be served with steamed white rice. If you don’t have rice, the other permissible option for Chicken A La King is puff pastry cups (a.k.a. vol au vent). I am against serving it with bread or pasta as some websites show.
How is my recipe different from the commonly used ones?
1. Cooking the chicken separately under a high heat will remove any freezer taste.
2. Using chicken stock enhanced with anchovy brings out the flavour of chicken in the white sauce.
3. The extended cooking time for the sauce removes any residual taste of flour and fully infuses the sauce with the taste of the capsicum.
(serves 2) Cassoulet is a hearty meal-in-one dish of poultry, pork and beans in a tomato sauce from Languedoc, in the south of France. This is my simplified method for making a Cassoulet using everyday ingredients like chicken legs and baked beans. It’s not exactly the same as what you’d find in Toulouse but I think you’ll find its a close enough imitation as long as you’re not French. More importantly my recipe only takes 1 hour to prepare and cook instead of a whole day if you were to do it ‘properly’.
Ingredients
Chicken Leg with Thigh (2)
Pork Sausages (2)
Pancetta (100g)
Onion (1/2)
Shallot (4)
White Wine (1/2 cup)
Baked Beans (1 can, small)
Oxo Beef Cube (1)
Tarragon
Thyme
Coriander Seed Powder
Preparation
Peel the shallots but keep them whole. The half onion should be cut into 3 wedges.
Trim (and retain) any excess skin and visible fat from the chicken. Season the chicken legs with a dusting of pepper, but no salt.
Fry 100g of diced pancetta in a pan on low heat with 1T oil (goose fat if you have any) together with the chicken trimmings and the two pork sausages.
When the fat from the pancetta begins to render, add the shallots and onions to the pan. Move the contents of the pan around to prevent them from getting burnt until the onion breaks up into soft pieces.
Pour everything from the pan into a casserole. The Casserole should be tall enough to prevent boiling over. Drain the oil back into the pan and turn up the heat.
When the pan is hot, brown the chicken in it. The chicken shouldn’t be in the pan so long that it gets cooked completely.
Place the browned chicken in the casserole as well and arrange all the contents snugly as shown. Sprinkle some black pepper over everything.
Preheat your oven to 180oC (350oF).
Melt 1 Oxo Beef cube in 3/4 cup of hot water and use this stock to deglaze the pan. Turn on the heat again and add 1/2 cup of white wine and the can of baked beans. While the mixture is being brought to a boil, add 1T Tarragon, 1T thyme, 1t coriander seed powder.
After the sauce has been boiling for half a minute, pour it into the casserole. Place the casserole in the oven for 25 minutes, uncovered. The cooking time may vary slightly, you’ll know its time when enough of the liquid has evaporated and the chicken is partially exposed.
You may serve your cassoulet immediately but it can also be put aside and reheated later, it will taste just as good. It is traditional to serve the whole casserole (as per below), with the individual plating done at the table. The dish has a lot of sauce, so it goes well with baguette or some other kind of bread.
Notes
If you haven’t cooked an authentic cassoulet before, here is a summary: Cassoulet is usually served with Duck Leg Confit instead of chicken and this is to be roasted separately. You’ll also need Toulouse Sausages which are hard to find, plus you also have to soak beans ahead of time and cook them for a really long time to get them soft. Other typical cassoulet ingredients that I left out include tomatoes, celery, carrots and laminated pork.
The nice thing about canned baked beans is they come pressure-cooked and their sauce has the same effect as the gelatin you would normally get from cooking pork skin in the Cassoulet for a long time. Baked beans are thus the secret to the greatly reduced cooking time.
Speaking of pork skin, if you’d like you could try adding pieces of smoked ham hock if you so desire; treat them the same as the sausages.
Some recipes sprinkle breadcrumbs on the cassoulet to form a crust, but I don’t belong to the crust camp.
You can use a pot or pan instead of glass or ceramic ware as long as they come with an all metal handle. Be warned – if you use an oversized sized container the liquid level will be too low to cover the chicken initially and it will get burnt. A solution is to bake the casserole covered and then again uncovered at the end.

 Ingredients

 you can refer to the ingredients listed on the package of curry powder on the right. Curry powder is the base for making curries. It is not the same as Garam Masala, which is just a seasoning.