RSS

Tag Archives: Chinese Wine

Drunken Chicken – made in a Toaster Oven

Drunken Chicken – made in a Toaster Oven
DrunkC 1000

(6 portions)
Drunken Chicken is a Chinese classic, the equivalent of a cold cut, similar in concept to jellied ox tongue. It is essentially succulent bite sized chunks of chicken that are infused with flavour, perfect as a cold starter or a one piece amuse bouche.  Making it takes quite a bit of time but requires next to no effort or skill, since my recipe doesn’t involve steaming and uses very few ingredients. As an added plus, you can make your Drunken Chicken well ahead of time and keep in the fridge until its needed. 

Ingredients

  1. Chicken Legs (2, leg and thigh, deboned)
  2. Chinese Wine  
  3. Liquid Smoke  
  4. Perilla Oil
  5. Salt
  6. Sugar

Marination and Cooking 

  1. Brine 2 boneless chicken legs in 1.5 cups of cold water containing 1 heaped T of salt and 1t sugar for 4 hours. If its a hot day, add a few ice cubes to the water every hour or keep the chicken in the fridge for the four hours.
  2. Drain the chicken and trim off any visible clumps of fat with kitchen shears. Marinate in a mixture of 6T of Chinese wine and 2t of liquid smoke for an hour.
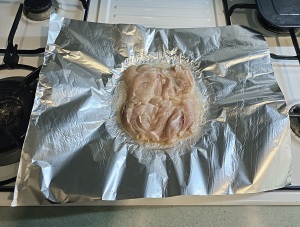
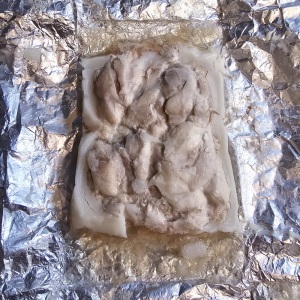
  3. Place a large sheet of foil (refer to the photo for size) on a plate and press the foil to the plate to capture the depressed centre of the plate. Spoon 1T perilla oil into the middle of the foil and then place one chicken leg with the skin side down on the foil. Rotate the chicken 360 degrees to spread out the oil. Spoon half of the marinade over the chicken. 
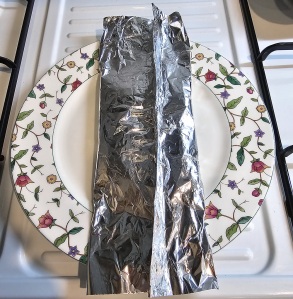
  4. Wrap the chicken in the foil. The first step is the bring the 2 long edges together and fold/roll the edge until you get a flat tube. Next you roll up the other two edges until you get a parcel. As you do the folding, take care to flatten all the rolls neatly to make the parcel as water tight as possible. Also, try to trap as little air as possible inside the parcel as this air will expand in the oven.
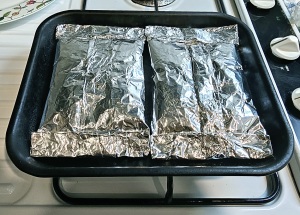
  5. Repeat the process for the second chicken leg; both parcels should be able to fit onto the toaster oven tray.
  6. Preheat the oven to 180oC (360oF). Set the timer for 20 minutes and place the tray in the oven.
  7. After the toaster oven turns itself off, leave the parcels undisturbed in the toaster oven until they reach room temperature. I usually leave them in the toaster for 2 hours or more.
  8. Put the parcels into the fridge. They should be in the fridge for several hours at minimum and in fact you can keep them in the fridge for several days as the meat is nicely sealed up.

Preparation

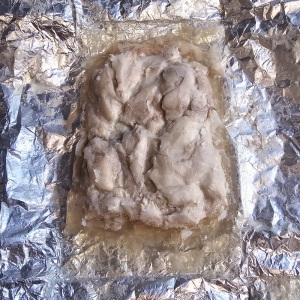
  1. When its time to serve your Drunken Chicken, unwrap the foil and remove the white solidified fat with a fork. You must do this quickly as it softens very soon after it leaves the fridge.
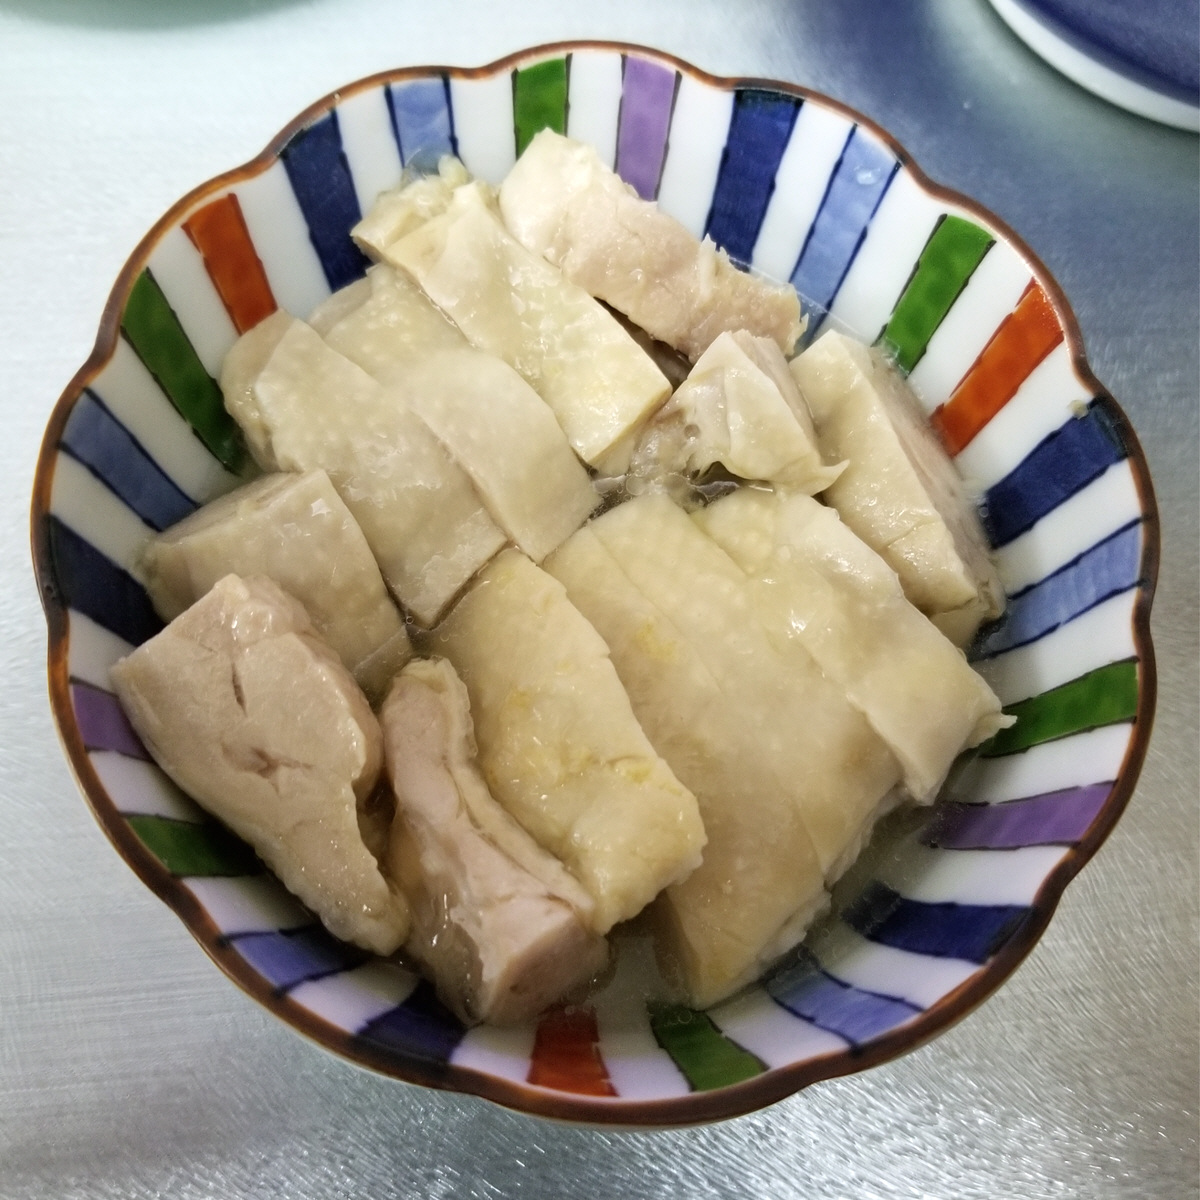
  2. The chicken will be encased in a jelly created from chicken essence and what is left of the wine after all the alcohol has evapourated. This is the all important gravy of Drunken Chicken. Scrape off as much of the jelly as you can into a bowl. Add 2T of boiling water to the jelly and leave the bowl in a bath of hot water to warm up.
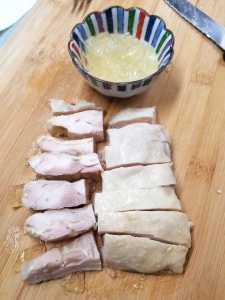
  3. Meanwhile, cut the meat into bite sized pieces and arrange then on to a serving plate or bowl. You may choose to put them into multiple pieces of smaller crockery if you intend to serve individual portions.
  4. When the jelly has fully liquefied, spoon the resulting liquid over the meat. The general idea is for the meat to be still cold while the gravy is at room temperature.      

Notes

  • If find certain ingredients hard to come by, you can use substitutes. Sherry is the standard western alternate to Chinese wine, and oil infused with any flavour, say walnut or rosemary will work just fine. In this sense what I have described is a cooking style in addition to a recipe for a specific dish. 
  • If you are a purist and love the taste of wine in your food, you may choose to add 2T of Chinese Wine instead of 2T of water in step 2 above.
  • It will be perfectly fine if you use frozen chicken, because of the brining. You can also use other parts of the chicken.
  • When the parcels are put into the fridge I suggest you place them on a plate as they very often leak very slightly, until the jelly has formed. 


Leave a comment

Posted by on November 11, 2023 in American, Appetizers, Recipe, Salad, Seafood


Tags: , , , ,

Pepper, Vermicelli and Prawn Clay Pot

(serves 4-6)
This is a hearty dish where the flavour of a concentrated stock boiled from prawn heads
is infused into glass vermicelli. I believe it originates from Thailand, though versions of it are also found in Chinese seafood restaurants in parts of Asia. Besides prawn, the dish uniquely also blends in the flavour of black pepper and the aroma of coriander. It’s actually quite a rustic dish and is not hard to make at all, even if don’t usually cook Asian food. 

Ingredients

  1. Tiger Prawns (500g)
  2. Glass Vermicelli (160g)
  3. Garlic (10 cloves)
  4. Scallion (3)
  5. Coriander (2 sprigs)
  6. Coriander Seed
  7. Ginger (4 slices)
  8. Black Pepper
  9. Fish Sauce
  10. Soy Sauce
  11. Chinese Wine

note: Claypot is part of the name of this dish but you can easily cook this in any deep or large frying pan, and a claypot is not actually required.

Preparation

  1. Separate the heads of the prawns and set them aside. Peel and de-vein the bodies and cut each prawn in half lengthwise. Marinate the prawn meat in 1t soya sauce and 0.5t salt.
  2. Peel 10 cloves of garlic.
  3. Cut the scallion in half. Cut the bottom half in half again. Julienne the top portion and set aside.
  4. Prepare 4 thumb sized slices of ginger.
  5. Cut off the roots and a bit of the tip of the coriander sprigs.
  6. Soak the vermicelli in some cold water, for 10 minutes, 15 minutes at the most. If you are doing this step a bit ahead of time you can simply drain away the water.
  7. Place the garlic, ginger and scallion in a large claypot. Stir fry with 4T of oil on high heat until some browning is visible.
  8. Add the prawn heads and continue stir frying until the heads are red, then pour in 1/2 cup of water.
  9. When the water comes to a boil, add 1T black pepper, 1t sugar, 1t salt, 1t fish sauce, 1t coriander seed powder, 2T Chinese wine. Simmer until the volume of water is reduced by half.
  10. Add the prawn meat and coriander sprigs. One minute later add the vermicelli. When the vermicelli blocks separate into individual stands give the pot one last stir and place the lid on the clay pot. Continue to simmer for a minute.
  11. Remove the lid, add 3T of oil and 1T of Chinese wine, stir fry until the clay pot is almost dry. Turn off the fire.
  12. Sprinkle on the julienned scallion and a pinch of black pepper. Replace the clay pot lid and bring the vermicelli to the dining table in the pot.


 Notes

  • It is important to use the right kind of vermicelli; these are the type made from mung beans. Examine the packaging properly (look for the words 粉絲 or 冬粉), so you don’t buy the wrong type made from rice which look a bit similar. They come in stiff white bundles (as shown) and become transparent (hence the glass in the name) when cooked. 2 bundles would typically weight 160g, the amount required for this recipe.
  • The thing about glass vermicelli is it can absorb a lot of water, but this will make it very soft and mushy, which you want to avoid. At the same time you can’t boil them separately and pour away the water when they are just right like for pasta, since you want the prawn stock to infuse into the noodles. Therefore make sure there isn’t too much liquid left in the pot in step 9. Even when you turn off the heat they will continue to absorb water until there is no more left.
  • You can use prawns bigger than Tiger prawns, but not the smaller varieties. That’s because the flavour of prawn heads diminishes greatly as the prawns get smaller.
  • Its best to use coarse ground black pepper, or if you have whole pepper corns (of any colour), that is even better.
 
Leave a comment

Posted by on February 4, 2020 in Appetizers, Chinese, Seafood


Tags: , , , , ,

Chinese-style Spicy Eggplant Casserole

(serves 4-6)
As Chinese New Year nears, I’ve been cooking more Chinese dishes, such as this Spicy Eggplant Braised in Clay Pot. In the winter time, it’s hearty nature will help warm up the whole family. The Eggplant in Clay Pot is a relatively common Chinese dish, as popular in restaurants as it is in the home kitchen, so it’ll be a good dish to try if you are cooking Chinese for the first time. It’s not complicated at all. Although this recipe involves quite a few Chinese sauces, they are the common and inexpensive ones, easy to find in the Chinese section of any large supermarket or any Chinese food store

Ingredients

  1. Minced Pork (200g)
  2. Eggplant (1)
  3. Garlic (6 cloves)
  4. Scallion (4 sprigs)
  5. Anchovies in Oil
  6. Toban Sauce
  7. XO Sauce
  8. Soy Sauce
  9. Oyster Sauce
  10. Chinese Wine
  11. Sesame Oil
  12. Corn Starch

note: Claypot is part of the name of this dish in Chinese (鱼香茄子煲) but you can easily cook this in any deep or large frying pan, and a claypot is not actually required.

Preparation

  1. Marinate the minced pork in a mixture of 1t soy sauce, 1T Chinese wine, 1T sesame oil and 3T of water.
  2. Peel and mince 6 cloves of garlic. Juliene the scallion, keeping the white bits separate from the green bits.
  3. You’ll need the long type of eggplant for this recipe, as some skin is best left on every piece to prevent the flesh from disintegrating when it is cooked. After removing the top, divide the eggplant into 4 cylinders. Slice each cylinder like you would a pie, the ones with a larger diameter into 8 segments, and the smaller ones into 6.
  4. On high heat, stir fry the eggplant in a large claypot (or pan) with 4T of oil until they begin to soften. As eggplants really like to absorb oil, you may need to add more oil halfway. Temporarily remove the eggplant from the claypot.
  5. Spoon 3t of anchovies in oil into the claypot. Add 2T of oil and under medium heat mash the little fishies until you get a paste. Add the minced garlic, the white bits of scallion and 2 heaped t of Toban sauce.
  6. Stir fry until everything is nicely combined, then add the pork and continue to stir fry until the minced pork falls apart and begins to shrink.
  7. Turn the heat down. Stir 1t of corn starch into 1/4 cup of water, making sure the starch is completely dissolved. Next, stir in 1T of Oyster Sauce and 1t of sugar into the water as well and then pour the starch mixture into the claypot.
  8. Stir occasionally to make sure nothing sticks to the bottom. After a while you should end up with something that looks like spaghetti bolognaise, as shown on the right. This is when you put the egg plant back into the claypot. Add 2 heaped t of XO sauce and simmer with the cover on until the egg plant is soft as shown in the top picture. This will take perhaps ten minutes.
  9. When the dish is done, turn off the heat and sprinkle the green bits of the scallion over the top as a condiment. Put the cover back on and serve everything in the claypot itself.

 Notes

  • You are not supposed to eat this Spicy Braised Eggplant by itself and it is traditionally served with steamed rice to balance out its strong taste, but if you are not into cooking rice, some egg noodles like fettuccine tossed in the sauce is a good alternative.
  • Here is some background on this casserole: The dish has its origins in Szechuan Province as a common stir fry dish, hence the use of Toban Sauce as its base. However, when the dish finds its way south to Hong Kong, the chefs there adapt the recipe to local tastes by cooking it in a wetter style inside a clay pot and adding bits of Cantonese salted fish to enhance its flavour. While not obvious to others, this is a really crazy combination, like putting sauerkraut in risotto, but it works. And that’s the story of this the Spicy Eggplant Casserole.
  • Cantonese salted fish is a rather exotic ingredient to expect of a Western kitchen, which is why I have substituted it with anchovies.
  • Some people like to add some corn starch to the pork marinade as well, which makes the pork softer. Personally I prefer more bite to the minced pork, but the jury is still out on whether this is better.
  • There is no need to soak the eggplant in salt water. It’s supposed to remove the bitter taste? But honestly I haven’t tasted a bitter eggplant in my entire life.
 
Leave a comment

Posted by on January 21, 2020 in Chinese, Main Courses, Seafood


Tags: , , , , , ,

The Dragon King’s Scallop Soup

(serves 8)
The Dragon King’s Scallop Soup is a fancy soup served in Chinese restaurants
carrying all the different tastes of the sea, such as prawn, scallop and crab, in a medley of tiny morsels. The soup uses a lot of different ingredients and involves a fair bit of work, but you would expect that for a soup that is fit for the Dragon King. I’ve worked the recipe such that it can be prepared in a Western kitchen, so you don’t have to worry about any exotic ingredients. With the Chinese New Year just around the corner, this is the perfect time to prepare such an extra special treat for your friends and family

Ingredients

  1. Scallops (300g)
  2. Medium Prawns (300g, about 12)
  3. Cooked Crab (1 tub, 8oz or 250g)
  4. Seafood Stock (4 cups)
  5. Eggs (3)
  6. Asparagus (6 spears)
  7. Carrot (1)
  8. Ginger (3 slices)
  9. Hard Beancurd (1 block, 340g)
  10. Straw Mushrooms (200g)
  11. Chinese Wine
  12. Bicarbonate of Soda
  13. Corn Starch

Preparation

  1. Prepare the seafood stock ahead of time in a large pot. See notes below.
  2. Leave the crab meat in a solution of 4T Chinese wine and 2 cups of water. Stir to loosen up the packed meat.
  3. Drain the beancurd block and flip it onto a large smooth plate. Using a butter (or other toothless) knife cut one slice lengthwise along the block that is one quarter of the width. Flop the slice onto the plate and gently move what is left to a new position by pushing along the entire surface with your open hand, such that there is sufficient space for another next slice to flop down. For the last 2 slices move the remaining beancurd to a spot that leaves space for them to flop in opposite directions. Cut each slice into cubes without moving them any further.Dragon Tofu
  4. Deshell and devein your prawns. Dice the meat into small pieces. Mix the white of one egg with a pinch of bicarbonate and 1 flat t of salt. Marinate the prawn in the egg white for 1 hour, then rinse off the egg.
  5. Dice the scallops and soak the pieces in a light brine made up of 2 cups of water and 2t of salt, for twenty minutes.
  6. Peel a carrot and dice it. Dice the mushrooms. Apply a peeler to the lower half of each asparagus spear to remove the fibrous layer and then cut the asparagus into thick slices.
  7. Drain the scallop and crab brine into the stock pot followed by 3 slices of ginger. Bring the stock to a low simmer.
  8. Heat up a few T of oil in a pan and pan fry the crab meat until most of its wetness has evaporated. Add one ladle of stock to the pan as a deglaze.
  9. Turn off the fire temporarily. Slowly drizzle the white of 2 eggs into the pot while stirring in a circular direction. Resume the simmer.
  10. Transfer the crab meat into the soup pot, followed by the diced carrots. Gently slide the beancurd from the plate into the pot. The beancurd is delicate so let gravity do the work.
  11. Wait for the soup to come to a simmer again. Mix 2T of corn starch with half a cup of cold water until the starch dissolves. Test with your fingers to make sure there are no lumps. Pour the starch mixture slowly into the pot while stirring gently. The soup will soon thicken.
  12. Bring the soup to a strong boil add the diced prawn and scallops, the asparagus and the mushrooms.
  13. In about 2 minutes when the asparagus has softened but is still crisp, turn off the heat. Stir in 1 flat t of white pepper. Add salt to taste and serve immediately.

 Making the Stock

  • The most common ingredient for boiling Chinese seafood stock is cured whole scallops (a.k.a. conpoy, pictured on the bottle label) but there are a variety of other cheaper alternatives to try such as cured whelk, conch and squid.
  • Fresh fish can be used for the stock, but it should be fried until it is crispy first. Fresh shellfish should be soaked in cold water first.
  • If you add the prawn heads to the stock you will get their extra flavour, but they will impart a reddish hue to the soup, which purists who expect a totally white soup will object to.
  • For the modern kitchen I recommend dried scallop granules (pictured, the whole bottle).  I usually use 1t of  per cup of water. Its convenient, cheaper but taste just as good. You can also use fish stock cubes, hon dashi granules or any combination of  everything mentioned above.
  • If you want more details, a few years ago I made an entire post about making Chinese Consume which you can refer to.

 Notes

  • Timing is everything in this recipe. If you cook the prawn or scallop too long they will get rubbery. If you cook the carrots or asparagus too long they will get mushy but you want them crisp. So cut and marinate everything ahead of time and follow the sequence of the recipe.
  • Knife work is also important, you want all the components to be of the same size, like in a Olivier salad. The reason you cube the beancurd first is to know the size of one cube. Dice everything else, the prawn, scallop, carrots etc. to the same dimensions.
  • Frozen seafood is no problem for this recipe, just make sure you defrost everything ahead of time. If you are buying frozen prawns that are already shelled, reduce the weight used accordingly. 
  • There is more than one type of beancurd. Make sure you buy the type that is hard or after some cooking the beancurd might disintegrate when your stir.
  • If you don’t have any Chinese wine, just use sherry.
  • If you can’t find straw mushrooms, you can substitute another type but make sure you choose a light coloured variety. Oyster mushrooms are a good alternative.   
 
Leave a comment

Posted by on January 12, 2020 in Chinese, Seafood, Soups


Tags: , , , , ,

Braised Dried Abalone with Mushroom

(serves 6)
Dried Abalone is one of the most exquisite of all Chinese delicacies and is served without fail at any respectable banquet. In Chinese cuisine, dried foodstuff when cooked properly is often preferred to the fresh original and Dried Abalone is considered to be the King of Dried Seafood. That’s why people take the effort to cook Dried Abalone over up to a weeks time. Compared to fresh abalone, Dried Abalone has a more intense flavour as well as a nicer tender texture to the bite.    
 

Ingredients Braised Abalone

  1. Dried Abalone (6 of 30g each)
  2. Dried Shiitake Mushrooms (6)
  3. Chicken Feet (12)
  4. Crushed Ginger (1T)
  5. Mini Chinese Cabbage (Bok Choy)
  6. Hon Dashi
  7. Chinese Wine
  8. Light Soya Sauce
  9. Oyster Sauce
  10. Brown sugar

Preparation 

  1. warning: this requires about a week of preparation.
  2. Soak the dried abalone in cold water. Keep in the fridge for 2 days changing the water every 12 hours or so. You can soak for a shorter period of time if you are using small abalone.
  3. The day after you put the abalone in the fridge start making the stock. Blanch the chicken feet in boiling water in a pot for a minute and then discard the water. Add 4 cups of fresh boiling water and bring to a simmer. Add 1T of Hon Dashi pellets. Simmer the stock for 20 minutesSnip This and allow to cool. Repeat the 20 minute simmer several times over a 24 hour period adding water as needed. If chicken feet make you squeamish or are hard to find, see my notes below for alternatives.
  4. After the long soak, you will notice you abalone have grown in size. Snip off the bits protruding from the round part of the abalone with scissors. It’s circled in red in the picture. This part contains the entrails of the abalone, so dig out any black bits you see as well. Then rinse well under running water.
  5. Place the abalone in a pot of cold water containing 1T of crushed ginger and 1T of Chinese wine. Bring to a boil and simmer for 15 minutes. This step removes some of the abalone’s seafood odour. Allow to cool and then discard the water.
  6. Pour the chicken stock through a strainer into the pot with the abalone. Add 1T soya sauce, 1T oyster sauce and 2T Chinese wine. Simmer for 20 minutes and allow to cool with the cover on. Do this 4 to 5 times a day for the next 4 to 5 days. Add more water as needed to ensure the abalone are submerged the entire time or else the exposed part will become dark and hard. At first you will notice a strong smell of dried seafood but do not be alarmed, this will diminish to a nice aroma before you are done. The danger of sticking to the pot’s bottom is greatest when you begin reheating, so check often until you see bubbling.
  7. On the third day of simmering, soak 6 shiitake mushrooms in cold water with 1t of brown cane sugar for an hour. Snip off the stems and add the mushroom caps together with the mushroom soaking liquid to the pot. Continue simmering as before.
  8. When the abalone is done it will be bigger yet again as the gelatin from the stock will have bloated it further. The circular bottom of the abalone is the hardest part so your abalone is done if that part has softened as much as the surrounding flesh.  When you cut the abalone in half the core should be of the same colour as the rest of the abalone.
  9. After the abalone is nice and soft, remove all the solids and boil down the liquid until it thickens into a light sauce. It is normal to serve the abalone with some baby bok choy or broccoli so add this to the sauce as you are boiling it down if you wish.
  10. Hydrating Abalone

Notesabalone in simmer

  • The best quality dried abalone is from Japan, they are the ones that soften most easily with braising. The medium sized ones are from Yoshihama while the large ones are from Amidori. They also happen to be the most expensive. For home cooking the ones from Dalian China are a good compromise in terms of price and quality. Abalone from South Africa is the cheapest, but they don’t tend to get as soft.
  • The size of dried abalone is measured in ‘heads’. This is the number of abalone in a catty (600g) and ranges from 6-30. The smaller the number, the bigger the abalone. The ones I used are about 20 head.
  • Dried abalone must be aged to draw out the correct taste. This is done (by the wholesaler) by alternately sunning the abalone and storing it in a jar over a few years, after which it will darken and develop a white dusty look. Beware of clean looking dried abalone of a light colour if you are buying through the internet, as they are un-aged.
  • The golden rule of rehydration is to use cold water. Do not use hot water as it makes rehydrated foodstuff tough and rubbery
  • The number of times you need to simmer depends on the size of your abalone. This recipe assumes size 20 head abalone. Smaller ones require less simmering and larger ones more simmering.
  • The best pot to simmer abalone in is one made of clay, as pictured. They spread and keep heat well. You can still use a metal pot if you don’t have one. 
  • Chicken FeetChicken feet is ideal for this recipe because of the gelatine it produces when boiled. They have very little fat but a lot of skin and connective tissue. Gelatine is the secret to the nice texture of rehydrated abalone. Pork tail also give off gelatine, but unlike chicken the taste of pork does not blend that well with seafood so you need to use pork that is not ‘porky’. I’ve also tried oxtail, taste-wise its not a bad alternative but oxtail leaves a lot of floaty bits and oil which you have to remove.
  • I have found hon dashi to be the easiest way to flavour the stock properly but a more traditional alternative would be to use dried scallops or conpoy.
  • A common use for any left over abalone sauce is to toss it with egg noodles, like a pasta sauce.
  • Don’t use fresh mushrooms as they have the wrong flavour and they would disintegrate with so much boiling anyway.
  • Here are some reference pages to Shiitake Mushrooms, Chinese Wine and Hon Dashi.
 
Leave a comment

Posted by on February 21, 2015 in Chinese, Main Courses, Recipe, Seafood


Tags: , , , , , , ,

Soya Sauce Braised Chicken

(serves 4)
Braising in soya sauce is one of the most basic Chinese cooking styles. My recipe is slightly modernized but its essentially the same Chicken In Soya Sauce that my mother used to cook for me when I was young. My ‘trick’ is to cook the chicken for only a short amount of time but have it soak in the braising liquid for a long time. The result is chicken that is really tender but still tasty. Its a great for to cook chicken if you don’t have an oven.   
 

Ingredients Soya Braised Chicken

  1. Chicken Leg with Thigh (4)
  2. Dark Soya Sauce (1/4 cup)
  3. Chinese Wine (1/4 cup)
  4. Onion (1)
  5. Maple Syrup
  6. Five Spice Powder
  7. Nutmeg
  8. Black Pepper

Optional Ingredients in photo

  1. Potatoes
  2. Bok Choi
  3. Egg
  4. Konnyaku Vermicelli (aka Shirataki)

Preparation 

  1. Defrost the chicken completely and pad dry with kitchen towels. Trim off any visible chunks of fat on the the thigh with a pair of scissors. The skin tends to shrink so leave any excess skin on.
  2. Marinate the chicken in 4T of maple syrup.
  3. Prepare your optional ingredients (see notes below) at this stage. If they require more than 7 minutes of cooking time, par-boil them for a while, otherwise, just cut them to the right size.
  4. Next, cut an onion into thick rings. Choose a pot which the chicken will fit snugly in a single layer. Stir fry the onions in the pot with 3T of vegetable oil over a very low flame.
  5. After the onion becomes soft and starts to caramelize, this will take some time, mix 1/4 cup dark soya sauce, 1/4 cup Chinese wine with 1 cup water and add this to the pot.
  6. Turn up the heat and bring to a strong boil. Add 1 heaped T of sugar, 1T five spice powder, 1T nutmeg and 1T black pepper.
  7. Arrange the chicken legs nicely into the boiling pot upside down and pour in all the left over maple syrup marinade. Top up with the optional ingredients to bring up the level of the liquid. Ensure the chicken is fully submerged. The vegetables don’t need to be completely covered as the liquid will be splashing about as it boils.
  8. Boil the chicken for exactly seven minutes. Leave the pot uncovered so the liquid can thicken and place the cover on only for the last 30 seconds. After turning the fire off, leave the pot covered for several hours, preferably overnight. This is the part where the flavour soaks into the chicken.
  9. You don’t want the meat to be overcooked, so remove the chicken first when reheating. When the braising liquid comes to a boil, turn the heat off before putting the chicken legs back in the pot. Give the chicken 5 min to warm up before serving.

Notes

  • You can swap in or add all kinds of other flavours to the soya sauce at step 6 depending on your preference, for example ginger slices, cinnamon, cloves.
  • There are many optional ingredients you can add to the pot with your chicken, just remember they must be of a type that does not adsorb too much flavour. For the photo I used potatoes, bok choy and shirataki, a yam based vermicelli which is already mostly water. Other possible options are chestnuts, yam and any kind of leafy vegetables.
  • If you don’t have Chinese wine, try sherry. My favourite for this recipe is actually sake. Do not skip the alcohol as it is needed to mellow out the soya sauce. It will evaporate anyway.
  • If you are using chicken breast meat, consider brining it first.
  • There will be lots of chicken-flavoured braising liquid left over. It is very useful. You can use it to braise additional vegetables that cannot be left in the braising liquid overnight, like eggplant, carrots, mushrooms. You can also use them to marinate boiled eggs (as in picture), as a BBQ marinade, to fry noodles etc. If you strain the liquid before storing it in an air-tight container in the fridge, it can easily last a fortnight (it should congeal into a gel).  
 
Leave a comment

Posted by on July 1, 2014 in Chinese, Main Courses, Poultry, Recipe


Tags: , , , , , , ,

Runny Yolk Boiled Eggs

(serves 4)
Half a boiled egg is perfect as an amuse-bouche or hors d’oeuvre. Its easy to prepare and can be cooked ahead of time. To avoid the powdery taste of fully cooked yolk, many recipes simply scoop the yolk out and mix it with something creamy like mayonnaise but I prefer the more natural solution, which is to have the yolk still runny after the white has cooked. In Japan, where the practice of eating Ramen with molten yolk eggs was developed, this type of egg is called Ajitsuke Tamago or just plain Ajitama for short.
 

Ingredients

  1. Eggs (4)
  2. Soya Sauce
  3. Chinese Cooking Wine
  4. Vinegar
  5. a Drawing Pin

Optional Ingredients

  1. Garlic (3 cloves)
  2. Smoked Salmon (25g)

Preparation
The first thing anyone learns about boiling eggs is to put cold water in the pot with the eggs to prevent them from cracking and leaking. This golden rule does not hold here as timing is absolutely crucial in having the yolk runny and white solid. Not to worry, there is a trick to that.

  1. Store your eggs in the fridge first and then submerge them in some tap water for 5 minutes to bring the temperature of the shell up but allow the yolk to stay cold.  A fresh egg will sink completely in water. If part of an egg floats above the water surface that means an air pocket has built up inside and it is a few weeks old – you may want to cook that egg fully. Also an air pocket means part of the boiled egg will be flat and the yolk will end up off-centre.
  2. Next heat a pot of water, adding a T of vinegar. Make sure you have sufficient water to cover the eggs.
  3. Using a drawing pin, punch a small hole at the base (the wider end) of the each egg. This will serve to relieve stress on the shell and prevent cracking since you are putting the eggs directly into boiling water.
  4. When the water is boiling strongly, lower the eggs into the boling water. If the water stops boiling momentarily after you put the eggs in, you are using too little water. Simmer from 6 minutes for medium sized eggs to 7 minutes for XL sized eggs. Use a wire mesh ladle so you can put the eggs in and take them out all at the same time.
  5. As the eggs are simmering, prepare a bowl of iced water. Once the eggs are ‘done’ transfer them immediately to the iced water to prevent further cooking.
  6. After the eggs have cooled sufficiently, and it is best to leave them in the fridge for a while, tap them over their entire surface to fully crack the shells. As the eggs are cold, the egg itself should have shrunk enough to detach itself from the shell membrane and this will help you to avoid damaging the eggs’ surface as you peel them.
  7. Mix 4T soya sauce, 2T Chinese Cooking Wine and 1t of sugar in the smallest container you have that can house the eggs without stacking them.  Top off with water, stir and place the eggs in, making sure they are fully submerged. Cover with clear film and refrigerate for a few hours, or overnight if possible. After the eggs are stained, they will retain some taste from the marinade.
  8. Near the time of dining, slice each egg into two, and place a few drops of the marinade onto the yolk to impart some taste to them.

Optional (i.e. if not eating with Ramen)

  1. While you are letting the eggs warm to room temperature, peel and slice three cloves of garlic as finely as you can and pan fry them in a dash of oil till they are golden.
  2. Cut a slice of smoked salmon into tiny squares.
  3. Use them both as condiments for your egg as shown above.

Notes

  • This type of egg, that is to say Ajitama, is served with many types of Ramen.
  • If you happen to be making Chashu for Ramen you can use the stewing liquid as the marinade instead of making it from scratch. The soya component of the marinade can also be replaced with things like olive tapenade, tea leaves or mashed anchovy.
  • If you want to use a zip-loc bag to marinate the eggs in, make sure the bag is kept in a bowl the entire time.  When you lift the bag without a bowl, its narrow base can squeeze the eggs and cause ruptures, especially if you are making many eggs at once.
  • The iced water is essential. Instant cooling will help ensure that your eggs are cooked to the correct degree each time. Besides, slow cooling results in a grey coating on the yolk which we’d like to avoid.
  • The purpose of the vinegar is to coagulate any egg white that escapes through the tiny holes you punched in the egg shells.
  • The boiled egg is versatile. Other than the garlic/smoked salmon condiment combo suggested, you can try a wide variety of savoury alternatives like caviar, salmon roe, crispy fried bits of Iberico ham etc.
 
Leave a comment

Posted by on December 5, 2010 in Appetizers, Japanese, Recipe


Tags: , , , ,

Chinese Cooking Wine

When one mentions Chinese cooking wine, they are usually referring to a rice wine callled Shao Xing Hua Diao (To make life easy, I’ll just refer to it as Chinese wine in this post). Shao Xing is a reference to where the wine is traditionally made, much like ‘St. Emilion’. Hua Diao is a reference to a fermenting procedure using certain ingredients, akin to a term like ‘Riesling’. To be entirely accurate, Hua Diao derives from the ornate carvings on the clay containers that the folk would bury their wine in while it fermented, often for several years.

In China, there are two main types of liquor. Distilled liquor is called white liquor (i.e. spirits), while the fermented liquor is know as yellow liquor (i.e.wine). Shao Xing Hua Diao is one of the primary yellow liquors. It is light brown in colour, in a shade that is quite close to whiskey and has a typical alcoholic content of 16%, although I have come across ones that go as high as 19%. They come in bottles of all shapes and sizes as you can see from the three bottles I had lying around the house. Those that come in brown glass are of a better quality and they’re easily available from any kind of store selling Chinese foodstuffs.

As I mentioned at the beginning, Chinese wine is fermented from rice. When rice wine is mentioned, Japanese Sake, another type of wine that is fermented from rice immediately comes to mind. And in fact, it would be quite instructional to include a brief comparison of the two. I have no doubt they started out as similar wines sometime in perhaps the Tang dynasty. The Japanese over their centuries of isolation learned to refine the sake producing process, to arrive at the clear and delicate white liquor that we enjoy today. This has made sake less versatile in the cooking arena, although it is still useful for specific dishes or purposes.

In contrast, Chinese wine was left behind in the evolutionary race. It has retained a more rural and relatively unsophisticated character (to me anyway, I’m sure there are plenty of people who beg to differ). I’d describe Chinese wine more as a sugarless liqueur than an essential part of a bartenders’ inventory, which brings me to why Chinese wine is such a wonderful addition to the kitchen. The traditional alcoholic beverages used in Western cooking, be it wine, port, sherry or cognac are made from fruit, and as a result they all have sweet undertones. They are complimentary ingredients and they add their own distinctiveness to the dish that is being created. Chinese wine on the other hand is a supplementary ingredient, thanks to its earthy and slightly salty flavour. I myself do not know of any other wine that is salty. This allows it to blend into a dish, remaining unidentified by the untrained palate. This makes it unique. Don’t judge it by its raw taste. Its value-added when it comes to cooking is not immediately obvious. Chinese wine has been used in Chinese cooking for ages. Perhaps you have had the fortune of trying a Chinese dish with the word ‘drunken’ in its name, such as drunken chicken or drunken prawns? These contain a sizable amount of Chinese wine.

So how can you use Chinese wine? The closest Western analogue that comes to mind is sherry. Any part where a recipe says add a dash of sherry to a soup or sauce, you can substitute Chinese wine. It can also be used as part of marinades, and is especially useful for freshening up seafood. I have also used it to great effect as a deglaze over pan-fried meat, say like over the bacon in a carbonara sauce. A spot of Chinese wine might also go well with various cold dishes. Anyway, you’re not really going to see many recipes asking you to add Chinese wine. Even in my own posted recipes, I’ll plop in cognac, rum etc. to suit the general populace, even though I might be actually using Chinese wine myself. My point is, experiment with it… and maybe you’ll get to experience that little twinkle of delight when you guests just can’t put their finger on your ‘secret ingredient’.

If you liked this post on Chinese Cooking Wine, you may also be interested in my post on its sweet complimentary, Mirin.

 
11 Comments

Posted by on November 2, 2010 in Chinese, Ingredients


Tags: , , ,