(serves 4)
In winter curry is a really nice hearty food that warms you up. This is a great basic Southern Indian curry recipe suitable for most palates and ideal for those cooking curry for the first time. It is mild in two ways. The grassy flavour of mutton is greatly reduced and so people who don’t like the taste of lamb may find it actually quite nice. It is also not very spicy, so those who don’t fancy spicy foods might still find it acceptable.
Ingredients
- Lamb Belly (500g)
- Potato (2 Large)
- Carrot (1)
- Onion (1)
- Shallots (4)
- Coconut Milk (1 Cup)
- Curry Powder
- Caraway Seeds
- Cumin
- Turmeric
- Vegetable Cube
Preparation
- Cut the lamb into one inch cubes. Trim off any obvious large layers of fat. It’s easiest to do this when the meat is semi-frozen, but warm to room temperature using water before proceeding with the next step.
- Place the lamb pieces in a pot and pour in boiling water from a kettle until the water level is a inch above the meat. Stir, wait 5 minutes, and pour the water away.
- Take the meat out of the pot and dry the pot over the stove.
- Peel and julienne 4 shallots. Using a low flame, pan fry the shallot slices in 4T of oil.

- When the shallot begins to brown add 4T Curry Powder and 2T Cumin to the pot and stir fry. Add water a bit at a time until you end up with a watery paste.
- Add 5 cups of water. When this comes to a boil, add the lamb belly pieces followed by 1t turmeric, 1t caraway seeds, 1 vegetable cube, 2t sugar and 2t salt.
- Cover the pot and keep it on a low simmer for 45 minutes.
- In the meanwhile, peel and cut the carrots into half inch thick discs and the onion into twelve wedges. Peel and cut each potato in 4. Dice one of the quarters into tiny cubes (you want them to disintegrate).
- After the 45 minutes is up, add the vegetables and 1 cup of coconut milk and simmer for a further 30 minutes. Boil uncovered and use this period to manage the thickness of curry to what you prefer.
- This curry can be prepared ahead of time and reheated for serving. Depending on the curry powder you may need to add more salt. Remember to taste before serving.
Notes
- Your curry is ideally served with rice, which you will also have to cook. A long grained rice is ideal, like Indian Basmati or Thai Jasmine rice. Any kind of sturdy bread, like Paratha, Naan, or even French Baguette would be an alternative staple.
- In case you are wondering what kind of curry powder to buy, you can refer to the contents of the curry powder I use pictured above. Once you examine what curry powder is made of, you’ll realize that the addition of 2T of cumin in the recipe serves to dilute the overall amount of chili, thus making the curry less spicy.
- The coconut milk also makes the curry less spicy, so if you want a more spicy curry, use only half a cup of coconut milk.
- If you are the type who wants the full flavour of lamb, skip step 2 whose purpose is to reduce the grassy overtones of the lamb. You can also use a lamb stock cube instead of a vegetable stock cube. As for myself, I usually use 1T of red miso in place of the vegetable cube. This really enhances the taste of the whole dish.
- This recipe can easily adapted to make chicken curry. Leave out the caraway seeds and use a chicken cube instead. Chicken doesn’t need to be cooked for that long so skip the entire 45 minute simmer and add the chicken pieces together with the vegetables in step 9.
- If you want a more northern taste to your curry, use plain yogurt in place of coconut milk and cherry tomatoes in place of the carrots.
Tags: Coconut, Cumin, Curry, Lamb, Onion, potato, Rice
(serves 8)
Gratin Dauphinois, or as the French call it Gratin de Pommes à la dauphinoise, is the fine dining version of scalloped potatoes. It is a dish of layers upon layers of thinly sliced potatoes bathed in creamy savoury goodness. Perhaps Gratin Dauphinois is the crème de la crème of potatoes precisely because of the amount of cream and milk it incorporates. This explains why it beats all other potato dishes hands down even though there is nothing special about it ingredients, and its method of preparation is unremarkable. It goes without saying Gratin Dauphinois is something every decent cook should have in his repertoire.
Ingredients
- Waxy Potatoes (750g)
- Cream (200ml)
- Milk (200ml)
- Garlic (2t minced)
- Shallots (2)
- Parmigiano-Reggiano (40g)
- Butter
- Sherry
- Cumin
- Tarragon
Preparation
- Slice the potatoes. Each slice should be about 1/8 of an inch or 3mm thick. As its the waxy type of potatoes you can leave the skin on.
- Mince a few garlic cloves until you get 2 heaped teaspoons of garlic. Finely chop 2 shallots.
- Put 200ml of whipping cream and 200ml of milk in a pot together with the garlic and shallots. Add 1t salt, 1t cumin, and 1t tarragon and bring to a boil.

- Arrange the potato slices into the pot, vertically as best you can. Add 1T of sherry and simmer for ten minutes, stirring gently occasionally to nudge apart any slices stuck together. Then allow the pot to cool.
- In the meanwhile butter a 2 quart sized (i.e. holds 8 cups) casserole, preferably one with a cover. Preheat your oven to 175oC (350oF).
- When the pot has cooled and the liquid within has visibly thickened, layer the potatoes a slice at a time into the casserole dish using a table spoon. Ensure each slice is coated in cream and take care to minimize any empty spaces. Spoon any remaining sauce, there shouldn’t really be much left over, over the top.
- Cover the casserole and cook in the oven for 25 minutes. If you don’t have a proper cover, just use foil snugly crimped over the top edges of your casserole dish.
- In the meanwhile grate 40g of parmigiano-reggiano.
- Take the casserole out of the oven, but leave the oven on. Using a spatula, press down on the potatoes firmly to compress them. Sprinkle the grated cheese evenly over the potatoes. Return the casserole to the oven uncovered and bake for a further 15 minutes, or until you see a nice golden cheese crust.
- You may serve your gratin dauphinois in the casserole or in square cake-like blocks on the plate with the main dish.
Notes 
- The boiling in the pot allows the cream and milk to interact with the starch of the potatoes, so it thickens before you begin layering. This is the only way the slices will be coated properly. If you are thinking to skip a step and arrange the raw potato slices in the casserole to do all the cooking in one shot in the oven, it won’t work. The potato slices will end up stacked together as if they weren’t sliced at all and all you end up with is boiled potatoes.
- Also you can’t just pour the potatoes and cream from the pot into the casserole in one go. There will be too many gaps and all the liquid will end up at the bottom.
- Gruyere is the other cheese commonly used to top off this dish. You can also try a combination of both gruyere and parmigiano.
- You can do most of the preparation of your Gratin Dauphinois ahead of time, up to the point you have baked the casserole the first time and compressed it. You can even keep the casserole in the fridge overnight. Continue with the cheese and final bake when it’s dinner time.
- Although I’ve suggested waxy-type potatoes because they hold their structure better, if you decide to use starchy-type potatoes, remember to peel the potatoes before slicing them.
- Pommes Dauphine is a deep fried cheese ball, a different thing altogether; just in case you got confused.
Tags: Cheese, Cream, French Cuisine, Parmigiano-Reggiano, potato, Sherry
(serves 4, or more depending on size of bird)
Spatchcock is a fancy word for butterflying the whole chicken. It sounds hard, but its quite the opposite. There are many advantages to spatchcocking. First and foremost a flattened chicken roasts more evenly, resolving a major issue with roasting chickens for those without a rotisserie; the thighs take longer to cook than the breast, but ironically when you roast a whole bird it is the breast that is more exposed to heat. Spatchcocking exposes the legs more and brings the breast down, saving the day. In addition, a spatchcocked chicken cooks in half the time and is in a more convenient shape for fitting on a fridge shelf.
Ingredients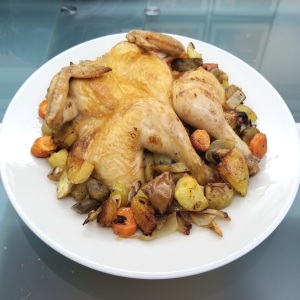
- Chicken, whole (1)
- Onion (1)
- Potatoes (2)
- Yam (1)
- Carrot (1)
- Salt
- Brown Sugar
- Butter
- Rosemary
- Fennel Seeds
Preparation Part I
- You have to begin preparation the night before.
- Starting on either side of the bishop’s nose, cut towards the corresponding side of the chicken’s neck (as per the picture below). This is best accomplished using a pair of kitchen shears. You will need to cut through the ribs, but not to worry, these are pretty flimsy in a chicken.
- From the inside of the chicken, snip an incision along the cartilage of the breast bone (it is white) top to bottom to weaken it. Be careful not to pierce the skin on the other side.
- Flip the bird over and press down on the breast with both hands to flatten it. You should end up with the iconic cartoon heart shape chicken breast.
- Prepare a brining solution using 1T salt, 1t brown sugar for every two cups of water. Make enough brine to ensure the entire chicken is submerged. Brine the chicken for 8 hours. If the weather is warm, either add a some ice every once in a while or leave the brining bird in the fridge.
Preparation Part II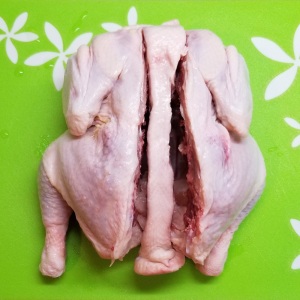
- When the brining is done (presumably the next day), place the bird on a wire tray to dry (as shown below). This will take several hours and again is best done in the fridge. Alternatively you can use a portable fan.
- You must dry the bird properly for it is the key prerequisite to a properly roasted chicken. The chicken is considered sufficiently dry when you put a piece of kitchen towel on it and the paper remains dry but sticks to the skin like a second skin.
- In a small pan, heat 1 heaped t of dried rosemary, 1 heaped t of fennel seeds in 4T of oil until you can smell a strong aroma. Turn off the heat before the herbs get burnt. Leave the pan on the stove while the chicken is drying; more herb flavour will be infused into the oil.
Preparation Part III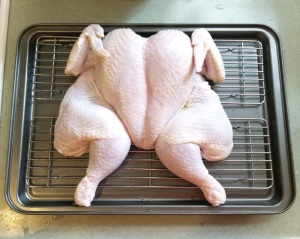
- Cut the potatoes and the yam into chunks. Depending on the variety you may want to peel them first. The yams should be double the size of the potatoes as they cook faster.
- Cut the carrot into discs and the onion into small wedges. Place all the vegetables on a baking tray.
- Preheat the oven to 205oC (400oF).
- Reheat the infused oil. When the oil becomes less viscous, strain the oil into a container. Add a large knob of butter to the oil. Next dissolve half a t of salt in the butter-oil mixture. Drizzle half of this mixture over the vegetables using a spoon.
- Position the chicken over the vegetables on the tray. Make sure all the vegetables end up under the chicken as any piece left exposed will become burnt beyond recognition.
- Paint the remainder of the oil-butter mixture on the chicken with a brush.
- Place the chicken in the oven for 45 minutes, 50 minutes if it is a bigger bird.
- When the chicken is golden brown, remove the pan from the oven without turning it off. Place the chicken on a large serving plate to rest after giving it a light dusting of pepper.
- Roll the vegetables about in the tray to cover them with drippings, space them evenly and place the tray back in the oven for around 10 minutes. When the vegetables have caramelized sufficiently, arrange them around the chicken on the plate. Pour any remaining drippings over the chicken and serve.
Notes
- As you can see from the pictures, the legs were open at an angle while drying but became parallel to each other after cooking as the meat contracted. Purists will secure the chicken with 2 long metal skewers in an X pattern, from the left thigh through to the right breast and vice versa to keep the chicken completely flat. This also helps all the skin brown more evenly. I think its a bit of an overkill, but skewers are definitely a good idea when BBQing.
- My brining mixture is a relatively weak one as we are brining the whole chicken and not just the breast. If you like your roast chicken on the salty side, you can double the salt in the butter-oil mixture to a full teaspoon.
- The back and spine that is cut out is good for boiling stock. If you don’t need it concurrently, you can wrap it in cling film and freeze if for later.
Tags: Brine, Butter, Carrots, Chicken, Onion, potato, Rosemary
(serves 10)
New England or Boston Clam Chowder, the ultimate blending of seafood and vegetables in a hearty soup. When you are making America’s most famous soup there are a few things you want. Thicken the chowder without any taste of flour, make the chowder faster without having to wait an eternity for the potatoes to disintegrate, give the chowder rich layers of flavour. After a lot of trial and error, I think I have come up with just the right recipe to achieve all these things.
Ingredients
- Canned Clams in Brine (4 x 184g)
- Bacon (6 slices)
- Canned Anchovies in Oil (50g wet weight)
- White Wine (0.5 cup)
- Potatoes (4 large)
- Leek (1 stalk)
- Onions (2)
- Scallion (10 stalks)
- Mascarpone (125g)
- Bread (4 slices)
- Hon Dashi
- Sherry
- Dill Weed
Preparation Part I
- Cut the crust off 4 slices of bread and leave in the fridge to dry overnight.
- Peel the potatoes. Boil 2 (not all 4) of them in a large pot with 10 cups of water.
- While the potatoes are boiling, cube the bread into 1cm pieces and crush them into crumbs in a plastic bag with a mallet. Toast the bread cubes lightly if they are not crispy enough to be smashed.
- Dice 5 slices of semi-frozen bacon and allow them to thaw.
- Fish the potatoes from the pot after boiling them for 20 minutes. Keep the water on a low simmer and put the bread crumbs in.
- Julienne the onions. Partially open a tin of anchovies and pour its oil into a pan. Fry half of the onions on low heat in the pan, stirring occasionally.
- In the meanwhile dice the remaining 2 potatoes into 1cm cubes. Julienne the scallion and the leek. Don’t add them to the pot just yet; you can put the cut vegetables with the raw onion bits.
- When the onions have become limp and translucent, mash the anchovies in the tin itself and add to the pan. Stir fry for a minute to mix the anchovy into the onions, turn up the fire and then deglaze the pan with half a cup of white wine. Bring to a boil and after a minute pour the contents of the pan into the simmering pot.
- Next, stir fry the bacon bits in the same pan. When the bacon fat has rendered and the bacon begins to brown add the brine from the clams, reserving the meat for later use. A minute after it reaches boiling, pour the contents of the pan into the (still simmering) pot.
- When all the breadcrumbs have melted, mash the 2 cooked potatoes and add the mash to the pot followed by all the vegetable bits (including the raw potato). Add 1T of Hon Dashi pellets, 1T dill weed and 1t sugar. Top up with water such that everything is submerged. Continue to simmer for another 30 minutes stirring occasionally, then leave the pot covered on the stove to cool.
- When you are about ready to serve your clam chowder, bring the pot back to a boil and add the clam meat. Place 125g of mascarpone in a bowl with some hot liquid from the pot. Mix until all the lumps are gone and pour back into the pot.
- Add 3T of sherry and 1t black pepper, simmer for a further 5 minutes and then add salt (and sugar) to taste. Serve with oyster or other similar type of unsalted crackers
Notes
- If you have fresh small neck clams you can add that to the chowder in step 11, but you still need to use the canned clams, for the clam brine.
- Yes I did not use any celery in my recipe, its not essential in my opinion. If you insist on adding some chopped celery, fry them with the onions in step 6.
- If you are using waxy type potatoes, you can keep the skin on the diced potatoes if you prefer. Depending on the size of your potatoes you may need more than 4; I’ve assumed the use of large ones. For a thinner chowder, use only 1 mashed potato.
- If you don’t have any Hon Dashi, you can substitute in any kind of seafood-type stock cube.
- I also have a more traditional Boston Clam Chowder Recipe here.
Tags: American Cuisine, Anchovy, Bacon, Clams, Leek, Onion, potato, Scallion, Soup
(serves 8-10)
The Russian Potato Salad (some people say Ukrainian) is the king is potato salads, so much so it is more of a cold appetizer than a side dish. It has great texture, being the perfect blend of starchy vegetables, crunchy vegetables and meat. It also looks great, its a kaleidoscope of colours bathed in a milky white dressing. Most importantly Russian Potato Salad tastes great. A perfect dish to make ahead of time so there is less time-pressure when you are cooking and serving your meal.
Ingredients
- Potatoes (6 = 3 cups)
- Carrots (3 = 1.5 cups)
- Frozen Peas (1.5 cups)
- Red Onion (1/4)
- Eggs (4)
- Ham (200g)
- Heinz Sandwich Spread (1/3 cup)
- Sour Cream (1/3 cup)
- Mayonnaise (1/3 cup)
- Liquid Smoke
- Dill Weed
Preparation
- Boil 4 eggs in a pot, starting with cold water. Simmer for 10 minutes once it is boiling and then place the eggs in cold water.
- Peel the carrots and potatoes and cube them into 1cm blocks. Place the cubed potato and carrot in a large sauce pan and add boiling water from a kettle. Add just enough water to cover everything and bring to a boil.
- Simmer for 8 minutes once it is boiling. Strain

better to cube first, then boil
through a colander and after a minute pour into a large salad bowl lined with some paper towels.
- Rinse the peas in water to remove any ice and then place those into the same pan. Again add just enough water to cover everything and bring to a boil. Simmer for 3 minutes once it is boiling. As with before strain through a colander and then add to the salad bowl.
- Julienne 1/4 of a red onion and cube 200g of ham.
- Mix 1/3 cup Heinz Sandwich Spread, 1/3 cup sour cream, 1/3 cup mayonnaise, 1T of dill weed, 1T of liquid smoke in a bowl. Add also 0.5t each of sugar, pepper and salt.
- Remove the paper towels from the vegetables.
- Peel the eggs and put them through an egg slicer a few times. The whites should end up cubed while the yolk should fall apart. Add the egg bits to the bowl together with the chopped onion and ham. Mix everything up gently and then add the dressing and do a second mixing.
- Refrigerate at least for a few hours before serving.

everything the same size
Notes
- Some people call this the Olivier Salad, after a Chef Olivier who served a similar style salad in the Moscow Hermitage Restaurant. That may well have been the original inspiration for this salad but its quite different, containing more exotic ingredients like grouse, crayfish and capers.
- One important feature of the Russian Potato Salad is all (except the onion) the pieces should be of the same size. Since you can’t change the size of the peas, that becomes your standard.
- Do not use canned peas, they are too soft and mushy and will get mashed.
- Heinz Sandwich Spread provides the taste of pickles and additional layers of flavour. It is the ‘secret ingredient’ of my recipe. If you can’t find some you can chop up some pickled gherkins with 1/3 cup of Crosse and Blackwell Salad Cream as an alternative, that’s how I used to do it.
- Everybody has their own version so feel free to experiment. You can use roast chicken or bologna instead of ham, these are the common alternatives for meat. Swap in beetroot if raw onion is not to your liking. You can also choose to leave the egg yolk out.
Tags: Carrots, Egg, Ham, Mayonnaise, Peas, potato, Salad, Sour Cream
(serves 6)
This Duck and Sherry Pie is a great festive dish for the winter season. It is quick and convenient as the Duck Confit (Cuisse de Canard Confit) will provide all the flavor that you’ll need. And the meat in Duck Confit already comes tender, so you don’t need to stew any duck for hours either. Furthermore the recipe resolves the issue of confit being overly salty by cooking the pie filling with sherry and sweet potatoes.
Ingredients
- Duck Leg Confit (2)
- Carrot (1 large)
- Onion (1)
- Sweet Potato (2)
- Mushrooms (100g)
- Peas (1/2 cup)
- Milk (1 cup)
- Sherry
- Mustard
- Flour
- Potato (2) – for the crust
Preparation
- Peel sweet potatoes and carrot. Cut the sweet potatoes and the mushrooms into 1 inch pieces. Dice the carrot and onion into 1/2 inch cubes or pieces.
- Debone the duck confit. This should be an easy task as the meat is practically falling off the bone anyway. Break up the duck meat into large chunks with two forks. Gently heat the duck confit in a pot, just enough to liquefy the lard the confit comes in.
- Spoon 6T of the duck oil into a pan and decant the rest into a bowl or jar for storage.
- Place the pan on a low fire and fry the onion and carrot bits until the onion softens.
- Sprinkle on 2T of flour and continue to stir fry for a minute. Slowly stir in 2/3 cup of milk, followed by 1/2 cup of sherry. Next add sufficient hot water to result in thin sauce. Add the sweet potatoes and simmer for 5 minutes.
- Next add the mushroom, peas and duck to the pan. Sprinkle on 1t sugar, 1t mustard and 1t of black pepper. After simmering for a further 5 minutes your filling will be ready.
- For the crust, boil 2 large potatoes for 15 minutes, peel and then mash them with 1/3 cup milk and 2T of duck oil.
- Pour your pie filling into either a large baking dish or spoon into individual ramekins or gratin dishes. Cover with a layer of the mash. Bake in the oven at 180oC until the crests of the mash get brown.

Notes
- For a traditional pastry type pie, skip step 7 & 8 and follow the procedure as described in my Savoury Pies Page.
- You’ll notice that we didn’t need to use any salt, stock cubes or herbs. This is because confit is pre-marinated with herbs, garlic and a hefty amount of salt and then cooked in its own rendered lard as you will see from my Duck Confit Page, If we had used butter and flour to make the sauce instead, you’d need to add all kinds of other ingredients to get the taste right.
- As you are not baking the duck confit directly to get a crispy skin, there is no need to buy ‘fresh’ duck confit from the grocer. Those that come in a can are perfectly fine for this recipe.
- Some of my friends prefer to eat my duck filling with bread instead of inside a pie, as pictured at the top of the page. This is even more convenient.
- If you would like a creamier pie, add 2T of sour cream in step 6.
Tags: confit duck, Duck, Pie, potato, Poultry, Sherry, Sweet Potato
(serves 4)
Braising in soya sauce is one of the most basic Chinese cooking styles. My recipe is slightly modernized but its essentially the same Chicken In Soya Sauce that my mother used to cook for me when I was young. My ‘trick’ is to cook the chicken for only a short amount of time but have it soak in the braising liquid for a long time. The result is chicken that is really tender but still tasty. Its a great for to cook chicken if you don’t have an oven.
Ingredients 
- Chicken Leg with Thigh (4)
- Dark Soya Sauce (1/4 cup)
- Chinese Wine (1/4 cup)
- Onion (1)
- Maple Syrup
- Five Spice Powder
- Nutmeg
- Black Pepper
Optional Ingredients in photo
- Potatoes
- Bok Choi
- Egg
- Konnyaku Vermicelli (aka Shirataki)
Preparation
- Defrost the chicken completely and pad dry with kitchen towels. Trim off any visible chunks of fat on the the thigh with a pair of scissors. The skin tends to shrink so leave any excess skin on.
- Marinate the chicken in 4T of maple syrup.
- Prepare your optional ingredients (see notes below) at this stage. If they require more than 7 minutes of cooking time, par-boil them for a while, otherwise, just cut them to the right size.
- Next, cut an onion into thick rings. Choose a pot which the chicken will fit snugly in a single layer. Stir fry the onions in the pot with 3T of vegetable oil over a very low flame.
- After the onion becomes soft and starts to caramelize, this will take some time, mix 1/4 cup dark soya sauce, 1/4 cup Chinese wine with 1 cup water and add this to the pot.
- Turn up the heat and bring to a strong boil. Add 1 heaped T of sugar, 1T five spice powder, 1T nutmeg and 1T black pepper.
- Arrange the chicken legs nicely into the boiling pot upside down and pour in all the left over maple syrup marinade. Top up with the optional ingredients to bring up the level of the liquid. Ensure the chicken is fully submerged. The vegetables don’t need to be completely covered as the liquid will be splashing about as it boils.
- Boil the chicken for exactly seven minutes. Leave the pot uncovered so the liquid can thicken and place the cover on only for the last 30 seconds. After turning the fire off, leave the pot covered for several hours, preferably overnight. This is the part where the flavour soaks into the chicken.
- You don’t want the meat to be overcooked, so remove the chicken first when reheating. When the braising liquid comes to a boil, turn the heat off before putting the chicken legs back in the pot. Give the chicken 5 min to warm up before serving.
Notes
- You can swap in or add all kinds of other flavours to the soya sauce at step 6 depending on your preference, for example ginger slices, cinnamon, cloves.
- There are many optional ingredients you can add to the pot with your chicken, just remember they must be of a type that does not adsorb too much flavour. For the photo I used potatoes, bok choy and shirataki, a yam based vermicelli which is already mostly water. Other possible options are chestnuts, yam and any kind of leafy vegetables.
- If you don’t have Chinese wine, try sherry. My favourite for this recipe is actually sake. Do not skip the alcohol as it is needed to mellow out the soya sauce. It will evaporate anyway.
- If you are using chicken breast meat, consider brining it first.
- There will be lots of chicken-flavoured braising liquid left over. It is very useful. You can use it to braise additional vegetables that cannot be left in the braising liquid overnight, like eggplant, carrots, mushrooms. You can also use them to marinate boiled eggs (as in picture), as a BBQ marinade, to fry noodles etc. If you strain the liquid before storing it in an air-tight container in the fridge, it can easily last a fortnight (it should congeal into a gel).
Tags: Chicken, Chinese Cuisine, Chinese Wine, Eggs, Maple Syrup, Nutmeg, potato, Soya Sauce
(serves 6)
Boston Clam Chowder is a clam chowder of the white variety that is popular in the New England area. Its basic ingredients are pretty standard, but it is precisely the combination of clams, bacon, onions, potatoes that makes the Boston Clam Chowder such a favourite. Its perfect for cold weather, or just anytime you hunger for a hearty soup. Once you know the secret to thickenining a chowder properly, whipping up a batch is not all that difficult.
Clarification – just because there is no cream doesn’t mean this is a healthy recipe.
Ingredients 
- Canned Clams in Brine (3 x 184g)
- Smoked Clams in Oil (1 flat tin)
- Onion (1)
- Fennel (equivalent of 1 onion)
- Bacon (6 slices)
- Potato (2)
- Milk (1 cup)
- Butter (50g)
- Flour
- Sage
- Thyme
- Cognac
Preparation
- Julienne the onion and fennel into small bits. For this part you only need the fennel bulb, but you can save the leafy bits (some people call it the frond?) for garnishing.
- Cut the bacon into small squares; the bacon will be easier to handle if it is stacked and semi frozen.
- Peel and dice one potato into small bits that will disintegrate after some simmering. This will make the chowder thicker. Cut the second one into large cubes that will remain intact.
- Fry the bacon bits in a pan on low heat to melt its fat. When the bacon is beginning to crisp nicely, add the onion and fennel and stir fry till they begin to caramelize. Turn up the heat and add the clams, including their brine.
- Pour everything into a soup pot. Add the potato and 2 cups of water. Set to a low simmer.
- Dry the pan with some kitchen towels and melt 50g of butter in it on a low flame. When the butter has melted, sprinkle in 2T of flour and stir fry till the flour begins to darken. Next, pour in 1 cup of milk very slowly, stirring vigourously the entire time to flatten lumps.
- After a while, you will end up with a thick white sauce. Add the tin of smoked clams to the sauce, including all the oil. Stir in some of the soup into the white sauce till it gets watery, then pour everything back into the soup pot.
- Add 1t thyme and 1t sage to the pot and simmer for an hour. You’ll need to stir occasionally to prevent bits from sticking to the bottom. Add hot water to bring the soup back to the right consistency as needed. At the end, a piece of bread should be able to stand (not just float) on the chowder. With 5 minutes to go, add 2T of brandy.
- Season only after the simmering is done. Taste first before adding salt. Depending on how salty the clam brine was, you may (or may not) need to add a pork / vegetable bullion cube. On the soup plate itself, garnish with black pepper and fennel leaves, plus some chopped parsley if you like.
Notes
- Use only the bottled variety of clams. Any food canned with brine will acquire a metallic taste and thus clams in a can are a no,no. The smoked clams are in oil, so the ‘can rule’ doesn’t apply.
- If you have the good fortune to be using fresh clams, all the better. Soak your clams in cold water to get them to extrude sand, and then quickly cook in boiling water for a minute. Use the boiling liquid in the soup as per the brine mentioned above but add the clams (after shelling) only at the very end – so the meat remains tender.
- If you don’t want to use or can’t find fennel, substitute with celery.
- The white sauce is an essential step so don’t think you can skip it. The flour will soak up the oil from the bacon and smoked clams. Otherwise, you may end up with droplets of oil floating on the surface.
- How come some restaurant’s clam chowder is so much whiter? They use milk in step 5.
- I also have a Flourless Boston Clam Chowder Recipe here.
Tags: American Cuisine, Bacon, chowder, Clams, Fennel, potato
(serves 6-8)
Chicken Salad is everyone’s favourite. It tastes even better if you make it with brined chicken and avocado. In this recipe, I’ve replaced some of the mayonnaise with a combination of chicken stock and cream cheese to give the salad more layers of flavour. Cumin is also used to evoke a slight oriental undertone. You can serve it on its own, as a sandwich or as a side dish. You can’t get any more versatile than that.
note: this recipe assumes you have already poached chicken according to my brined chicken breast recipe.
Ingredients 
- Poached Chicken Breasts (2 havles)
- Potatoes (2 large)
- Avocado(2)
- Leek (0.5 cup, chopped)
- Soft Cream Cheese (4T)
- Mayonnaise (3T)
- Cumin
- Chopped Parsley
Preparation
- Peel your potatoes, cut them in half and then boil them for about 20 minutes. After the boiling is done and the potatoes have cooled, cut them into 1/2 inch cubes.
- In the meanwhile, cut your poached chicken breast also into 1/2 inch cubes. In a salad bowl, drench the chicken in half the concentrated stock left over from the dry poaching process.
- Slice the leek into rings and stir fry them in a pan with 3T of olive oil over a low flame till they break apart into limp rings. Turn the heat off and while the pan is still hot add 4T cream cheese (Philadelphia, tub version), 3T mayonnaise, 1/3 t of cumin and the other half of the concentrated chicken stock. Stir till everything in the pan is well mixed and allow to cool. This is your dressing.
- Cut around the seed of each avocado such that the avocado is halved but attached via the seed only. Twist to pull each avocado into two pieces. One half will still have the seed attached, bulging out. Repeat the same process with this half so the seed becomes attached to a quarter of the avocado, at which point you should be able to wriggle out the seed with your hands. With the flat end of the avocado pieces on the cutting board, slice away the hard skin. Next, cube your avacado to the same size as the chicken and potato.
- Add all the components to the chicken in the salad bowl, sprinkle on 1t white pepper and 1T parsley flakes. Gently fold the salad with a large spoon till the dressing covers every piece of the salad.
- Cover with cling wrap and refrigerate for a minimum of 2 hours before serving.
Notes 
- I’ve kept this chicken salad recipe simple. I urge you to experiment to get your own personal version. Apple, walnuts, raisins, pine nuts, boiled egg, raw red onion bits and ham are some things commonly found in chicken salad.
- If you want a tasty chicken salad sandwich, skip the potatoes and put everything else between slices of bread. I sometimes also serve my chicken salad with pieces of toasted milk loaf as pictured.
- You should use the riper avocados with black skin. The green-skinned ones can’t be eater raw. Leave the avocado to the last as avocado changes colour quickly if left exposed to the air.
- No salt is needed as the chicken is brined and the stock is salty. If you chicken is left over from another source, you’ll need to make a 1/4 cup of stock using 1/4 of a chicken cube.
Tags: American Cuisine, Avocado, Chicken, cream cheese, Cumin, potato
(serves 6-8)
Whipped potato is fast becoming a common staple in modern fine French cuisine and has become a recent favourite of mine. It is lighter, creamier and smoother than your run-of-the-mill mashed potatoes. You can use whipped potato as a base for stewed meat dishes or serve it as a side dish. This tarragon flavoured version is a basic recipe and you can easily modify it by adding some of the flavours suggested in the second half of the recipe.
Ingredients 
- New Potatoes (500g)
- Milk (3/4 cups)
- Butter (50g)
- Tarragon
Preparation
- Set a pot of water to boil and then place the potatoes in with the skin. Starting with cold water and boiling without the skin will both increase the water content which is what we want to avoid. Some will go as far as to bake the potatoes to avoid the water.
- Your potatoes should be fully cooked in fifteen minutes (20 if you are not using new potatoes). If the skin is broken, then its over done. Remove from water and allow to cool a bit. As soon as the temperature allows you, peel off the skin, you can mostly just use your fingers.
- Empty the pot of water and add 3/4 cups of milk, 50g of butter, 1t of salt and 2t of chopped tarragon. Heat to a low simmer for a moment to bring out the taste of the tarragon.
- Manually break up your potatoes lightly. You needn’t use a wire masher and can make do with a fork since you only need the potatoes broken up into smaller clumps.
- Blend the potatoes and milk in small portions in a food processor. Don’t go more than 1 inch above the blades or the higher portion will not get blended. It should take about 10 seconds per batch on high to make your potatoes creamy and get some air whipped into the mixture. Manually stir the batches in a big bowl with a spatula to reach an even consistency.
- Your whipped potatoes should be semi-liquid when you are done, such that a scoop of it would flatten by half its height by itself. Garnish lightly with chopped tarragon and serve in individual bowls, with a tea spoon.
- Hot milk allows your whipped potatoes to be served warm, so try not to make this ahead of time if possible.
Variations
Whatever flavours you wish to add to your whipped potatoes, apply them to the milk. In all the following versions omit the tarragon and remember to adjust the salt accordingly.
- Fennel
This will give your whipped potatoes a very alluring aroma. Simply slice up one fennel bulb into the milk before you start heating it up. You can also use fennel seeds if these are easier to procure. Strain after about an hour to recover the flavoured milk.
- Truffle
This is ultimate in potato sophistication. Skip the butter and add 2T of truffle oil to the milk AFTER it has been boiled to retain as much of the truffle aroma as possible. Alternatively some actual truffle into your potato before blending. Finish with a few drops of truffle oil on the final product.
- Meat Lovers
Leaving any actual meat in your whipped potatoes would go against the ‘Rules of the Kitchen’. One easy way to produce a meaty flavour is to add four slices of bacon into the milk as it boils and fish them out after they are cooked. You can also use stock cubes or powder. You would want to reduce the amount of salt in the basic recipe in either case.
- Asian Spiced
This variety would be more unique and invite comments from your diners. 1-2 t of one of the following: Coriander seed powder will give a more sublime flavour. Turmeric will impart a hint of ginger and give the visual illusion of polenta. Cumin will give your whipped potato a curried flavour. Lemon grass is another alternative.
- Aligot
Aligot is a Southern French potato dish which uses cheese, typically Tommes or sometimes Cantal. Strictly speaking, this is not the proper way to make Aligot but you can approximate it by doing this: Use garlic salt instead of regular salt. Gently reheat your whipped potato in a pan and then sprinkle in grated cheese while stirring till you get a slightly stringy texture.
Notes
- Why do I call it French? In Kobi vernacular, Whipped = French, Mashed = English and Smashed = American.
- Whipped potatoes are best made with the white variety of potatoes which are less powdery. I typically look for ‘New Potatoes’ on the packaging. Its a generic term for potato species that are characterized by their small size (half the size of Russet, those potatoes that are baked with skin in tin foil) and their roundness – plus they are white of course.
- To go the extra mile you can boil the peeled potato skins in the milk plus butter in step3 for that extra ‘potato flavour’. This will probably be more relevant if you are having your whipped potato au natural. As you will have to strain the milk to get rid of the skins, don’t add anything that you want to keep until after this stage.
- Some people prefer half and half instead of milk but boiled potatoes are quite creamy when blended, so I don’t think cream is necessary.
Tags: potato, Tarragon


