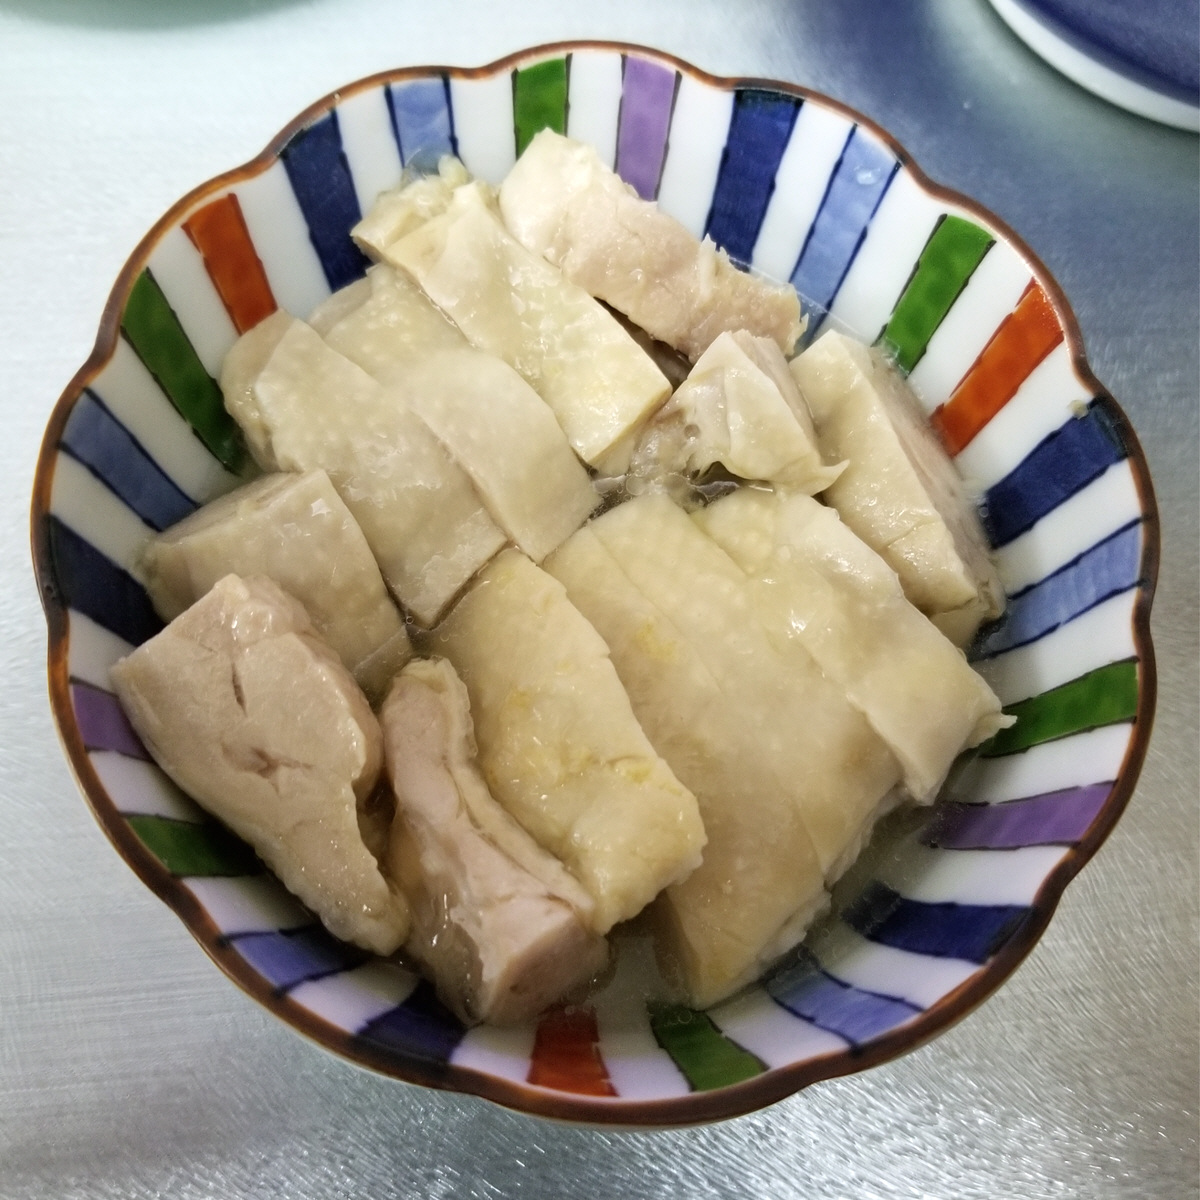
(6 portions) Drunken Chicken is a Chinese classic, the equivalent of a cold cut, similar in concept to jellied ox tongue. It is essentially succulent bite sized chunks of chicken that are infused with flavour, perfect as a cold starter or a one piece amuse bouche. Making it takes quite a bit of time but requires next to no effort or skill, since my recipe doesn’t involve steaming and uses very few ingredients. As an added plus, you can make your Drunken Chicken well ahead of time and keep in the fridge until its needed.
Brine 2 boneless chicken legs in 1.5 cups of cold water containing 1 heaped T of salt and 1t sugar for 4 hours. If its a hot day, add a few ice cubes to the water every hour or keep the chicken in the fridge for the four hours.
Drain the chicken and trim off any visible clumps of fat with kitchen shears. Marinate in a mixture of 6T of Chinese wine and 2t of liquid smoke for an hour.
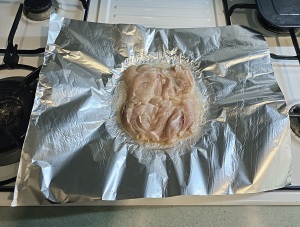
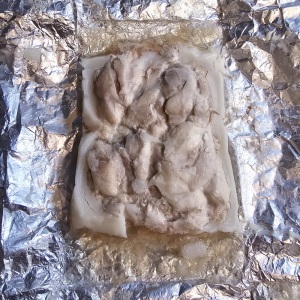
Place a large sheet of foil (refer to the photo for size) on a plate and press the foil to the plate to capture the depressed centre of the plate. Spoon 1T perilla oil into the middle of the foil and then place one chicken leg with the skin side down on the foil. Rotate the chicken 360 degrees to spread out the oil. Spoon half of the marinade over the chicken.
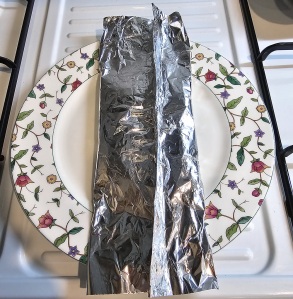
Wrap the chicken in the foil. The first step is the bring the 2 long edges together and fold/roll the edge until you get a flat tube. Next you roll up the other two edges until you get a parcel. As you do the folding, take care to flatten all the rolls neatly to make the parcel as water tight as possible. Also, try to trap as little air as possible inside the parcel as this air will expand in the oven.
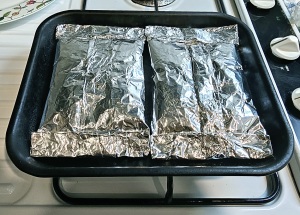
Repeat the process for the second chicken leg; both parcels should be able to fit onto the toaster oven tray.
Preheat the oven to 180oC (360oF). Set the timer for 20 minutes and place the tray in the oven.
After the toaster oven turns itself off, leave the parcels undisturbed in the toaster oven until they reach room temperature. I usually leave them in the toaster for 2 hours or more.
Put the parcels into the fridge. They should be in the fridge for several hours at minimum and in fact you can keep them in the fridge for several days as the meat is nicely sealed up.
Preparation
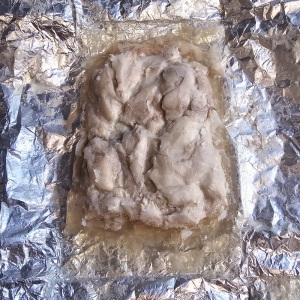
When its time to serve your Drunken Chicken, unwrap the foil and remove the white solidified fat with a fork. You must do this quickly as it softens very soon after it leaves the fridge.
The chicken will be encased in a jelly created from chicken essence and what is left of the wine after all the alcohol has evapourated. This is the all important gravy of Drunken Chicken. Scrape off as much of the jelly as you can into a bowl. Add 2T of boiling water to the jelly and leave the bowl in a bath of hot water to warm up.
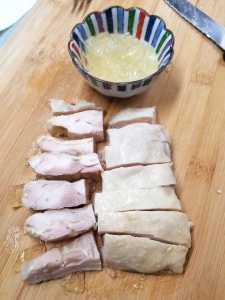
Meanwhile, cut the meat into bite sized pieces and arrange then on to a serving plate or bowl. You may choose to put them into multiple pieces of smaller crockery if you intend to serve individual portions.
When the jelly has fully liquefied, spoon the resulting liquid over the meat. The general idea is for the meat to be still cold while the gravy is at room temperature.
Notes
If find certain ingredients hard to come by, you can use substitutes. Sherry is the standard western alternate to Chinese wine, and oil infused with any flavour, say walnut or rosemary will work just fine. In this sense what I have described is a cooking style in addition to a recipe for a specific dish.
If you are a purist and love the taste of wine in your food, you may choose to add 2T of Chinese Wine instead of 2T of water in step 2 above.
It will be perfectly fine if you use frozen chicken, because of the brining. You can also use other parts of the chicken.
When the parcels are put into the fridge I suggest you place them on a plate as they very often leak very slightly, until the jelly has formed.
(the dressing is for 6 portions) This is one of the three great American salads (the others being the Waldorf and Caesar) and one of my favourites. It takes a bit of work but it is easily the best looking salad in the world. If you were looking for a salad to impress, look no further. The standard Cobb will have crumbled Blue Cheese sprinkled all over it but I’ve incorporated it into the dressing instead. This way, anyone who doesn’t have a taste for strong cheese can apply a different salad dressing.
Ingredients
Blue Cheese (70g)
Sour Cream
Mayonnaise
Lemon
Honey
Chopped Parsley
Lettuce (half a head)
Ingredients of your choice
Preparation of Blue Cheese Dressing
Chop the Blue Cheese roughly into little cubes. The smaller you cut them, the less mashing you’ll need to do later.
Place the crumbled cheese into a bowl and add 4T of Sour Cream. Using a table spoon, mash the cheese into the bottom of the bowl in a circular motion until it is mostly incorporated into the Sour Cream. You’ll want to leave some small bits of cheese, so just mash enough to ensure are no clumps.
Add 2T Mayonnaise, 1T water, 2t lemon juice, 1t honey, 0.5t pepper. Mix well until the dressing is homogeneous.
Stir in 1T of chopped parsley. Depending on the type of blue cheese used, you may want to add a pinch or two of salt. Taste before you decide if it needs salt.
As long as you keep the blue cheese dressing in the fridge covered with cling film, you can make the dressing ahead of time.
Preparation of the Salad Itself
Slice the lettuce finely and arrange it to form a bed for the salad. You can use individual dishes as I did or just one big plate.
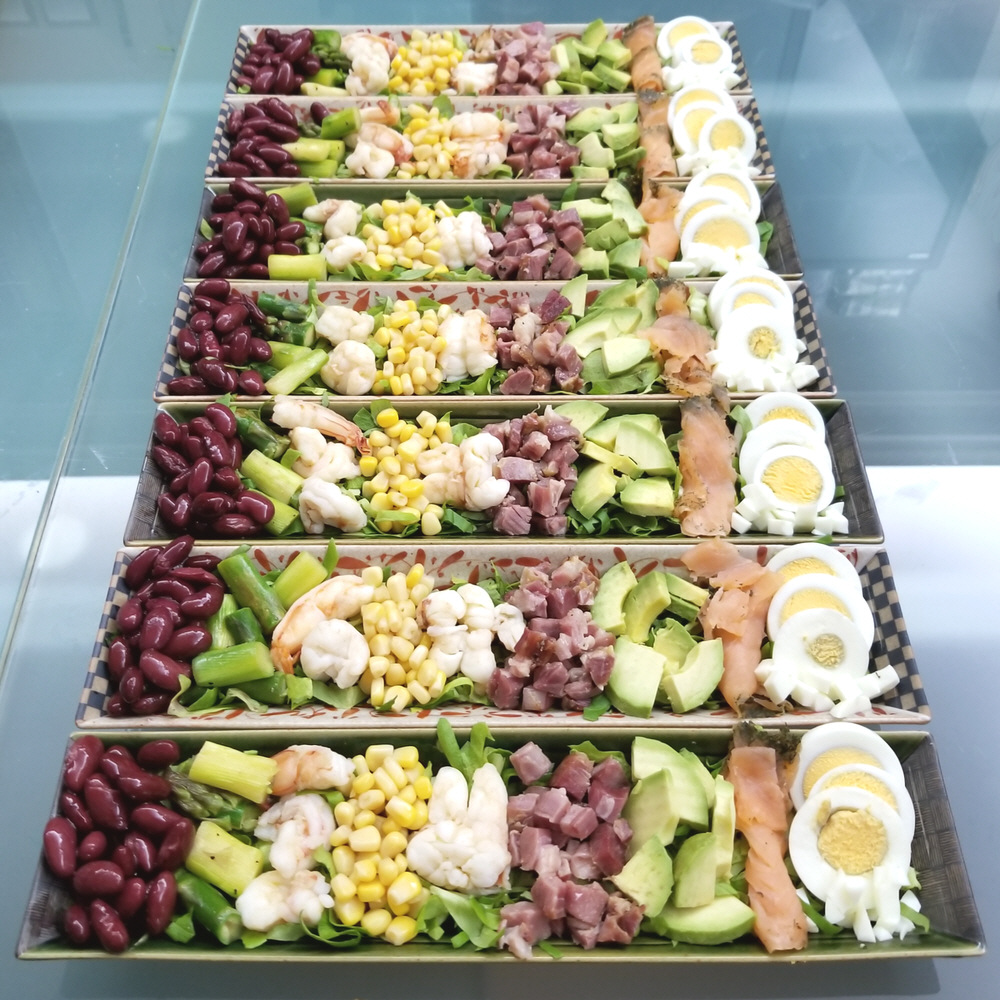
I didn’t specify what to use in the ingredients section as there is no set rule as to what the signature foods of the Cobb Salad are (other than blue cheese). In the picture what I used was (from left to right) canned kidney beans, sauteed asparagus, prawns, canned corn, lobster, diced ham hock, avocado, smoked salmon and sliced boiled eggs.
Other items commonly appearing in a Cobb Salad include roast chicken, tomatoes, bacon, purple onions and zucchini.
The important thing is keep in mind is you need a variety of colours to get the visual rainbow effect. Plan your colour scheme ahead of time to keep similar colours separated; it will be a pain to change the positions of the ingredients later.
Cook whatever ingredients you need to beforehand (for instance boiling the eggs) and cool them in the fridge, as hot food will wilt the lettuce. The idea is to have everything ready and then assemble the salad all at once to ensure freshness.
If you are using avocado, which I highly recommend, you should make sure they are sufficiently ripe (skin almost black and the body no longer firm to the touch).
Notes
The trick to keeping your avocado slices from oxidizing (turning brown) is blanching. Put the whole avocado in boiling water for ten seconds and then transfer immediately into a bowl of iced water.
Roquefort is the ‘normal’ cheese for Blue Cheese salad dressing, but my preference is for Stilton. It is creamy, it’s smell/taste is not as aggressive as Roquefort or Gorgonzola and it is less salty. Its no wonder the Brits call it the King of Cheeses.
Blue Cheese normally comes in 300 gram wedges. If you do not intend to use/eat the remaining cheese anytime soon, you can freeze it, as long as you’ve wrapped it properly in cling film. You should first divide the remaining cheese into individual portions so you won’t need to defrost the cheese to cut it. The other thing blue cheese is great for is quattro formaggi pasta sauce or pizza.
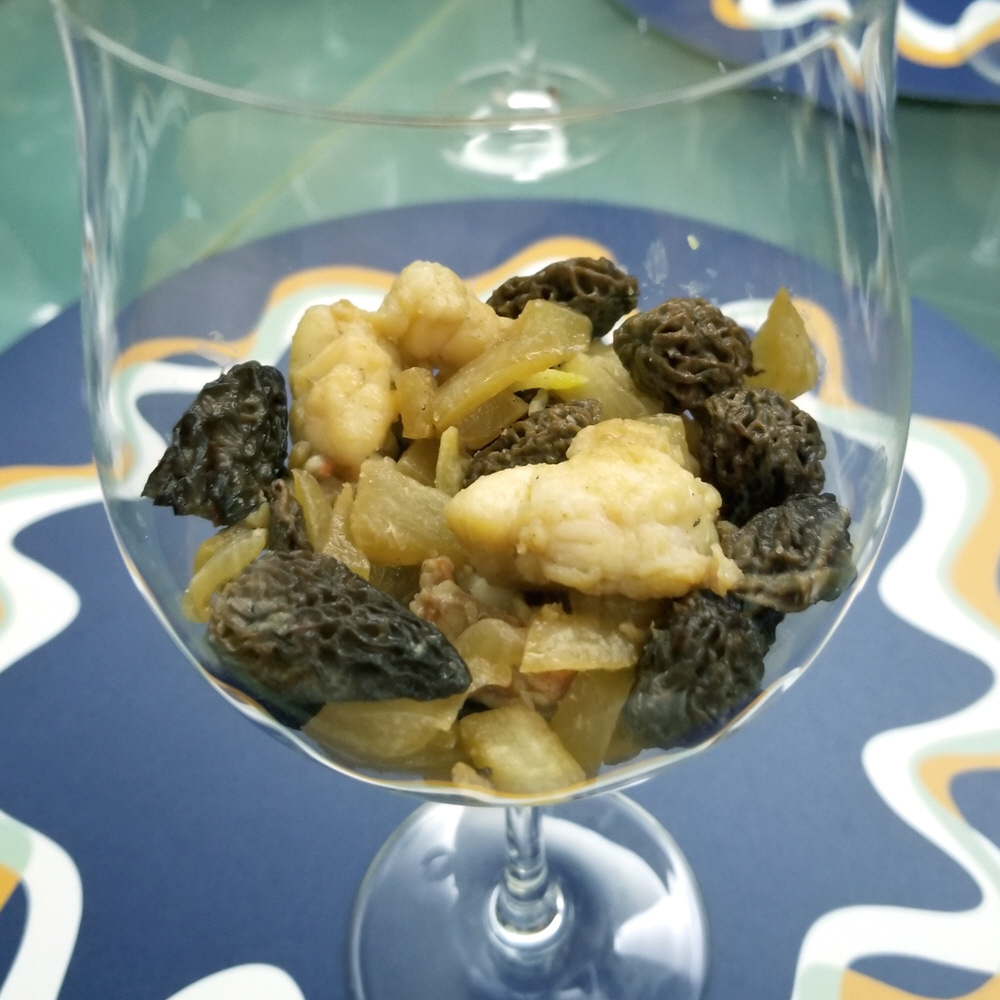
(serves 5-6) This is essentially a deconstructed Lobster Thermidor served chilled, containing all the key ingredients of the hot version – lobster, wine, mushrooms, onions, cream and cheese. Morel mushrooms make up for the flavour that comes from the grill while the whipped cream and Parmesan provide the structure to hold the dish together. It makes for a great lobster appetizer that is neither greasy nor filling like the original.
Ingredients
Lobster Tails (500g)
Dried Morel Mushrooms (1 cup)
Grated Parmigiano Reggiano (1/3 cup)
Onion (1)
Whipping Cream (300 ml)
White Wine (1/3 cup)
Butter
Paprika
White Pepper
Tarragon
Chopped Parsley
Preparation
Defrost and remove the shell of the lobsters. Brine the meat in a solution of 1T salt and 1t sugar in 2 cups of water for 20 minutes. Cut the lobster meat into bite sized morsels. drain off all the excess brine by leaving the lobster meat in a strainer.
Soak 1 cup of dried morel mushrooms in 1 cup of water, until the mushrooms are soft. Squeeze the morels like a sponge to remove excess liquid, but keep all the soaking liquid for later use.
Finely grate 1/3 cup of Parmigiano Reggiano.
Dice one onion into 1/4 inch pieces.
Add a large knob of butter to large pan, and pan fry the onions on low heat until they begin to soften.
Add a second large knob of butter and the morels. Stir fry for a further minute.
Turn up the heat and add the lobster followed by a light sprinkle of white pepper. Stir fry until the the lobster is no longer translucent, then add 1/3 cup of white wine together with 1t of chopped tarragon. Bring back to simmer and turn off the heat.
Pour the contents of the pan into a strainer with a bowl below to catch the excess liquid.
Return the liquid to the pan. Add the morel water, 1t sugar and bring to a boil. Then sprinkle on the grated parmesan and stir until all the sheese has melted. Simmer the liquid down to half a cup. Pour the liquid into a cup.
Pour the cheese wine mixture into a cup and and allow to cool to room temperature. The lobster and mushrooms need to be cold, so place them into the fridge in a ziploc bag.
Pour 300 ml of cream into a container and whip until it forms stiff peaks. Then pour in the (room temperature) cheese wine liquid, add 1 flat t of paprika and fold until they combine completely. If you are using a hand held blender, you can use a three second pulse on low speed.
Pack the (cold) lobster and mushrooms snugly into wine glasses (or some other serving container) and top off with the mousse. Garnish each serving with a pinch of finely chopped parsley.
Cover the mouth of each glass with cling film and leave in the fridge to chill until it is time to serve.
Notes
Most recipes use gelatin powder as the solidifying agent for savoury mousse but parmesan cheese brings with it an additional level of umami flavour and tastes more natural.
There’s no point in using the more expensive large lobster tails. FOr 500g, 4 small lobster tails will do the job nicely.
If you are pressed for time, you can put the ziploc with the cooked lobster in the freezer for 15 minutes. For the liquid, you can put the cup in an ice bath.
The best way to put the mousse into wine glasses is to push the mousse off a table spoon using a tea spoon. Let the mousse drop dead center into the glass without touching the sides of the glass. You can flatten the mousse using a tea spoon as you rotate the glass.
If you don’t have any morel mushrooms, you can substitute with another kind of dried mushroom (like Porcini). Don’t use fresh mushrooms.
Remember to wash the strainer before you reuse it in step 8 as it has previously held raw lobster meat.
(serves 3) Every place has its own way to prepare Korma but its features are universal. The curry is always cooked using almonds and/or cashew nuts as its base flavour, it is always light couloured and it is always mild. This last characteristic makes Korma the go to curry for anyone who are not into spicy food, and children. The Singapore method uses evaporated milk instead of yogurt or coconut milk to marinate the meat and this creates a distinct texture and taste unique to this method of preparation.
Ingredients
Chicken Thighs (4, deboned)
Shallots (4)
Ginger (1 thumb)
Evaporated Milk (100 ml)
Coconut Milk (150 ml)
Almond Flour
Curry Powder
Cumin
Chicken Cube (1)
Cashew Nuts (50g)
Preparation (4-6 hours ahead)
Place the chicken into a bowl or plastic container and sprinkle in 2 heaped T of curry powder. Evenly coat each piece of chicken. Add 100 ml of evaporated milk, and mix well. Cover and leave in the fridge for a minimum of four hours.
Preparation
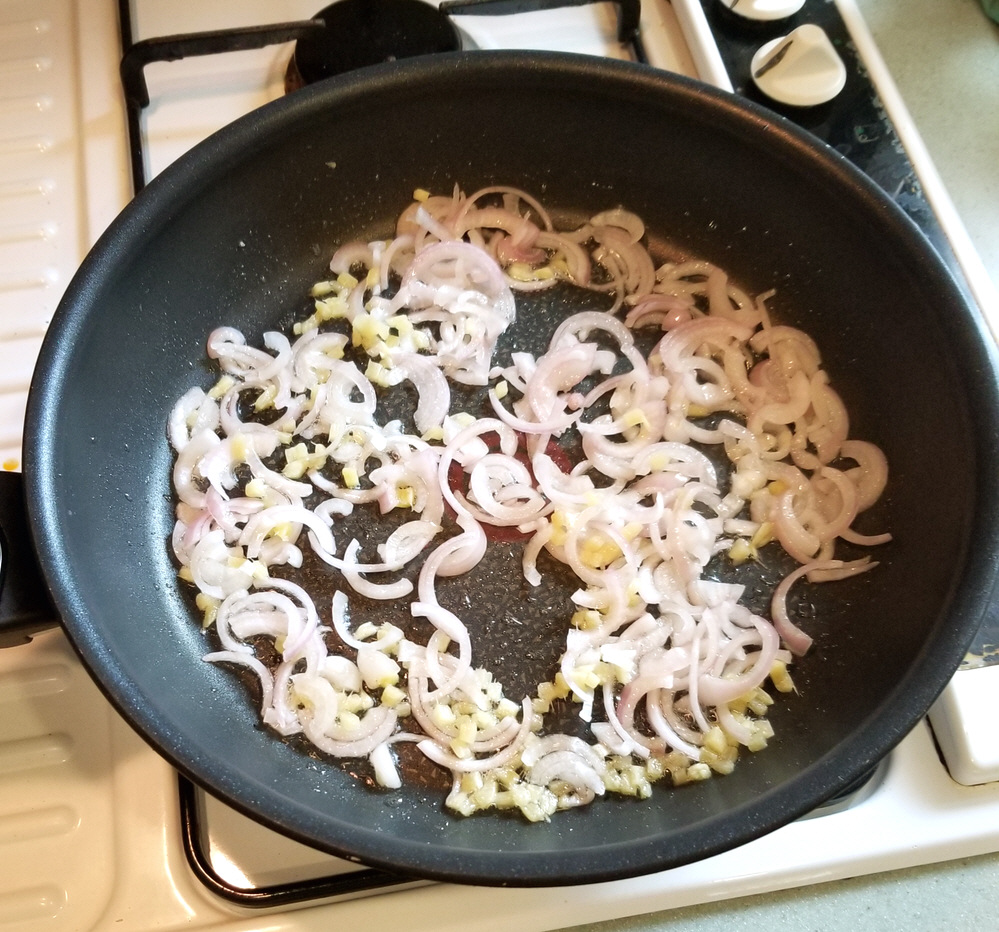
Peel and cut each shallot in half. Julienne the shallots.
Peel the ginger and cut first into slices 2mm thick. Next slice into strips and then finally cubes.
Put 3T of oil in a large pan and add the sliced shallots and diced ginger. Pan fry until the shallots start to brown. Transfer the contents to a plate temporarily.
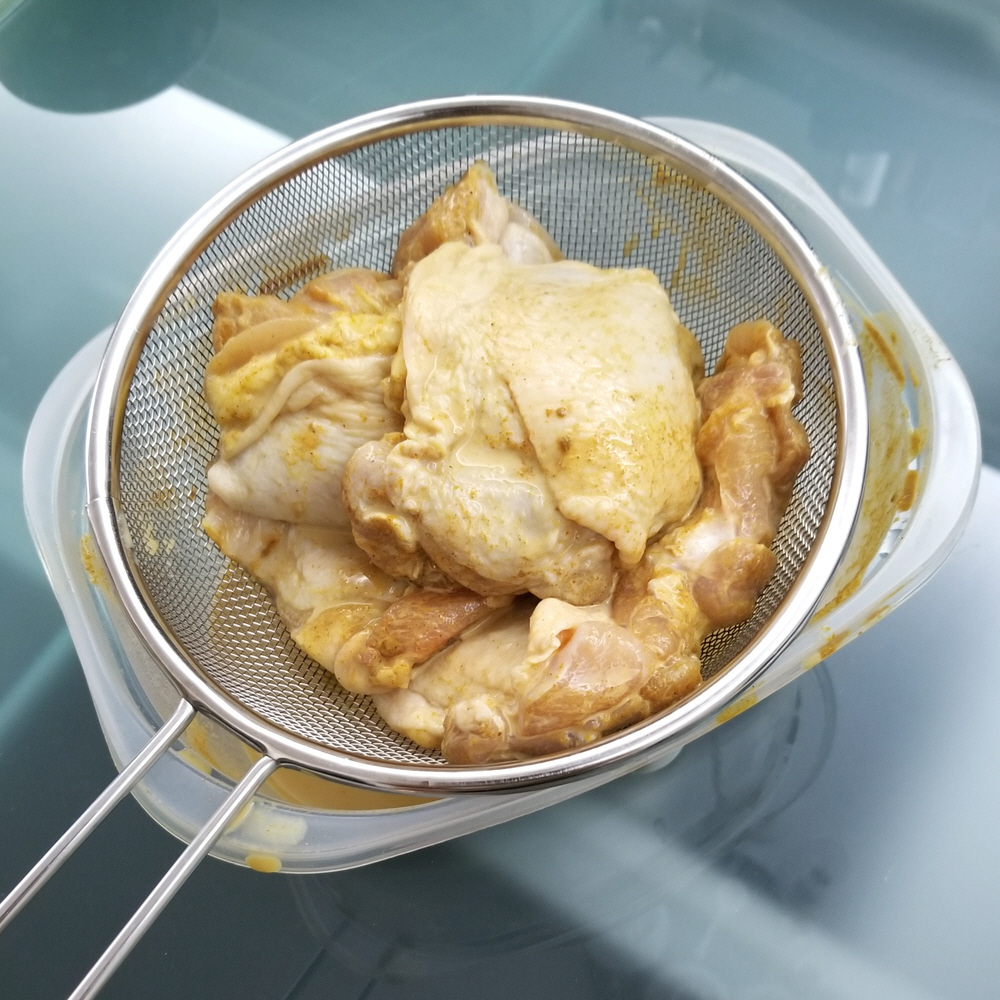
Dissolve 1 chicken cube in 1 cup of water. Add the resulting chicken stock to the chicken and move the chicken about to wash off the marinade. Drain the chicken in a strainer over the container as shown above.
Using the same pan, heat up 1 T of oil and pan fry the chicken. Start with a sizzling hot pan and fry the chicken skin side down for 2 minutes. Flip the chicken, turn the heat down and pan fry for a further 2 minutes.
Transfer the chicken to a cutting board to cool.
Pour the diluted marinade into the pan and return the shallots and ginger to the pan.
Bring the pan to a simmer and sprinkle in 4T almond flour and 1T cumin. Stir until there are no clumps and leave on a simmer.
By now the chicken should have cooled enough to touch. Cut each chicken thigh into about six pieces. Return the chicken together with any drippings back into the pan.
Add 150 ml coconut milk, 50 g (1/4 cup) of roasted cashew nuts and 1t of sugar. Cover and simmer for an additional 10 minutes.
Check if you wish to add salt before serving. Chop up 1 sprig of coriander and use it as a garnish.
Notes
In case you are wondering what is curry powder, you can refer to the ingredients listed on the package of curry powder on the right. Curry powder is the base for making curries. It is not the same as Garam Masala, which is just a seasoning.
If you’ll be making other dishes, you can prepare your korma ahead of time and just reheat to serve. It doesn’t taste any better if freshly made.
The thicker parts of a chicken thigh will not be cooked from 4 minutes of pan frying, especially without a drop lid. That’s fine, simmering in the curry will finish the job. The idea is to caramelize the chicken and extract the oil and flavour from the skin.
I find cutting the chicken using a pair of kitchen scissors easier than using a knife.
Though its not part of the recipe, you should serve your korma with steamed rice or some kind of Indian bread.
(serves 3 to 4) Miso Stew or Miso Nabe is a winter dish that is popular in Hokkaido. The concentration of protein and carbohydrates in miso and soya milk creates a stew that is hearty and robust, giving it the power to keep the cold at bay. Every region has its own unique way of cooking their miso stew and there is no definitive cooking method or set of ingredients, though the meat is usually fish, pork or chicken. If you’ve never tired a Miso Stew don’t worry, my particular way of cooking Miso Stew is suitable to Western tastes.
Ingredients
Chicken Legs (2, with thigh)
Red Miso (4T)
Carrot (1)
Onion (1)
Mushroom (1.5 cups)
Yam (1)
Garlic (1T, minced)
Mirin
Sake
Soy Sauce
Soya Milk (unsweetened, 3/4 Cup)
Maple Syrup
Preparation (the day before)
Debone the chicken and cut the meat into bite sized chunks. Keep the bones in the freezer for use the next day.
Mix in a large bowl 2T Red Miso, 2T Sake, 1T Mirin and 1T Maple Syrup until you get a paste. Stir in 1T of minced garlic.
Place the chicken meat in the bowl and toss well until each piece is coated with the marinade. Cover the bowl with cling film and keep it in the fridge overnight.
Preparation
Peel a yam and cut it into bit sized chunks. Place the yam pieces on a sheet of aluminium foil and drizzle them with 2T oil and 2T mirin. Wrap the yam up in the foil and place in a toaster oven set at 180oC (360oF) for twenty five minutes.
Put 3T of oil in a large pan (or clay pot) and heat the pan until the oil is searing hot. Keeping the fire on high, pour in the chicken together with all the marinade. Stir fry.
When the chicken begins to shrink, add 3/4 cup of soy milk and 3/4 of water. After a quick stir, pick out the chicken pieces and set them aside on a plate.
When the contents of the pan come to a boil again, put the chicken bones in the pan, as well as 1T sugar, 1T Soy Sauce and 2T of Red Miso. Turn the fire down to bring the liquid in the pan to a low simmer.
Peel a carrot and slice it into 1/8 inch thick oval pieces. Put the carrot slices in the pan.
Peel an onion and cut it into 6 equal wedges. Place the onion in the pan. Cover the pan and simmer for about 15 minutes.
Cut your mushrooms into appropriate size if you have chosen to use a big variety. I used Shimeji in the picture above and used them whole.
When the carrot is no longer crunchy, add the mushrooms, chicken and yam to the pan. Cover and simmer for a further five minutes. Remove the chicken bones before serving.
Notes
You’ll notice I specified Red Miso above. You can also use Hatcho Miso, but preferable not any of the white, yellow or golden varieties of Miso, for the unique flavour of miso dissipates into plain saltiness with cooking. For more information on Miso, you can refer to this post about Miso.
Nabe (pronounced nar-bay) is not the Japanese word for stew. It refers to a shared hot pot, sort of like a fondue using soup.
If don’t have any unsweetened soya milk, you can use plain milk instead.
The reason you put in the carrots before the onion is carrot takes longer to soften. Don’t reverse the order of steps 5 and 6.
One key element of this recipe is cooking the yam and chicken separately from the stew. Both chicken and yam taste better when cooked at high temperatures. You can of course choose to just boil everything in the stew, but the result will not be as good.
Miso stew is best eaten with steamed rice as a staple, although you can use another type of staple, like noodles or bread. This stew is not meant to be eaten on its own.
Instead of putting the bones in the freezer, you could also keep them in the bowl with the marinated chicken if it is big enough. A third option would be to boil the bones to create 3/4 cup of stock which you then put in the fridge.
(serves 4) In winter curry is a really nice hearty food that warms you up. This is a great basic Southern Indian curry recipe suitable for most palates and ideal for those cooking curry for the first time. It is mild in two ways. The grassy flavour of mutton is greatly reduced and so people who don’t like the taste of lamb may find it actually quite nice. It is also not very spicy, so those who don’t fancy spicy foods might still find it acceptable.
Ingredients
Lamb Belly (500g)
Potato (2 Large)
Carrot (1)
Onion (1)
Shallots (4)
Coconut Milk (1 Cup)
Curry Powder
Caraway Seeds
Cumin
Turmeric
Vegetable Cube
Preparation
Cut the lamb into one inch cubes. Trim off any obvious large layers of fat. It’s easiest to do this when the meat is semi-frozen, but warm to room temperature using water before proceeding with the next step.
Place the lamb pieces in a pot and pour in boiling water from a kettle until the water level is a inch above the meat. Stir, wait 5 minutes, and pour the water away.
Take the meat out of the pot and dry the pot over the stove.
Peel and julienne 4 shallots. Using a low flame, pan fry the shallot slices in 4T of oil.
When the shallot begins to brown add 4T Curry Powder and 2T Cumin to the pot and stir fry. Add water a bit at a time until you end up with a watery paste.
Add 5 cups of water. When this comes to a boil, add the lamb belly pieces followed by 1t turmeric, 1t caraway seeds, 1 vegetable cube, 2t sugar and 2t salt.
Cover the pot and keep it on a low simmer for 45 minutes.
In the meanwhile, peel and cut the carrots into half inch thick discs and the onion into twelve wedges. Peel and cut each potato in 4. Dice one of the quarters into tiny cubes (you want them to disintegrate).
After the 45 minutes is up, add the vegetables and 1 cup of coconut milk and simmer for a further 30 minutes. Boil uncovered and use this period to manage the thickness of curry to what you prefer.
This curry can be prepared ahead of time and reheated for serving. Depending on the curry powder you may need to add more salt. Remember to taste before serving.
Notes
Your curry is ideally served with rice, which you will also have to cook. A long grained rice is ideal, like Indian Basmati or Thai Jasmine rice. Any kind of sturdy bread, like Paratha, Naan, or even French Baguette would be an alternative staple.
In case you are wondering what kind of curry powder to buy, you can refer to the contents of the curry powder I use pictured above. Once you examine what curry powder is made of, you’ll realize that the addition of 2T of cumin in the recipe serves to dilute the overall amount of chili, thus making the curry less spicy.
The coconut milk also makes the curry less spicy, so if you want a more spicy curry, use only half a cup of coconut milk.
If you are the type who wants the full flavour of lamb, skip step 2 whose purpose is to reduce the grassy overtones of the lamb. You can also use a lamb stock cube instead of a vegetable stock cube. As for myself, I usually use 1T of red miso in place of the vegetable cube. This really enhances the taste of the whole dish.
This recipe can easily adapted to make chicken curry. Leave out the caraway seeds and use a chicken cube instead. Chicken doesn’t need to be cooked for that long so skip the entire 45 minute simmer and add the chicken pieces together with the vegetables in step 9.
If you want a more northern taste to your curry, use plain yogurt in place of coconut milk and cherry tomatoes in place of the carrots.
(serves 4) Dashi is the quintessential Japanese seafood consomme. As it is made using desiccated ingredients, there is no frothing or oil patches, and thus no need for repeated skimming, making it much less labour-intensive to prepare than its Western equivalents. In addition, using no fresh seafood means a seafood consomme without the smell of seafood. Daikon is a mild tasting root vegetable that absorbs the taste of whatever it is simmered in. Together Dashi and Daikon form the ultimate combination. The recipe is essentially two recipes, one to boil the Dashi itself, and a second to make a soup by infusing the Dashi into the Daikon. The result is a delicate, yet intense and flavourful consomme.
Ingredients
Daikon (400g)
Konbu (20g)
Sakura (1/2 Cup)
Small Mushrooms (1 Cup)
Hon Dashi
Sake
Raw Rice
Spring Onion
Glossary
Daikon = Japanese Radish
Konbu = Dried Kelp
Sakura = Dried Shrimp
Hon Dashi = Bonito (Tuna) Stock Granules
Preparation
Cut out a six inch long section of the Daikon (Japanese Radish). As the outer layer of the Daikon is deceptively fibrous, you will need to remove more than just the skin. Drag the peeler lengthwise along the daikon three times, over the same area. Rotate a bit and repeat until you end up with a sort of octagonal cross section. Now peel down the ‘corners’ of the octagon until you end up with a roundish cross section.
Cut the Daikon cylinder into 4 equally sized discs. If you want you can bevel the edges (which I didn’t bother to) for a more professional appearance.
Add 1 heaped T of raw rice into a pot containing 4 cups of water. Bring to a boil and simmer for 10 minutes.
Add the Daikon pieces to the rice water and simmer for 15 minutes. (This will leech out the distinct grassy taste of the radish)
Rinse the Daikon in water and set aside for the time being.
After cleaning the pot, add 6 cups of cold boiled water to it. Place 20g of Konbu (Dried Kelp) in the water and very slowly heat up the water. Use the Konbu as is, do not wipe or rinse it, even if you notice some white specks.
When you see small bubbles forming at the bottom of the pot, remove and discard the Konbu immediately. (If the water gets any hotter, the stronger undesired tastes of the Kelp will be extracted into the stock as well)
Place the Daikon back in the pot and simmer under a low flame for one hour. Replenish the water as neccessary. Leave the Daikon to soak in the pot until you are ready to serve the consomme, for several hours if possible to maximize flavour infusion. If it’s overnight, you’ll need to refrigerate.
Slice enough mushrooms to get one cup of bite sized mushroom pieces.
When it’s time to serve the soup, bring the pot back to a simmer. Add the mushrooms and 1T of sake and simmer for five minutes. Garnish with finely julienned spring onion stalks.
Notes
Type of Konbu
There are a few varieties of dried kelp, and the one I typically use is called Hidaka Konbu (日高昆布). It is an affordable multipurpose kelp and the most commonly used variety. 20g is three blades cut in two. There are more expensive varieties such as Ma Konbu (真昆布) and Rishiri Konbu (利尻昆布) but Hidaka is good enough for home cooking. Don’t confuse Konbu with the edible Seaweed Sheets (Nori) used in sushi. I’ve included a photo so you know what Konbu looks like.
Type of Mushroom
I usually use a mushroom called Hen of the Wood (a.k.a Maitake) which has a nice earth flavour, or Beech Mushroom (a.k.a. Shimeji). Morels would be suitable as well. Small mushrooms with a little bit of the stalk are the way to go. Mushrooms to avoid are the dark ones like portobello, which will make your consomme black and the less delicate varieties like abalone mushrooms.
A more traditional alternative to using Hon Dashi granules is to use skipjack tuna shavings (a.k.a. bonito) instead. If you choose to go this route, you will have to boil a cup of bonito shavings in the stock for one minute and then wait for the shavings to sink (about 10 minutes). Then you have to pour the pot’s contents through a metal mesh. I don’t bother with this as Hon Dashi granules can achieve the same taste in a few seconds.
Daikon is a Japanese word and it may be labelled under a different name wherever you are. Some other names for Daikon are White Radish, Oriental Radish, Winter Radish and Icicle Radish. Korean Radish is not the exactly the same but can be used as a substitute. What you should not substitute for Daikon are red radish or horse radish.
If you can’t find any Sakura dried shrimp, what else can you use? Dried Anchovies would be a good substitute, but you have to remove them before you add the mushrooms. You can also use mini clams, but add these together with the mushrooms. Do not use Chinese type dried shrimp which are vastly inferior in quality and in any case unsuitable for soup. Again, for the avoidance of doubt I’ve included a photo of Sakura for your reference.
If you happen to have some lying around in the fridge, you can also use cooked rice instead of raw rice. Increase the amount to 2 heaped T but reduce the boiling time from 10 minutes to 1 minute.
FYI: Stock made from Konbu alone is called Konbu Dashi. Stock made from Bonito shavings (and therefore from Hon Dashi granules too) alone is called Katsuo Dashi. Stock made from a combination of both Konbu and Bonito is called Awase Dashi. If someone mentions Dashi without specifying what type, he means Awase Dashi.
(serves 6) Making a fresh savoury cold appetizer is not easy, but this recipe does the trick. This Mango Shrimp cocktail uses a ‘cocktail sauce’ that contains no tomato or vinegar, even though it looks exactly like the usual shrimp cocktail. The secret comes from using prawn heads and paprika to make the cocktail sauce red instead of tomato sauce. I guarantee your guests will be pleasantly surprised when they taste the first spoonful and find the cocktail is neither sour nor tangy.
Ingredients
Mid-sized Prawns (400g)
Avocado (2)
Asparagus (8 spears)
Mango (1 large)
Minced Garlic
Mayonnaise
Milk
Mustard
Brandy
Paprika
Preparation
Place 2 Avocados into the fridge.
Cut off the heads of your prawns and snip off the whiskers. Using kitchen scissors, cut the shell of each prawn down the back and pull out the intestines.
Fry 2t of minced garlic with 1T of oil in a pan on hig heat. When the garlic begins to brown, add the prawn heads and stir fry till they are fully red, then add a cup of water and 1T brandy. Turn the heat down to a simmer. Crush each prawn head with a wooden spatula to release their flavour.
Add the prawn bodies to the pan and fish them out again when they are curled up and red on both sides. Pour the pan’s contents through a sieve into a bowl.
Return the reddish prawn stock to the pan. Add 2T mayonnaise, 2T milk, 1t mustard and 1t paprika to the pan. Simmer until the liquid thickens into a thin orange sauce. Put the ‘cocktail sauce’ into the fridge to thicken and cool.
Peel and dice the prawns. Wrap in cling film and place into the fridge.
Cut off the bottom quarter of each spear of asparagus and then use a peeler to remove any fibrous skin at the bottom end. Par boil the Asparagus for 2 minutes, you can use the same pan. Cut the asparagus into pieces and place them in the fridge.
Cut the mango on both sides of the seed. Using a knife, carve a crisscross grid on each of the ‘halves’. With a large spoon, spoon out the mango cubes, one row at a time. Put the mango cubes in the fridge.
When it is time to serve the shrimp cocktail, halve the avocados and extract the seed using the blade corner (the part next to the handle) of a large knife. Delicately spoon out the flesh and dice. Try not to do this ahead of time as avocado darkens fast when exposed to air.
Toss the 4 components of your cocktail together in a salad bowl and assemble the mixture on individual soup dishes. Drizzle the ‘cocktail sauce’ over the mixture and serve immediately.
Notes
To make the cocktail more substantial, you can serve it as a salad by adding a bed of shredded lettuce.
Try to dice everything to similar dimensions. Form a picture mentally of the final result before you start slicing and dicing. For the asparagus consider only the length of each bit as you can’t adjust the diameter.
One option is to add a flat t of cumin along with the paprika, to add some more heat and give your cocktail a kick. This is the way the French would do it, but its not for everyone.
Choose your uncooked ingredients carefully. The avocado should be just becoming black for the flesh to be soft. If the avocado is still crunchy to the bite, it is too raw. If it is mushy, then it is too ripe. The mango should be ripe enough that its not sour. Taste both of these before putting them in the fridge, to give yourself the opportunity to procure replacements if necessary.
Prawns have to be of a minimum size before their heads develop flavour. In spite of the name, you should not use shrimp (i.e. small prawns). For this recipe, individual prawns should weigh no less than 50g (i.e. 8 or less prawns that add up to 400g).
Going the extra mile: If you want the cocktail to have a nice clean look, you cannot toss the avocado together with the rest of the components as they will ‘grease’ up everything else. The best way to avoid this is to arrange the components separately in stripes like a Cobb salad or like a pie chart. Layering in a wine glass will work as well. Another thing you can do is shock the asparagus in ice water after blanching, to make them a brilliant green.
(serves 6) Coleslaw is the perfect chilled and tangy salad to go with BBQ and deep fried dishes. It’s also visually appealing, with just the right proportion of green, white, red and purple. Coleslaw is an easy salad to make, but its also quite difficult to perfect. Follow this recipe, which contains all the traditional elements of a proper slaw, and you will get it right every time.
Ingredients
Cabbage (1 head)
Carrot (1 large)
Purple Onion (1/2)
Mayonnaise
Rice Vinegar
Mustard
Maple Syrup
Caraway Seeds
Raisins (40g)
Salt
Preparation
Spoon 3 heaped T of mayonnaise and 1 heaped t of mustard into a small bowl ahead of time, so they can warm to room temperature.
Add 2T of rice vinegar to the mayonnaise and mix until there are no more lumps. Add 1T Maple syrup, 40g of raisins, 1 heaped t of caraway seeds and stir. Place the dressing in the fridge.
Cut the cabbage in quarters and divot out the stem. Cut the cabbage into 5mm slices and then manually break apart the slices into strips.
Make a brine using 4 cups of water with 2T of salt and 2t of sugar. Soak the cabbage in the brine solution for 25 minutes.
After rinsing, lay the cabbage on a tea towel. Roll the towel up and while holding both ends, shake to dry the cabbage. Open up the towel on the table.
Cut a purple onion in half from top to bottom. Peel off the dead layers and then slice half of the onion into 3mm slices. Manually break the onion slices into individual half rings.
Using a serrated peeler, peel away and discard the outer layer of a carrot. Continue to ‘peel’ the carrot until the entire carrot is gone. Cut the carrot strips in half.
Arrange the onion and carrot over the cabbage. Transfer the three veggies into a salad bowl by the fistful. This is a great way to create an evenly distributed slaw.
Spoon the dressing over the coleslaw and then toss.
Leave the coleslaw in the fridge for half an hour to mature, toss again before serving.
Notes
Brining the cabbage removes the water that would otherwise leach out after a while and make your coleslaw a watery mess. Some recipes simply ask you to salt the cabbage directly, but I think brining applies the salt more evenly and lets you use the right amount of salt every time.
Making the dressing first gives time for the flavour of the caraway and raisins to infuse into the dressing. If you don’t allow the mayonnaise to warm up first, your dressing will be lumpy.
While they have the same shape and size, fennel seeds (light brown) are not the same thing as caraway seeds (very dark brown). I would not consider fennel seeds an alternative; only use them in coleslaw as a last resort.
(serves 2) Miso-Cured Black Cod, also known as Gindara Saikyo Yaki, started out as a way to preserve fish in Japan, but has since become the default method of cooking Alaskan Black Cod. The curing process cuts through the fattiness of the black cod, and results in a decadent smokey and buttery flavour that makes Gindara appreciated by one and all, young and old. Of all the ways of preparing fish in Japan, this is perhaps the one that is most suited to Western palates.
Ingredients
Alaskan Black Cod (500g)
White Miso
Mirin
Sake
Minced Garlic
Cooked White Rice
Mayonnaise
Salt
Preparation
Make a solution using 2 cups of water with 1T of salt and 1t of sugar. Brine 500g of black cod in the solution for 20 minutes.
After rinsing the cod, wrap each piece in some paper kitchen towel and squeeze gently over the sink. Wrap the fish with fresh pieces of kitchen towel to soak up any remaining water. Leave the fish to fully dry on a metal rack for half an hour or so.
Mix 2 heaped T of white miso (40g) with 3T Mirin and 2T sake in a bowl until you arrive at a paste. Stir in 1t of minced garlic.
Slather the marinade onto the fish and then place the fish into a zip lock bag. Seal the bag with minimal air and then proceed to move the fish pieces around inside the bag. This will ensure the miso mixture comes into contact with every surface of the fish.
Cure the fish in the fridge, for 2 days if you desire a milder flavour, and up to a week for a more intense miso infusion.
When you are ready to cook your black cod, allow the fish to warm to near ambient temperature.
Use a few T of oil to wash the curing marinade off the fish. Miso chars easily, so you should be thorough.
Arrange the fish on a baking tray with the skin side facing up and place the tray in a toaster oven preheated to 180oC (360oF) for twenty minutes.
Traditionally miso-cured black cod is served fish white steamed rice, a generous dollop of mayonnaise and a few slices of pickled ginger.
Notes
Alaskan Black Cod is also called sablefish. It is technically not actually a member of the cod family, so do not substitute another type of cod. You can however cure other kinds of large oily fish with the same method. Swordfish for example would be a good alternative.
Brining and removing the excess water are essential as they prevent a fishy odour from developing. You are after all leaving the fish raw for several days in the fridge. Other recipes typically get you to sprinkle salt over the fish, but I find brining to be more effective, and less salty.
Oily fish take to freezing much better than white fish, so there is no need to use fresh fish, especially if you follow steps 1 & 2.
If you are using steak cuts (as pictured) a good idea would be to roll the fish pieces onto their side for the final 5 minutes of baking, then plate with the bottom side up. This gives the fish a good finish.
If you are using a full oven, you can reduce the cooking time to fifteen minutes as a large oven does not lose much heat compared to a toaster oven when you put the fish in.
You must use only white miso. It is milder and sweeter. Outside of Japan it’s probably the last type of miso you would have around at home, so if you are tempted to try this with red or yellow miso, don’t. YIt won’t end well. Even if you do use white miso it will still tend to be a bit on the salty side, it is cured fish after all. You thus have to serve it with a very plain unsalted staple, like rice.
Miso-cured Black Cod is also great for BBQs. Just wrap individual pieces in foil and broil them over the barbie.

 Ingredients
 Notes
Notes 
 Cut the lobster meat into bite sized morsels. drain off all the excess brine by leaving the lobster meat in a strainer.
 Ingredients

 you can refer to the ingredients listed on the package of curry powder on the right. Curry powder is the base for making curries. It is not the same as Garam Masala, which is just a seasoning.


